Are you looking to take your fretboard knowledge and improvisational skills up a notch? Then guitar modes have got you covered! While it’s not completely necessary to learn any theory on the guitar to be an excellent musician or songwriter, it can only enhance your ability in following through with these endeavors. As you read on, we’ll cover how to play the 7 major guitar modes, and take a peek under the hood at how these modes work! Let’s dive in!
How to Play the 7 Guitar Modes
Jumping right into things, we’ll go over how each of these seven modes is played on the guitar using guitar tablature. This section assumes that you might already know a bit of theory behind the modes, or are simply just here to learn how to play them! Both reasons are okay. However, if you are interested in learning a bit more about the seven modes, then read onwards, as we will cover that in a bit more depth.
Let’s begin by playing these seven modes in order:
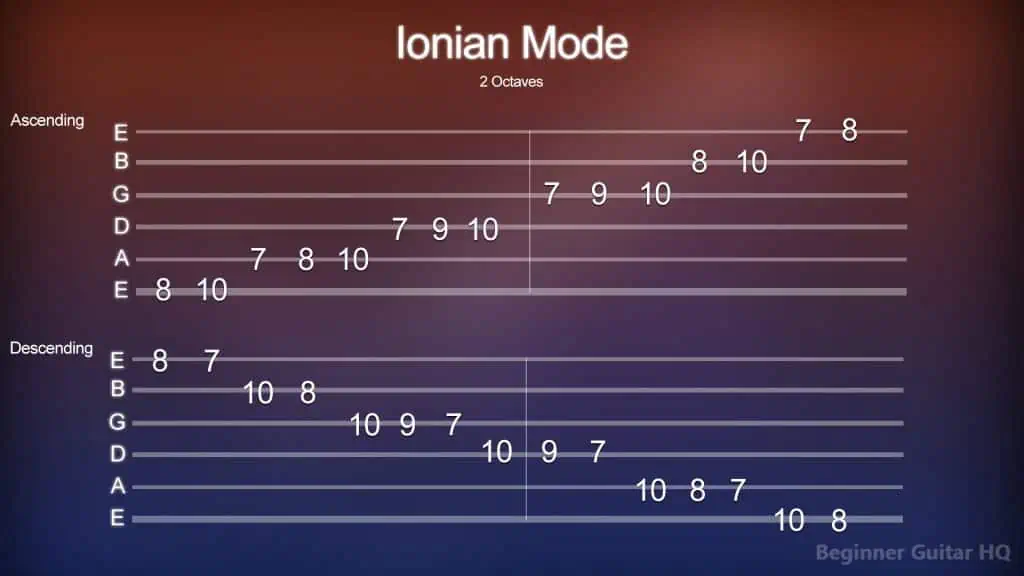
Guitar tablature of the Ionian Mode ascending and descending.
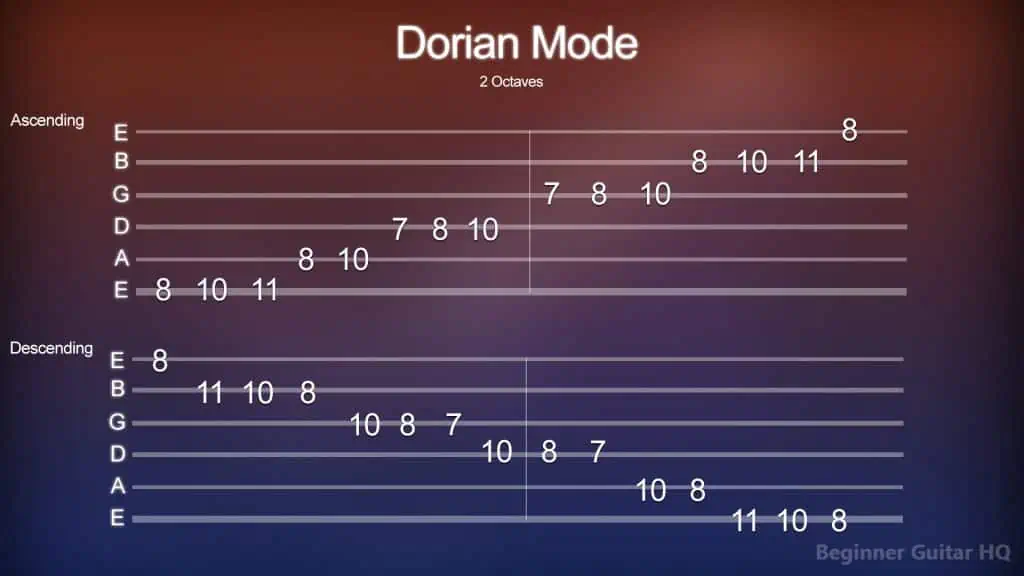
Guitar tablature of the Dorian Mode ascending and descending.
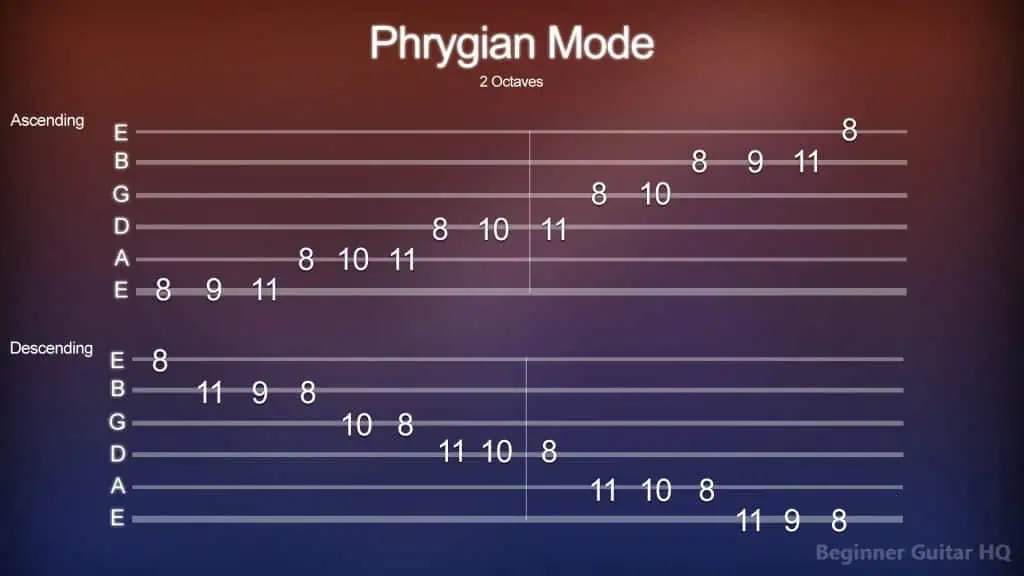
Guitar tablature of the Phrygian Mode ascending and descending.
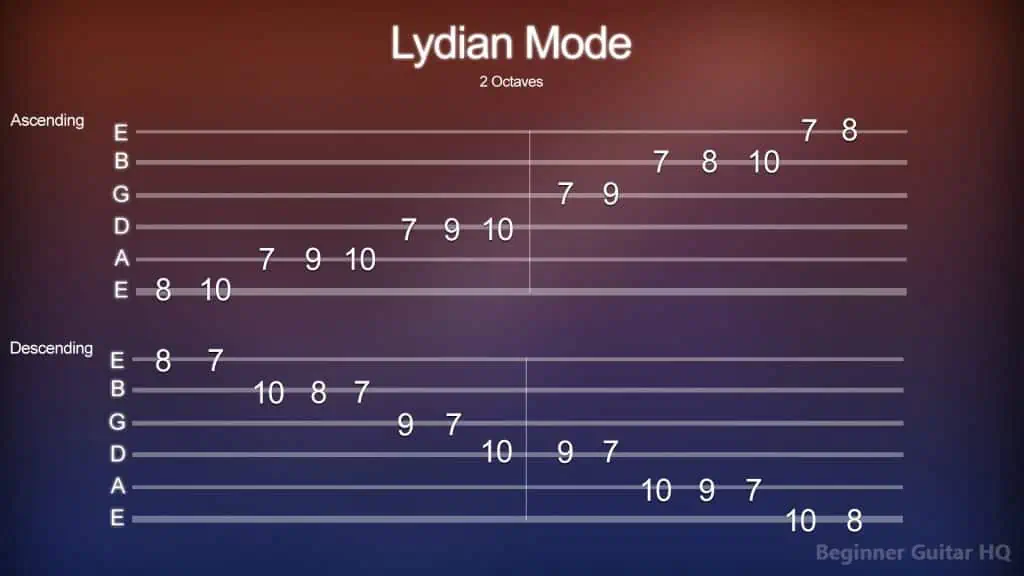
Guitar tablature of the Lydian Mode ascending and descending.
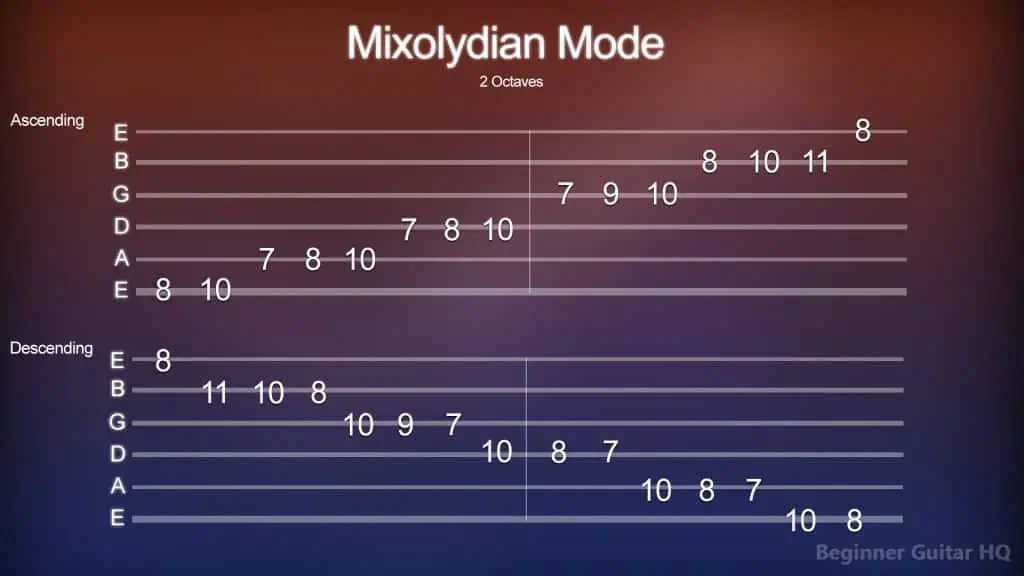
Guitar tablature of the Mixolydian Mode ascending and descending. 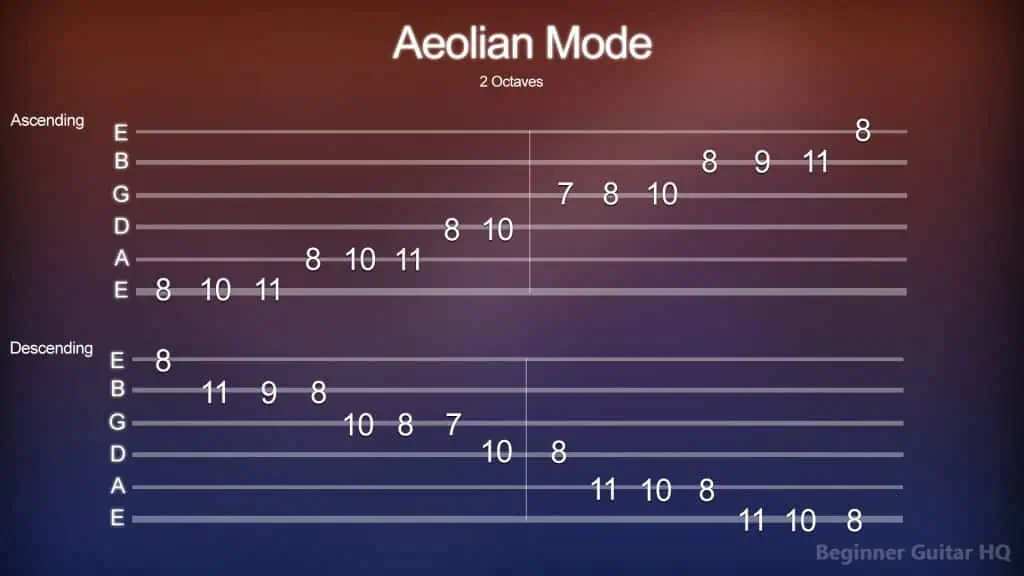
Guitar tablature of the Aeolian Mode ascending and descending.
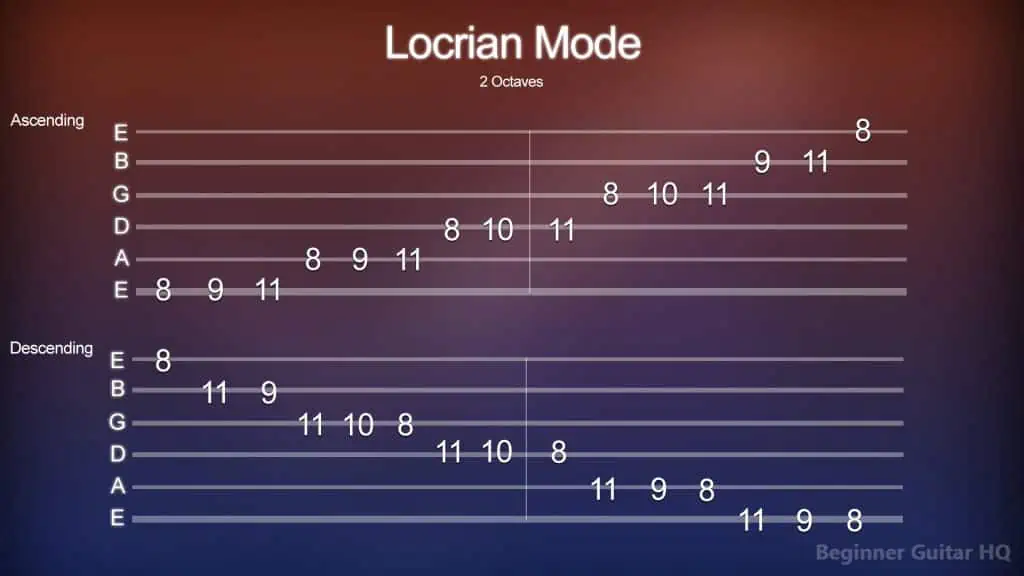
Guitar tablature of the Locrian Mode ascending and descending.
Trouble With Tablature?
Guitar tablature, otherwise known as “tab” is an easy and effective means for guitarists to write, share, and practice some of their favorite songs and exercises. In fact, tablature is a perfect solution for guitarists that have minimal music theory knowledge; essential for those who are reading sheet music/musical notation.
First, let’s bring our attention to the six horizontal lines. Each line represents a different string on the guitar. From the bottom to the top, we have our low E, A, D, G, B, and high E strings. On top of the strings, you might notice a number, indicating the fret we’re to play on the corresponding string. For instance, if you see the number 2 on the low E string, then you’re to play the 2nd fret of the low E string. If you see the number 5 on the A string, then you’re to play the 5th fret of the A string. In the case you see the number 0 on a given string, then it’s implied you’re to play an open note (a string to be played but not fretted). That’s all there is to it!
While there are many immediate benefits to using guitar tablature, which is excellent in helping aspiring guitarists learn how to play, there are some slight drawbacks. The first drawback is detail, or a lack thereof. As a beginner, it’s important to know that the quality of tab-to-tab can vary quite a lot, and might not supply you with the necessary information on how things are meant to be played. That means in cases like this, it might be up to you, the guitarist to use your ear and fill in the missing gaps. However, this is not to say that all tablature is lacking in quality, and shouldn’t be used. In fact, there are markings used across tablature to help supply this information in greater depth:
H = Hammer-on
P = Pull-off
B = Bend
X = Mute
PM = Palm Mute
\ = Slide Down
/ = Slide Up
~~~ = Vibrato
Furthermore, another pitfall beginners might suffer with tablature or even sheet music, is proper playing technique. More specifically, proper fingerwork. Most often, self-taught guitarists don’t have fingerwork at the forefront of their minds when playing, which is understandable, as learning a new instrument can be slightly overwhelming! When learning a new song or exercise, it’s very rare, if ever, that you’re supplied with information on where your fingers should go. Therefore, it’s good to keep fingerwork in mind, read ahead of what you’re about to play, and plan for it! Make sure that you keep your hand and wrist nice and loose, fingers coming directly down on the strings, with the notes within the space of your hand.
What Are Guitar Modes?
Let’s talk a bit about the elephant in the room; guitar modes. What are they? Well, if you’re familiar with inversions, like those used in triads; a mode can be thought of as an inversion of a scale.
Small Recap
First, it might help to recap what triads and inversions are to better put things into perspective. A triad is a type of chord containing three notes played in unison. The notes that are used within a major triad fall on the 1st, 3rd, and 5th degrees of a major scale, otherwise known as the tonic, mediant, and dominant degrees. In the key of C major, these notes would be C, E, and G. That’s our C major triad.
When you form the triad, C is the lowest note, with E wedged in the middle, and the G stacked on top. This is known as root position, as our root note, C, is at the base of our triad. When we invert our triad, it moves to 1st inversion, where C is no longer the lowest note, but it instead becomes E, which was originally the second note within the triad; everything shifts. Therefore, 1st inversion would be E, G, and C, in that specific order. Next, we’ll shift to 2nd inversion, where G becomes the lowest note, with C and E following it. Therefore, the 2nd inversion is G, E, and C. Shifting yet again, we’re back at the root position.
Now, of course, this would change if we were dealing with 7th chords, 9th chords, and 11th chords – where the chord might contain 3rd, 4th and 5th inversions. However, for simplicities sake, we’ll leave it there.
Guitar Modes Revisited
Circling back, let’s run through the seven different major guitar modes. We’ll explain them in more depth as you read on:
- Ionian
- Dorian
- Phrygian
- Lydian
- Mixolydian
- Aeolian
- Locrian
Each of these different modes can be made from a different note within the C major scale. Let’s run through each of these, shall we?
Ionian
The Ionian mode is what most beginners learn on the guitar, without even realizing it! This is because the Ionian mode is the C major scale. Now, we know that within a diatonic scale, we have seven notes, containing five tones, and two semitones. In fact, major scales follow a strict pattern of these tones (T) and semitones (S) that appear as follows:
T > T > S > T > T > T > S
Let’s bring up our C major scale to compare this pattern:
C > D > E > F > G > A > B > C
You can observe that the C major scale follows this pattern accurately. Pay attention to the third interval being a semitone, as well as the third interval within our scale containing the notes E > F. The same occurs on the seventh interval, being a semitone, and the seventh interval of our C major scale containing the notes B > C.
Most beginners tend to start with the Ionian mode, due to the simplicity of the C major scale, containing no sharps or flats. However, remember when we mentioned inversions? This is where things are going to slightly change as we move to our next mode.
Dorian
The Dorian mode starts on the note, D. Normally, the D major scale would follow suit of the C major scale, restricted to the tone (T) and semitone (S) pattern. With modes, however, this is not the case.
To play in Dorian mode, we shift the root note from C to D and, shift the pattern of tones and semitones forward. This gives us a new pattern:
T > S > T > T > T > S > T
Now, normally, the D major scale contains two sharps within its key signature. Therefore, the notes would be D, E, F#, G, A, B, and C#. However, when we’re playing in Dorian, we’re playing the enharmonic equivalent of C major, which contains no sharps or flats, as C major does. Therefore, the notes in Dorian mode would be:
D > E > F > G > A > B > C > D
In fact, if you try playing it, then playing your D major scale, you’ll hear quite a difference. Let’s move on to our next mode.
Phrygian
When we’re playing in the Phrygian mode, our root note is E. As mentioned before, we’re moving through the notes of the C major scale, therefore, every note within contains its own mode. In fact, rather than imagine the pattern of tones and semitones as a shifting sequence, you might consider it as something “static”; or non-moving. Here’s a comparison:
C major scale with tone/semitones:
T > T > S > T > T > T > S
C > D > E > F > G > A > B
Seeing our tone/semitone pattern side by side, with our C major scale, we can see that our note E, falls on the semitone (S) point of the C major scale. Therefore, if we were to move from that point, all the way around our C major scale, we’d land on E, giving our pattern of tones and semitones a different look. Here’s that pattern for our Phrygian mode:
S > T > T > T > S > T > T
As mentioned before, the Phrygian mode, starting on E will contain the same key signature as our C major scale, uninfluenced by the E major scale:
E > F > G > A > B > C > D > E
Are you starting to see the pattern? Let’s move on.
Lydian
The Lydian mode, as you might have guessed, starts on the note, F. As you can probably see, in reference to what we mentioned earlier, our C major scale, as well as its pattern of tones and semitones is inverting upon itself. We’ll be shifting, yet again, forward through our pattern of tones (T) and semitones (S), giving us this new pattern:
T > T > T > S > T > T > S
And here are the notes within our Lydian scale, starting with F:
F > G > A > B > C > D > E > F
It’s becoming pretty straightforward now, moving on.
Mixolydian
Our Mixolydian mode starts on note, G. Ignoring the key of G, instead following through with C major, we get this pattern of tones and semitones:
T > T > S > T > T > S > T
Therefore, the Mixolydian mode would appear as:
G > A > B > C > D > E > F > G
A fun fact about our Mixolydian mode is that it can also be called the “blues scale”. This is due to the flatted seventh degree of the mode, as normally in the G major scale, we have an F#. However, due to the nature of the C major scale, and that we’re starting on the note G, this inherits the key of C, flattening the F# to F natural.
Aeolian
The Aeolian mode may also be referred to as our natural minor scale; A minor. As you might already know, A minor, just like C major, contains no sharps or flats within its key signature, as they have a relative key relationship. Therefore, running through an octave, A to A, following the key of C major (or A minor), you get the pattern of tones and semitones:
T > S > T > T > S > T > T
Therefore, the notes in Aeolian, or A minor, would be:
A > B > C > D > E > F > G > A
Because this is no different than a natural minor scale, this follows the exact same structure of tones and semitones a minor scale would use! Pretty neat! Moving on.
Locrian
Our last mode, the Locrian mode, you guessed it, starts on the note, B. Once again, we shift our pattern of tones, and semitones, now becoming:
S > T > T > S > T > T > T
Therefore, the Locrian mode, starting on B would appear as this sequence of notes:
B > C > D > E > F > G > A > B
If you want a clear representation of how different modes sound, pull up a nearby piano or keyboard, and start on a different white key, playing one whole octave. You may try this from any note within the C major scale. However, for those looking to try this out and learn how to play this on the guitar, the next section is for you.
Exercises Using Modes
Now that we’ve covered how to play all seven modes, as well as how they work, let’s go over how we can make the most of them in practice.
Why practice guitar modes?
- It can improve your fretboard knowledge. We’re all used to our traditional scales, D major, E minor, G major… etc. However, playing in a different mode allows you to experience a natural major or minor scale somewhat differently, utilizing a different root note. This can ultimately have a positive effect on how you choose to improvise, solo, or even write music in general.
- It can change your perspective on guitar theory. As we can see, modes and scales are different entities, and although a mode is a sort of scale, not all scales are modes. This is similar to the way that while triads are chords, not all chords are triads. To go further on the point of improving fretboard knowledge, learning modes can help you bridge the connection between scales and chords.
- It can improve your fingerwork. As with the various other scales and finger exercises you can practice on the guitar; guitar modes can help with fingerwork as well. This gets you used to playing different patterns thus improving your muscle memory, finger strength, and dexterity.
- It’ll keep things interesting. Sometimes all we need is a new method to practice or learn within our craft to keep things exciting. Modes are excellent for really flipping scales on their head, and trying something you might not have thought to.
Do any of these reasons strike a chord with you? Perhaps you have your own reasons to practice with modes? In any case, let’s get you started with some of these great exercises, that you might like to incorporate into your practice routine:
Ascending and Descending
This method is a common and straightforward method used by most people practicing scales. The idea is you start from the first note within the mode, and while down-up picking, reach the peak of the mode, and descend back down to where you started. Simple as that.
Playing in Thirds
Playing in thirds is a really good way of keeping yourself sharp, while also improving your fretboard knowledge a little! To play in thirds, you’ll start from the first note of the mode, then skip the following note, playing the third instead. From there, you’ll return to the note you skipped but jump over the third note within the mode, playing the fourth, and so on. Therefore the sequence of notes would appear like this: 1-3-2-4-3-5-4-6-5-7
Ascending/Descending Pendulum
The best way I can describe this exercise is similar to a pendulum rocking back and forth, gathering more force. In a way, it’s kind of like being on the swingset at a park! First, you’ll start on the root note of the mode, play the next note, then return home. Then you play the root, second, and third note within the mode, then return to the second, and then home, and so on. For instance, the sequence of notes would appear like this:
1-2
1-2-3-2
1-2-3-4-3-2
1-2-3-4-5-4-3-2
1-2-3-4-5-6-5-4-3-2
1-2-3-4-5-6-7-6-5-4-3-2-1
Improving Your Practice
To truly make the most out of these different exercises, it’s good to keep a couple of things into consideration:
Posture
The guitar is an extension of you, therefore, it’s important always to be thinking about your posture. This may also vary slightly depending on whether you’re standing, sitting, or playing classical guitar (using a footstool).
Generally, to achieve good posture, you want to make sure that your back is straight, your legs spaced, your feet firmly planted, and holding your guitar neck at roughly a 45-degree angle. You also want to make sure that your guitar is being pulled toward your body, rather than you leaning into the body of the guitar, this will ruin your posture. Keeping your wrist nice and loose, you want your fingers to come directly down on the strings, not draped over them, as you want your fingertips to make the most contact.
A final note, loosen your shoulders, and remember to breathe! It’s important to try and remove as much tension as possible. You want to make sure that you achieve a posture where playability meets comfort!
Timing
To improve upon sloppy playing technique, timing is a huge factor. Therefore, it’s good to practice with a metronome. A metronome is a handy little device that produces a ticking/clicking noise to help you keep on time, measured in BPM (Beats Per Minute).
When practicing with a metronome, it’s good to practice along with a comfortable BPM. Anywhere within the 40 – 60 range is great for beginners to start, gradually increasing BPM by 1 – 3 when ready to move up. It’s good that we start slow with something we’re trying to improve, because if you can’t play it slow, how can you play it quickly?
A good rule of thumb when practicing is to try and get it down 10 times in a row without messing up. Your skill level can help determine what defines “messing up”, whether that be a late/early note, buzzing string, incorrect note… etc.
If you’re just starting out, remember to play slow, and complete the exercise. Don’t be too hard on yourself!
Conclusion
Now you have all of the knowledge and tools at your disposal for getting started with guitar modes. What will be the first thing you decide to do with modes? Will you run through the various exercises, or put your music theory to the test? You might even choose to listen to a chord progression and improvise along using these different modes! Whatever you decide to do, make sure you have fun and enjoy the process! Keep on rockin’.

