Music in itself is an art, an art where one serves itself as but an extension of their instrument. It’s easy to learn to play an instrument such as the guitar — but to completely dominate it is an endeavor many of us still pursue. Learning how to fix sloppy guitar playing can help you achieve these milestones a lot easier as you teach yourself the fundamentals and what goes into this perfect, disciplined practice.
Demonstrating a “clean picking style” while playing high on the neck of the guitar.
Why You Are Likely Here
There are a lot of musicians that struggle with the same issues in their pursuit of bettering themselves on guitar. There is nothing to worry about — the fact that you’re here shows that you want to improve! You may be able to play fast, but struggle with timing, or you might play with precise timing but you aren’t exactly hitting the notes with enough pressure. You may even struggle with everything! Regardless, from beginner to expert, we all have ways in which we can improve!
As you continue to read on, you’ll discover a lot of useful methods for improving the overall tone and quality of your playing.
Why is Timing Important?
In a nutshell, timing is to music — what a railroad is to a train. They provide structure and give you direction. Without timing, you might find that whatever you’re trying to play can become derailed with ease. Before you know it, everything falls apart!
Timing is crucially important no matter what instrument you are trying to play. That’s why orchestras have a conductor to signal time signatures to the musicians playing; why a band practices so much together, so they play in sync, or while classical musicians study their sheet music carefully so they can play the piece of music as true to the composition. Timing is the essence of structure in music. It’s been relevant since music began.
Showing a clock as a symbol for “time” — ticking like a metronome.
What’s the Deal With Time Signatures?
Whether or not you realize it, all music follows its own time signature. A time signature is commonly found on sheet music following the clef, whether it be a treble clef, bass clef, tenor clef, alto clef… where the number is expressed as a fraction. The top number indicates the number of beats to count, while the bottom number indicates what beat. Whether it’s a quarter note, eighth note, half note… etc.
When I give you a 4/4 time signature that means, there are 4 beats in each bar. The other 4 means the type of note; which happens to be a quarter note. So every beat is represented by a quarter note.
Pretty easy to understand, right?
Another example: If I gave you a 3/4 time signature, that would mean there are only 3 beats in each bar. And every beat would be a quarter note since it’s represented by a 4. Therefore, the beat would be very waltz like. 1-2-3.. 1-2-3.. 1-2-3.. You get the idea.
We discussed how important timing was — time signatures are essentially the math behind the music. We use this to help us calculate when we play the desired notes, when we take a rest, when we increase the tempo… etc.
Time signatures occur everywhere in music. However, as tablature is much easier for beginners to read, it doesn’t usually show the time signature because there would be no way to understand it using tab. It goes off your own instincts and memory of the song you’re trying to play. Which is where a metronome would come in handy.
Using a Metronome to Improve Timing and Speed
An essential tool for musicians to brush up on their timing and at different tempos is the metronome. A metronome is a device that creates electronic ticking, much like a clock but at whatever tempo you set it to measured by BPM (Beats Per Minute). The standard BPM for pop music tends to be around 120 BPM at a 4/4 time signature.
This is pretty much what we would classify as dance music. A consistent beat, that’s easy to follow, dance to, and very rhythmic.
Another image of guitarist practicing, down-up picking on an electric guitar.
When we use a metronome for the first time it’s best that we start off slowly. The reasoning for that is because 90 % of us will likely try to play things as quickly as possible, thus resulting in more mistakes. When we play along to a metronome, the goal is not to play as quickly as possible. It’s to play as consistently accurate as possible. The only consistency met by trying to play quickly as possible, is consistent sloppiness.
Personal Story:
When I met with my Guitar instructor, Zack in college; one of the first things he had taught me was playing quickly gets you nowhere without having appropriate discipline. He gave me a list of exercises to practice so I could improve my finger techniques, ones I’ll go over with you later. These finger exercises felt weird and pointless, and worse yet my ego was absolutely shot because he set the metronome to a messily 80 BPM. I knew I could play faster than that! Nevertheless, I listened to him. Played these exercises for hours on end while he watched. If I messed up, even a tiny bit — start over. Eventually I got pretty good at it! I was all the way up the neck, finally. Then he said, “Do that 10 more times in a row without messing up.” It was brutal and I felt bored. I was determined to listen to him, as I knew there was reasoning behind this madness. I’d stay up until 3:00 AM practicing this same exercise on my Ibanez in my dorm room, and what I found was quite shocking. My fingers had developed the muscle memory to hit the notes almost automatically, even when I decided to adjust the tempo a little higher. It was incredible! I carried that experience with me when practicing anything on the guitar. If you can play it slowly and patiently, you’re already doing something the 90 % are not; consistently playing accurately.
Not everyone can afford a metronome, or really wants to buy one; and that’s okay. There are different ways to get ahold of a metronome, for free and legally of course! You can Google search for an online metronome, and Google can supply you with their own. If you don’t like theirs, however, there are plenty of websites out there that have great metronomes as well!
If you’d rather not have to lug around your computer each time you want to use a metronome, however, there is an alternative! You can download the metronome app from the app store. It’s pretty good and does the job! Just get a pair of earphones, and crank the volume, and play to the beat!
Advantages Between Electric VS Acoustic Guitars
When starting out, or learning to develop your skills on the guitar; people often wonder which is best to practice on? The real answer is: You can’t go wrong with either. While there are some obvious advantages that come from both flavours of the guitar, the answer is based around: What do you want to play?
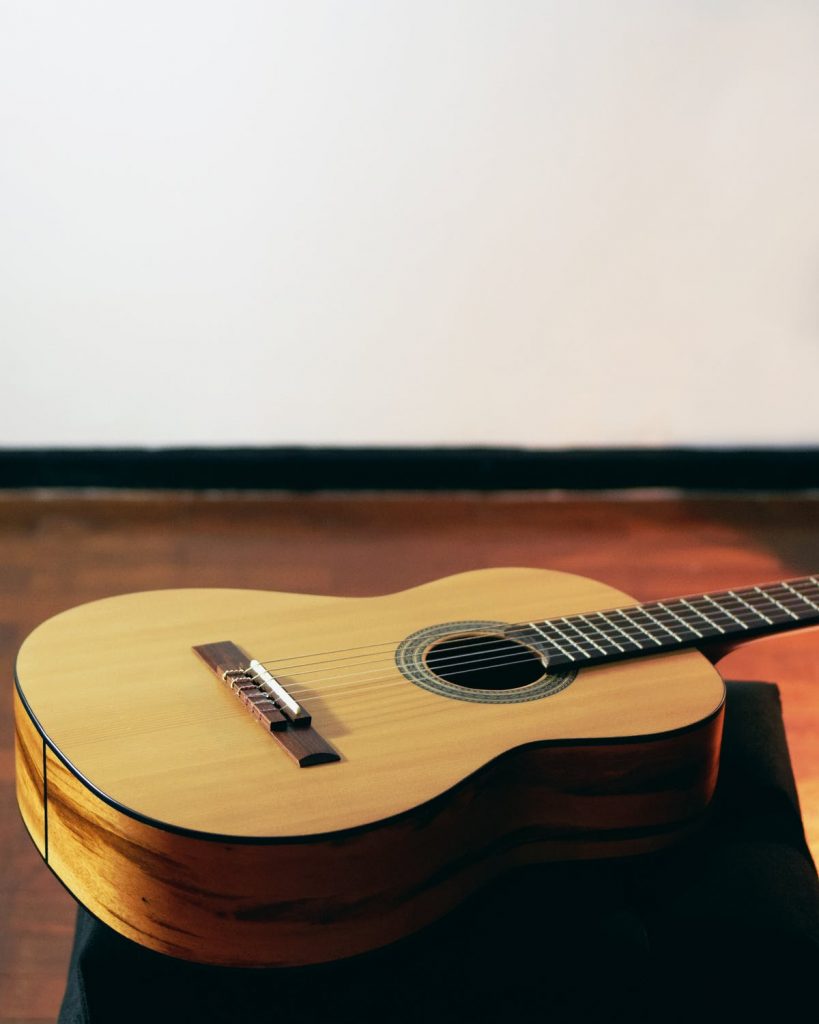
Images of an acoustic and electric guitar, showing their differences.
When practicing on the Acoustic Guitar, you have a more clear, raw sound that resonates from within the instrument’s soundhole. This virtually allows you to play anywhere you desire. The frets are wider and fewer in number, however, you have a choice in choosing whether you want to play with nylon or steel strings. This can make it easier or harder on the fingers. Overall, the main thing is comes down to is you get a clean, organic sound from the Acoustic Guitar making it very suitable for practice and an excellent choice for beginners.
When deciding to play Electric Guitar, the only way to increase the volume is from an amplifier, or electronic device. This can ultimately lead to a lot of feedback from the strings, or distortion. Normally, when practicing on your own, it’s best to do so without an amplifier in a quiet space. The Electric Guitar without amplification is fairly quiet. The perks of using one, however, include that the neck is thinner — the frets are also thinner and greater in number, and it’s much easier to play notes, form chords… etc.
Should you decide to practice with amplification; there’s nothing wrong with that. It’s more difficult but there are ways around it:
- Turn down the gain on the guitar or amp.
- Increase the bass, but lower the treble.
- Lower your guitar’s volume knob, while increasing the gain on the guitar amp.
The choice is yours to make! There are pros and cons to both instruments, however, there is no wrong answer. There are amazing things that can be done on both instruments. As far as practice goes, define what it is you want to achieve and which instrument pulls you more towards that answer.
Posture and Placement
It’s important to remember that when you are playing an instrument, you are but an extension of the instrument. The guitar holds itself in perfect posture when you play it, as should you! This will ultimately help you not sprain or strain yourself when playing, hitting the notes properly, and feel comfortable with the guitar in your lap.
The following assumes that you are a right-handed guitarist:
- Make sure that you’re sitting with your back straight in a comfortable spot – with nothing that is going to interfere with your arms around the body or neck of the guitar, like armrests or clutter.
- Firmly plant your feet on the ground – this helps give you some stability for when you place the guitar in your lap so you can hold it nice and firm.
- Place the guitar in your lap – Make sure that the guitar is nice and firmly pressed against your chest, while your right thigh slots into the curvature of its body.
- Anchor your right arm over the body of the guitar – This helps ensure that you have a “returning point” for your hand to come back to. You can either anchor your wrist to the bridge of the guitar, or just above the low E string, right above the soundhole.
- Wrap your left wrist under the top of the neck of the guitar – When doing so make sure that your left thumb is pressed against the back of the guitar neck, not above the neck. This changes the way your fingers come in contact with the frets. They will be draped downward, with the fingertips coming right down on the strings; that’s where you want them. It allows you to have more freedom, and precision.
This is one way you can fix sloppy guitar playing. Practice it a little!
Pressing your thumb to the back on the neck is crucial to fix sloppy guitar playing. I know for people who have a little more experience playing this might be hard, because they’re used to holding their thumb above the neck, just because it’s comfortable. Maintain a conscious effort in keeping the thumb pressed to the back of the neck, even when it wants to go to the top. I cannot stress this enough, how important this is.
Finger Exercises For Beginners
To build upon the foundation of your technique, you need to work in some finger exercises! These are useful for building finger dexterity, and muscle memory. This is initially some of what my guitar instructor, Zack had taught me in one of my first lessons with him in college. We’ll be covering the 1,2,3,4 method and the various patterns involving it, how you can escalate the challenge, and difficulty when you’re ready and how to keep it interesting!
A man forming guitar chords while arpeggiating the notes. Another exercise.
To understand the 1,2,3,4 method, you just have to look at your hand.
Index Finger – represented by the number 1
Middle Finger – represented by the number 2
Ring Finger – represented by the number 3
Pinky Finger – represented by the number 4
You are to align these fingers with the first four frets of the guitar. So, naturally…
Index Finger – 1st fret
Middle Finger – 2nd fret
Ring Finger – 3rd fret
Pinky Finger – 4th fret
So using a metronome you may want to set it to something comfortable and easy to play along with. Perhaps, 80 BPM (Beats Per Minute) wouldn’t be a bad idea!
Following the ticking of the metronome, wait until it goes around a couple of times and then right on the first beat go…
On the Low E string play: 1st Fret, 2nd Fret, 3rd Fret, 4th Fret… On each tick with the proper fingers. Index, Middle, Ring, Pinky…
Then on to the next string!
On the A string, play: 1st Fret, 2nd Fret, 3rd Fret, 4th Fret… Still following each tick of the metronome.
Then play the D string: 1st Fret, 2nd Fret, 3rd Fret, 4th Fret…
Onto the G string: 1st Fret, 2nd Fret, 3rd Fret, 4th Fret…
Then the B string: 1st Fret, 2nd Fret, 3rd Fret, 4th Fret…
Finally, the High E string: 1st Fret, 2nd Fret, 3rd Fret, 4th Fret…
Once you’ve hit the 4th fret of the High E, you’re then going to play backwards!
It will be something like:
High E string: 4th Fret, 3rd, Fret, 2nd Fret, 1st Fret…
B string: 4th Fret, 3rd, Fret, 2nd Fret, 1st Fret…
G string: 4th Fret, 3rd, Fret, 2nd Fret, 1st Fret…
D string: 4th Fret, 3rd, Fret, 2nd Fret, 1st Fret…
A string: 4th Fret, 3rd, Fret, 2nd Fret, 1st Fret…
E string: 4th Fret, 3rd, Fret, 2nd Fret, 1st Fret…
Then after you’ve hit the 1st Fret again, you’ll start at the 2nd Fret and make your way up to the 5th Fret. So it’ll go something like this…
Low E string: 2nd Fret, 3rd Fret, 4th, 5th Fret…
A string: 2nd Fret, 3rd Fret, 4th, 5th Fret…
D string: 2nd Fret, 3rd Fret, 4th, 5th Fret…
G string: 2nd Fret, 3rd Fret, 4th, 5th Fret…
B string: 2nd Fret, 3rd Fret, 4th, 5th Fret…
High E string: 2nd Fret, 3rd Fret, 4th, 5th Fret…
You’ll work your way back down to the 2nd Fret as you’ve done before, and then move up to the 3rd Fret and work your way to the 6th Fret of each string. Keep doing this until you’ve reached the 12th Fret of the guitar.
If you can achieve this 10 times without messing up, you’re ready to increase the tempo, let’s say to… 85 BPM. Then try again!
For those of you who may have difficulty understanding the exercise, check the tablature down below!
When you reach the bottom: start at the 2nd Fret instead of the 1st Fret and work your way back up, going all the way to the 5th Fret of each string.
Keep repeating this pattern until you make it all the way to the 12th Fret of the guitar.
This is an excellent exercise to build strength and muscle memory in all of your fingers. Especially if you avoid using your pinky finger a lot of the time because it feels weird or doesn’t feel strong enough.
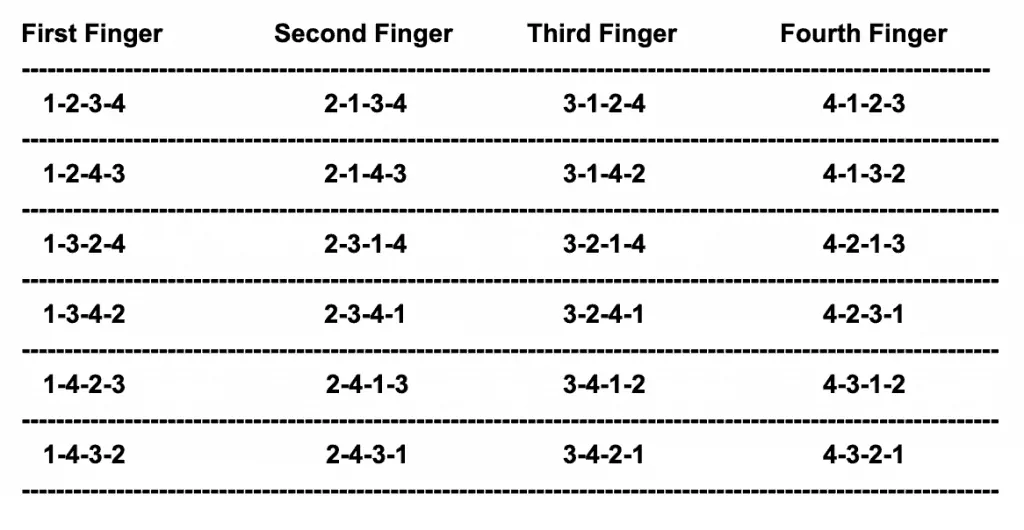
The best part about utilizing the 1,2,3,4 exercise is that it has multiple variations. When you begin to feel comfortable enough at a certain tempo and desire to change things up, you can change 1,2,3,4 to 1,3,2,4 or 2,1,3,4. Below is a list of all the different patterns you can try!
This is an excellent place for beginners to start working on their finger dexterity. This will ultimately fix your sloppiness when it comes to playing notes on the fretboard. As mentioned before, make sure that you keep that thumb pressed against the back of the neck of the guitar. You really want those fingers to come down and make contact with the strings. This will ensure that you get the most out the note, (no buzzing, muted notes…) and that over time your fingers will develop calluses; making the skin on the tips of your fingers stronger.
However, if you have done this exercise before and need a more difficult challenge… keep reading.
Finger Exercises For the Experienced
The method you’re going to learn here, is about different variations of Spider Exercises. It should be known that the 1,2,3,4 exercise is in fact a type of Spider Exercise. The reason why we’re separating the two, is because the 1,2,3,4 exercise is a lot easier for beginners to pick up. The chart above can still be applied to these exercises and playing the different variations, however, the real difference will be the strings you play on.
For instance; we’ll take the 1,2,3,4 exercise before, but modify it… the pattern will be the typical 1,2,3,4.
Then, what you’ll want to do is come back down…
And as you can see towards the end, you move everything up by 1 fret each time you go completely up and down.
Remember: if you can get this down, you can easily change the finger order just as in the beginner exercises, so please refer to that chart!
Another exercise you may practice at will is the ascending finger exercise. We’ll be looking at the simple 1,2,3,4 pattern for this one as well!
And just as before, we go back down…
There are a lot of different Spider Exercises you can find across the internet should you need more challenges to go by! These are pretty tough challenges to get you started, however! Always remember, when it’s finished, you transpose the notes of the exercise up by 1 fret each!
Finger Exercises Without a Guitar
There are a number of techniques you can practice without the use of a guitar at all! A very useful one is called Rasgueados which is a right hand strumming technique used in Flamenco music. The idea of it is to build strength in not just one, but both of your hands while stretching your fingers.
Note: While these exercises are helpful, be careful with how often you do them. It is possible to develop carpal tunnel syndrome in your hands from excess stretching.
With that in mind, keep reading on how to safely do so!
- First you want to imagine as if you’re holding a ball in your hand, about the size of a tennis ball. Start to wrap your palm around it and place it on your leg, with your fingertips/nails touching your thigh.
- Next, you’ll want to flick your pinky finger outward on both hands! Make sure to leave the other fingers still.
- Keeping your pinky finger out, flick your ring fingers on both hands.
- Next, keeping both of those fingers out, flick out the middle finger on both hands. Then shortly after the same with the index finger.
- Retract all of the fingers in both hands to their initial position. Start again!
This technique especially helps those who either play Flamenco, Fingerstyle, or Classical Guitar, as holding the hand like so is what they do about 100 % of the time.
Another exercise that works, is by pressing your hand against a table, but with the fingertips touching the surface, and the palm forced slightly downward just touching the table. If your fingers are arched and your hand posture looks like a claw, then you probably got it correctly!
Different from before, while pressing our hand down to the table, we individually lift one finger up at a time, starting with the index finger. Gently put the finger back down before lifting the next finger. (You don’t need to do it as slowly as the first exercise, you can do it as quickly as you wish.)
This helps build finger independence. As you do this, imagine you’re playing on a fretboard. When you press that finger down, you are playing that note.
Tip: If you can imagine doing the 1,2,3,4 exercise from before, try doing different variations of it whenever you’re not near your guitar.
Importance of Down-Up Picking
Playing clean and on time with a guitar pick requires some practice. When using a guitar pick, it’s important that you down-up pick on each string to keep the natural flow of the melody and transitioning fluid. It’s recommended that you learn to pick this way immediately upon getting started with using a pick to not acquire any bad habits such as picking in a singular direction.
A simple way of building familiarity with down-up picking, we may refer back to the 1,2,3,4 exercise. Alternate your guitar picking up and down on each fret, making sure that you play the notes clean and on time.
Going Forward!
To recap: we have covered many of the basics to developing clean guitar playing technique. It’s important that going forward, you review these exercises and implement them into your daily practice!
For those who might be at a standstill wondering, “Well, I’ve practiced the exercises, I’ve gotten pretty good at them! But what do I do to further my progress?” Worry, not. Below I have laid out tasks you can undertake to improve your clean guitar playing technique.
- Don’t rely on the metronome – You’ve developed the muscle memory to play not just clean, but on time as well — try going the extra mile and be able to play a piece of music while keeping track of the timing in your head. Keep a mental note of rests, triplets, and other notes that may perhaps throw of your timing.
- Practice forming chords for extended periods of time, and transitioning to other chords – This will build your strength of holding notes for an extended period of time. Think of it as yoga but for your fingers; transitioning from one pose to the next. If you want to take it a step further: arpeggiate the notes, by down-up picking them in different patterns.
- Try barre chords – These are very uncomfortable for most to play on the guitar — you need to use the full force of your index finger to keep the strings from buzzing when forming the barre chord. Try different variations of it until you get a consistent solid sound.
Note: When practicing the chord exercises, keep the thumb to the back of the neck and not looking over. This will solidify your practice and ensure you get the fullest potential of each finger.
If you are feeling very confident on the spider exercises given to you earlier, then why not take it up a notch! Try looking up how to sweep pick if you’re using an electric guitar. If you’re on acoustic, however, look up how to play fingerstyle guitar!
There are countless ways to grow and hone your abilities. Different genres of music can also teach us a lot about proper playing technique. If you’re playing electric guitar, look up some metal music. If you’re on acoustic guitar, perhaps try classical, or folk music.
Now you know all that you need to sound clean and professional when playing guitar! Practice hard, but more importantly, practice safe!


