Mastering the “Six Stringed Behemoth” can be a challenge that requires a lot of time and devotion. When you take the time to learn the names of each string, you bring yourself one step closer to being a better guitarist! Let’s dive in!
Contents
Why Are the Names of Each String Important?
The Six Strings of the Guitar are the heart of what makes the instrument what it is. Every string has its purpose, working in unison to make the guitar have its wonderfully warm sound, to its bright timbres.
Each string of the guitar has a name corresponding to a note used in Standard Tuning. Standard Tuning is how the guitar strings are tightened/loosened to achieve the right body of notes used as the foundation for most sheet music or tablature. There will be more on this later.
Therefore, knowing what each of these strings is named will help you further understand how to tune these strings to the corresponding note in its name. Furthermore, achieving this understanding will also assist you in understanding all of the notes on the fretboard. (This is a major tool that can help you improve as a guitarist, in terms of improvisation, chords, writing/composing… etc.)
What Are the Names of the Six Strings?
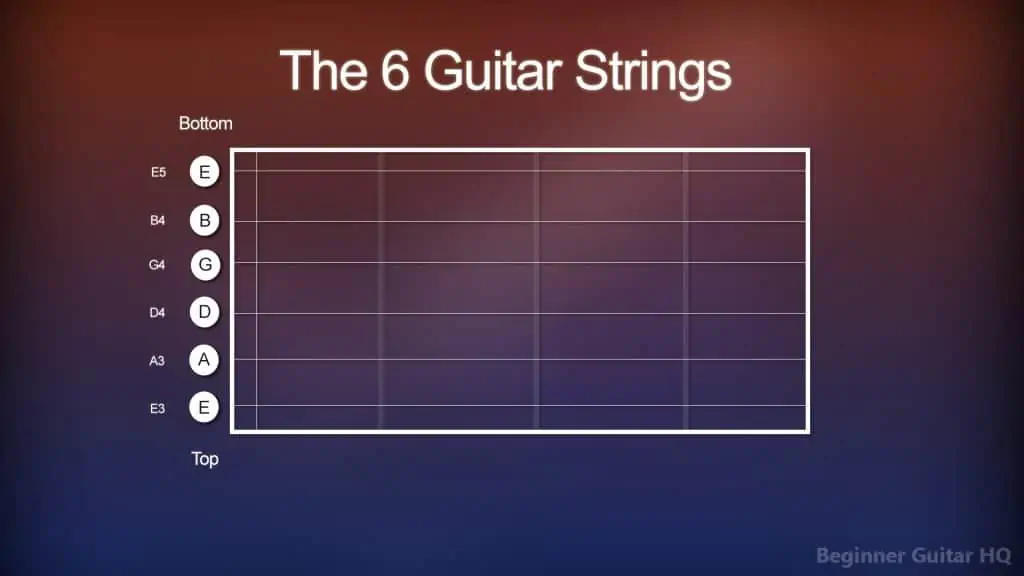
The notes of the six strings as used in Standard Tuning are as follows from the top, downward: E – A – D – G – B – E
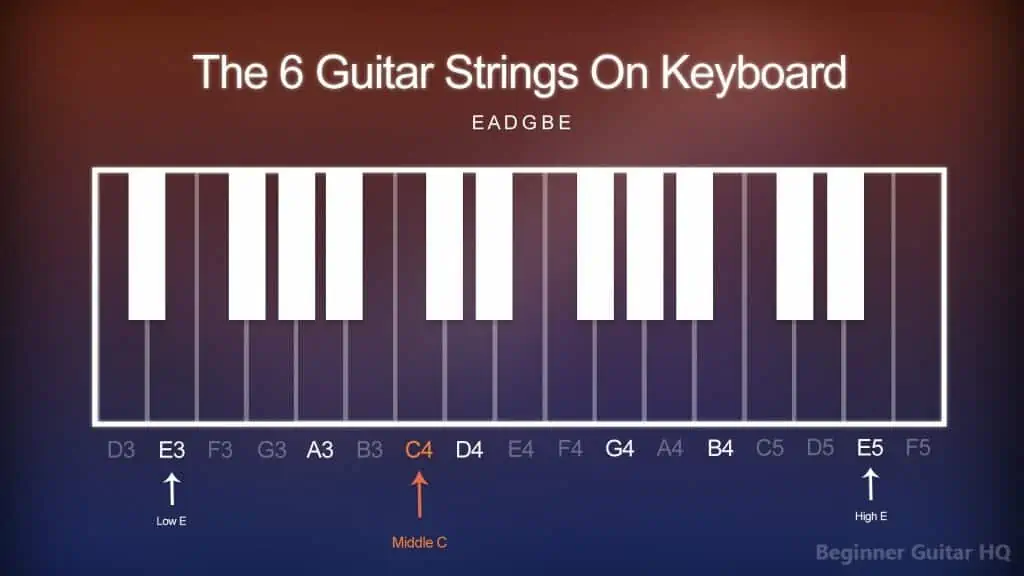
If you have a Piano handy, strewn across the keys, their exact notes/octaves are: E3 – A3 – D4 – G4 – B4 – E5
A helpful reference to keep in mind is that the thick strings are where the lower notes are. So, when you’re looking down at your guitar, the string closest to you, (most upward), is the low E string. This may also be called the 6th string. In standard tuning, the low E is the lowest note you can play. On the other side of the spectrum, you have a thinner string, furthest to the ground. This is the high E string, also known as the 1st string.
The other strings between the high and low E strings are the A-D-G-B strings. (Otherwise known as the 5th, 4th, 3rd, and 2nd strings.)
A diagram of the guitar’s fretboard, displaying the names of each string from top to bottom.
A diagram of a piano’s keyboard, displaying the octave and note of each string on the guitar.
How Do I Remember the Six Strings Effectively?
Guitar Theory in general can sound intimidating to beginners, however, learning the notes of each string used in Standard Tuning can be made simple!
There are a couple of fun sayings you can use to help you memorize the strings. For instance, one that I typically use is: Eat A Damn Good Breakfast Everyday (E-A-D-G-B-E). It’s nice and straightforward, and it serves as a positive reminder!
Others you can try:
- Eddie Ate Dynamite, Good Bye Eddie.
- Eat Apples Daily, Grow Big Ears.
- Eric And Dave’s Guitars Beat Everyone.
- Elephants And Donkeys Grow Big Ears.
All of these follow the E-A-D-G-B-E acronym. There are plenty more you can find, or if you feel like getting creative, you can make one up yourself! The point is, that you want it to be fairly easy to memorize the six strings of the guitar. The best advice here is not to overcomplicate things!
More on the Six Strings: Different Types of Strings
Types of Strings
There are five common types of guitar strings used:
- Steel Strings
- Nickel Strings
- Brass Strings
- Bronze Strings
- Nylon Strings
It’s important to understand the distinctions between these different strings so that you will have a better idea of what you need to achieve the sound you are looking for.
We’ll start with Steel Strings. These strings are used in a typical fashion on electric instruments. However, you’ll also come to find they are used on modern Acoustic Guitars giving them a more bright, crisp, and louder sound. When it comes to Electric Guitars, however, they take the three lowest strings, the E – A – D (6th, 5th, and 4th Strings), and plate them in nickel, therefore, creating Nickel Strings.
Important sidenote: This 50/50 string combination of steel and steel with nickel plating has been common for Electric Guitars for years. Nowadays, string sets of either pure nickel or pure steel have been gaining some popularity. This just means that the strings aren’t plated in another metal. For some, it might be desirable to make the switch to pure nickel strings as it gives the strings a richer tone, with a lot more body and warmth. For others, pure steel strings might be preferred, giving the strings a brighter, more crisp tone. This is a case of high-end vs. low-end frequencies and finding what you desire. There are no right or wrong answers.

Now, on to Brass and Bronze Strings. These are the two common flavors of steel strings used on the acoustic guitar. They are still considered “steel strings” as the wires are made of steel but just plated in another metal, in this case: Brass or Bronze. When referring to Brass Strings, most can be called “80/20 Bronze Stings”. This just means that the plating is made from 80% copper, and 20 % zinc. For Bronze Strings, they may also be called “Phosphor Bronze Strings”. The plating that is used on these is 92% copper and 8% tin.
When you are trying to decide which one you need for your acoustic guitar, the feeling isn’t as important as the overall sound you get. What is meant by that is, that when plucking or fretting the string, you won’t feel much of a difference on your fingers. However, when you hear the way that the string resonates there will be quite a noticeable difference.
In a nutshell, brass strings are always going to have a brighter tone than bronze. Bronze, however, carries a warm, rich and mellow timbre. (As discussed prior, this is another case of high vs. low-frequency response). When you are trying to decide on which string is best for you, it’s best to factor in your guitar itself, as some guitars already contain a prominent high-end response. This can make your guitar sound too bright, in which case, you may prefer the Bronze Strings.
Finally, let’s briefly discuss Nylon Strings. If you are a classical guitar player, then you will generally want to use these on your classical guitar. They typically carry a rich and mellow tone, which works great on the classical and acoustic guitar as much of the sound resonates from the body of the guitar as opposed to the strings.
Just a word of caution: Classical guitars are different than your standard acoustic guitar, they are incompatible with steel strings as these guitars do not have a truss rod to protect the neck. Therefore, putting steel strings on a classical guitar could cause the neck to warp. Contrary to that, putting nylon strings on a steel-string acoustic guitar will do little but soften your sound, and make it more folk-like.
How Does the Fretboard Tie In?
If you’re a beginner, you might just be learning the open string notes of each string on the guitar. In other words, the E-A-D-G-B-E notes we had covered earlier. By merely plucking each string on the guitar, without pressing strings down on the fretboard, we can achieve these open string notes.
But how can that lead to us learning the rest of the fretboard?
When you understand the natural pattern of notes, in addition to the open notes used in standard tuning; everything gets easier.
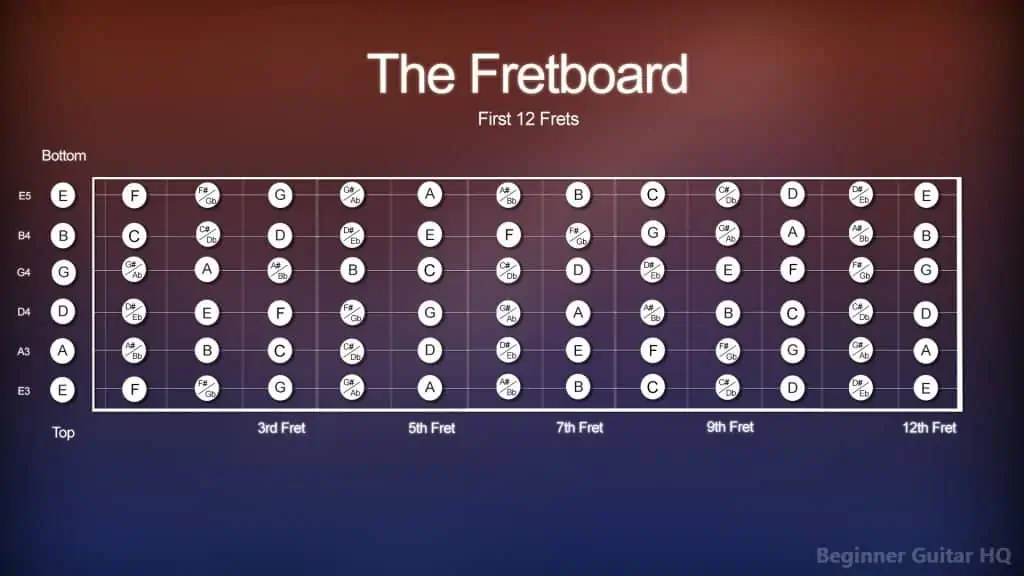
A diagram of the guitar’s fretboard, showcasing all of the notes on the neck.
As you can see in the diagram above, if we were to start at the high E string (1st string), the pattern of notes are as follows:
E > F > (F# / Db) > G > (G# / Ab) > A > (A# / Bb) > B > C > (C# / Db) > D >
(D# / Eb) > E
First Takeaway: There are # and b symbols next to letters on the fretboard.
There are things we call sharp notes which are represented by a # symbol. When a note is sharp it means that the note is raised by a semitone. On the other end of the spectrum, we have flat notes. These are represented by a b symbol, which indicates that the note is to be lowered by a semitone.
So, for instance, what you see between the C and D notes is ( C# / Db ). This means that this fret, in particular, can either be called C# as it is a semitone above the C note, or Db as it is also a semitone below the D note.
Second Takeaway: The B and C notes are next to each other, as well as the E and F notes.
Despite these notes being next to each other, this still means that they are a semitone apart. If you were to go a tone above B, you would wind up on C#/Db. So, what does this mean? Every note on the guitar’s fretboard is exactly one semitone apart from the next. When you skip a semitone and land on the note after, we call that a tone.
Examples of tones:
- C – D
- G – A
- B – C# / Db
Examples of semitones:
- E – F
- A – Ab
- D# / Eb – E
Third Takeaway: Starting from the High E (open string note) to the E on the 12th fret; this is a whole octave. It takes 12 notes to reach an octave. The E notes are the same but in different registers. One is just in a higher pitch than the other.
What makes things more interesting is when you delve deeper and tackle the patterns of notes within the natural major and minor scales. Using what you have just learned about half steps and whole steps should make that an easier task!
In music, it’s important to remember that the alphabet ends at the letter G and circles back to where it began at A. Whether you are playing the piano or playing the guitar the B and C are always a semitone apart, as are the E and F notes. In summary, if you remember these things, in unison with knowing the open string notes, then you will be well on your way to understanding the fretboard.
Other Tunings: How They Alter the Fretboard.
We know that E-A-D-G-B-E is the tuning used for most songs out there, so why change it?
Well, it varies.
To Make it Easier
For instance, sometimes there are notes that go really well together, but it’s just too darn difficult to play in standard tuning. This is where detuning your instrument can be the most helpful solution. The most common one I see is Drop D tuning, which would look something like D-A-D-G-B-E (the low E being detuned to D). This can make it easier to play Power Chords, which normally call for the use of three fingers to instead be playable with one.
To Reach Impossible Notes
If we detuned our guitar to Drop D tuning, then that gives us an extra two lower notes to work with. This can help you play heavier riffs, depending on the genre of music you’re looking to play.
There are a ton of other dropped tuning’s to work with:
Drop C tuning: C – G – C – F – A – D
Drop Bb tuning: Bb – F – Bb – Eb – G – C or A# – F – A# – D# – G – C
Drop A tuning: A – E – A – D – Gb – B
… And plenty more!
These examples are traditionally used in rock or heavy metal, but one that I personally enjoy is F- A – C – G – C – E or D – A – E – A – C# – D with a capo on the third fret. This will give you a nice midwest emo tuning, which makes it sound very folk-like.
Andy McKee’s Drifting uses D – A – D – G – A – D tuning, and it sounds beautiful.
Andy McKee performed his song Drifting using the Slap Guitar playing style in D-A-D-G-A-D tuning.
What Happens to the Fretboard?
When you change the guitar’s tuning, everything on that string gets altered. So, for instance, if you were to go into drop D tuning, you would be shifting from E back to D. As we learned earlier, this is a whole step backward, or a tone. That means that all of the notes on that string move up by two frets.
As you can imagine, if you were to change the tuning of three strings or more, that would change quite a lot of the guitar’s notes making for some very cool, and other times very wacky combinations.
Tuning Your Guitar – Beginner’s Practices
Tuning your guitar is an excellent habit to get into when picking up your instrument every day. There are a few fairly common methods you may choose from to make it easier:
- Electronic Tuner
- Tuning Fork
- Piano or Guitar
- Relative Tuning
A woman’s hand, holding a tuning fork.
Electronic Tuner
These are fairly inexpensive but do the trick. Whether it’s digital or physical, most come with a sort of needle that bends left or right to indicate if a string is sharp or flat of the proper tuning. Yours may come with a blinking light of some sort as a visual aid. The way these tuners can commonly detect a proper tuning is either through a microphone built into the device or by being able to plug the instrument into it.
If you’re fortunate enough, there are some that come with other built-in features like a metronome and tempo adjuster. There are even some that have a built-in “smart tuner”, and capo attachment, depending on how much you’re willing to spend.
Tuning Fork
Using a Tuning Fork is a pretty simple way to gauge if you’re in tune or not. It only has one note when it’s struck, the A note, just two notes higher than middle C. So, simply, strike the tuning fork against something sturdy and firm enough to withstand the impact, yet not to scuff it up. Something like your knee, chair, or table should work just fine. It’ll start to ring and resonate with a clear A note. On your guitar, you’ll want to play an A note on each string and loosen/tighten the tuning knobs on the head of the guitar until they sound in tune with one another.
Tuning With a Piano
If you have a Piano, Electronic Keyboard, or even an online method to get a Virtual MIDI Piano, then this is another surefire method of getting your guitar in tune! Assuming you have a trained enough ear!
Earlier, we briefly discussed the keyboard, and where the open string notes of the guitar fall into place on that. The notes were: E3 – A3 – D4 – G4 – B4 – E5
You could absolutely use those notes in each of their octaves as a reference point in tuning each string of the guitar.
A good habit when tuning your guitar is to start on the Low E and work your way through each string until you hit the High E.
Some might prefer to use an Electronic or Virtual Keyboard as in time, a Piano can go out of tune. It is a stringed instrument after all.
Tuning With Another Guitar
If you have a tuned Guitar ready at the side, this will also work as a solid reference point. This is as simple as plucking the same open string notes on the guitars and trying to match the pitch of one to the other. It’s best, however, to make sure that the guitar that you’re using as a reference point is in tune. The last thing you would want is to take your guitar even further out of tune.
Relative Tuning
This method is compatible with any other method recommended here. What is meant by that is that you only need to know the proper tuning of one string to figure out the rest.
We call this Relative Tuning because we use that string that we had just tuned to play the same note as the Open String Note that we’ll be tuning next. So for instance: If you wanted to tune your A string next, you would need to find the A note on the low E string we had just tuned.
On the low E string, you can find the A note on the 5th fret. Play it, then play the open A string note. If your guitar is in tune, the will sound the same! If not then adjust your A string’s tuning knob until the pitches sound the same.
You can find these relative notes:
- Low E String – 5th Fret = Note of A
- A String – 5th Fret = Note of D
- D String – 5th Fret = Note of G
- G String – 4th Fret = Note of B
- B String – 5the Fret = Note of high E
It’s as easy as that! I prefer to start with the low E string. You may choose to use any string, but oftentimes, as it’s a very good habit for guitarists to get into, tuning from the low E string, all the way to the high E string is good practice.
Conclusion
The guitar string names are important to know for every guitarist out there. It does not matter how in-depth you wish to get with guitar theory, this information will serve you for years to come! Keep on rockin’!

