The process of applying equalization to a mix is an art form. It’s something that eludes many beginners, and up-and-coming producers alike, as we chase the perfect sound. However, would it surprise you that something so important can also be something glossed over in the overall process? As you read on, we’ll cover the importance of equalization, and what you can do to get started with applying it to your mix, and perhaps other areas as well! Let’s dive in!
Contents
What is Equalization?
Equalization, or “EQ” for short, is the process of manipulating different frequencies to achieve an overall better-sounding mix. Within the space of a studio, the role of “who EQ’s what” can vary. It could be the sound engineer, mixing engineer, producer, or even just better left for the artist and their team to manage, depending on how much freedom they decide to give you.
Equalization plays a very important role in how things sound, which can make all the difference in how certain instruments and their parts are represented in the greater whole of the mix. Alongside other elements, such as panning and leveling, for instance, EQ can help give the different parts of your mix their own space to shine. By adjusting the frequencies, you can help instruments of a like frequency not clash with one another. For instance, a bass guitar and a kick drum both carry a lot of low-end frequencies, and when heard together might make the mix sound a little muddy. When situations like this emerge, then that’s when you need to make a decision about which one should have more priority. This particular situation may also be a great opportunity to look into sidechaining.
Of course, however, there may be times when you may want to look into panning a particular instrument that may clash with the lead vocals, which in most cases the lead vocals should be front and center. However, we’ll focus more on the equalization side of things – although it’s important to note there are other tools at your disposal for giving tracks their own space within the mix.
Now that you know a bit more about equalization, where do you find it? Well, fortunately enough, it’s something of a standard for all DAWs (Digital Audio Workstations) to have as a stock plugin. However, that is not to say that you can’t purchase, or acquire free plugins from another source to import to your DAW. You may also decide you’d like to acquire a standalone piece of software to run on your desktop for equalization. There are even websites, and services that mix your music for you, but that’s probably not why you’re here.
Whether you need to adjust the overall mix, the guitar, bass, vocals, percussion, you name it, equalization is always useful for bringing out the best qualities in each.
Using Equalization
Now, let’s get to the meat of things, where we’ll go over how to EQ a few basic percussive instruments that may be in your mix. There’s no short or really correct answer for “how to properly EQ” your mix. Something important to understand is every producer/mixing engineer has their own way of mixing music, and a large part of that may be due to the genre of music they’re mixing. Sometimes the bass becomes a more prominent element in the mix, or the vocals outshine everything, or maybe fade into the background, perhaps there’s more emphasis on the drums – all of these things are worth considering for your mix and what you’re going for. With that said, however, let’s go over some general guidelines for some different drums. In these examples, I’ll be using FL Studio’s stock “Fruity Parametric EQ 2” plugin:
Kick Drum
The kick drum is the heartbeat of the song, and naturally carries a lot of lower frequencies. It’s important to note, however, the three fundamental points of a kick drum’s sound.
- The Bass – the low punchy sounding thud you hear.
- The Impact – the body of the kick, carrying some low – mid range frequencies.
- The Transient – the higher pitched popping sound, hanging around the mid range frequencies.
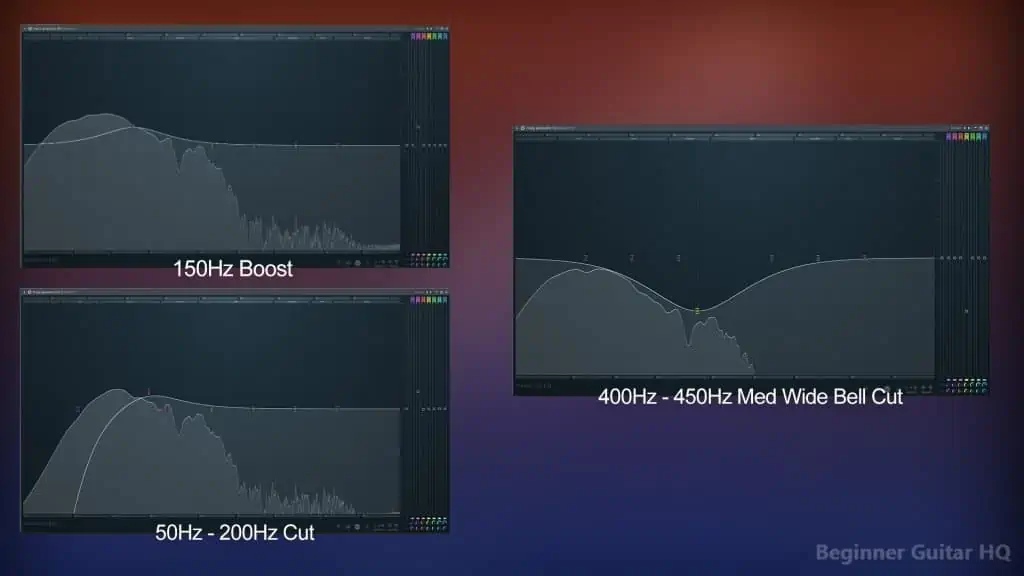
With these three things in mind, depending on your mix, you might choose to bring certain elements forward, diminish them, or outright cut them. For instance, if you want your drum to sound heavier, then you may want to consider boosting the frequency around 150Hz. However, if it sounds too muddy with the mix, you may decide to cut some of it out completely, especially so it doesn’t interfere with the bass. Another option is to apply a medium-wide bell around 400Hz – 450Hz.
Equalizers displaying the different types of equalization you can apply to a kick drum.
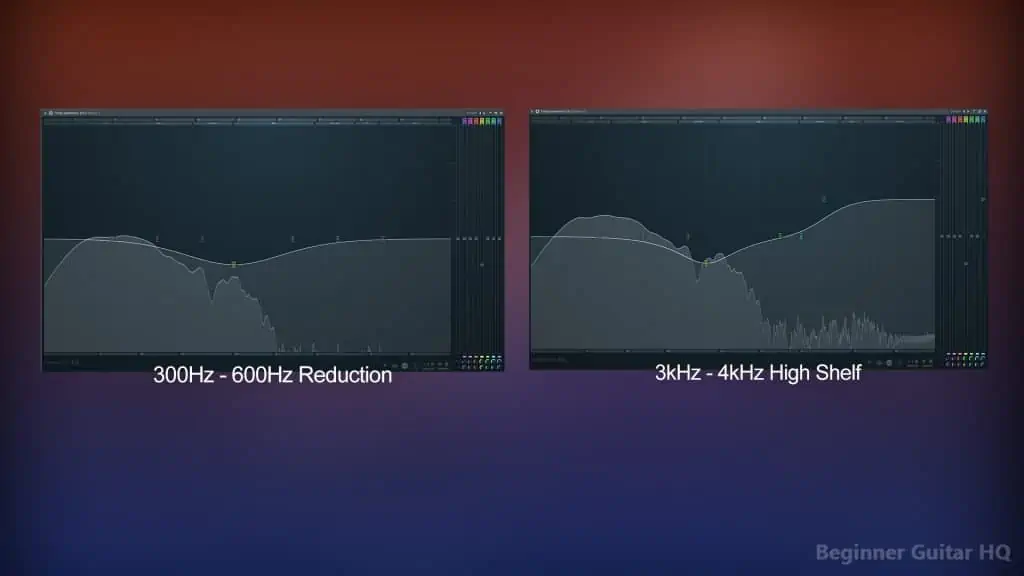
If the body of your kick drum has a bit too much of a boxy sound, then it may help to lower it within the range of 300Hz – 600Hz. Lastly, we’re on the high end where we hear our transient. You can improve upon the punch by increasing it with a high shelf in the upper-mid range at 3kHz – 4kHz. However, be mindful that this may end up clashing with other percussive instruments.
Equalizers displaying the different types of equalization you can apply to a kick drum.
Drum Snares
The snappy drum snare helps add some life to our drum beats. For this, we mainly need to focus on two elements: the impact, and the transient. We’ll start at the lower end and work our way up.
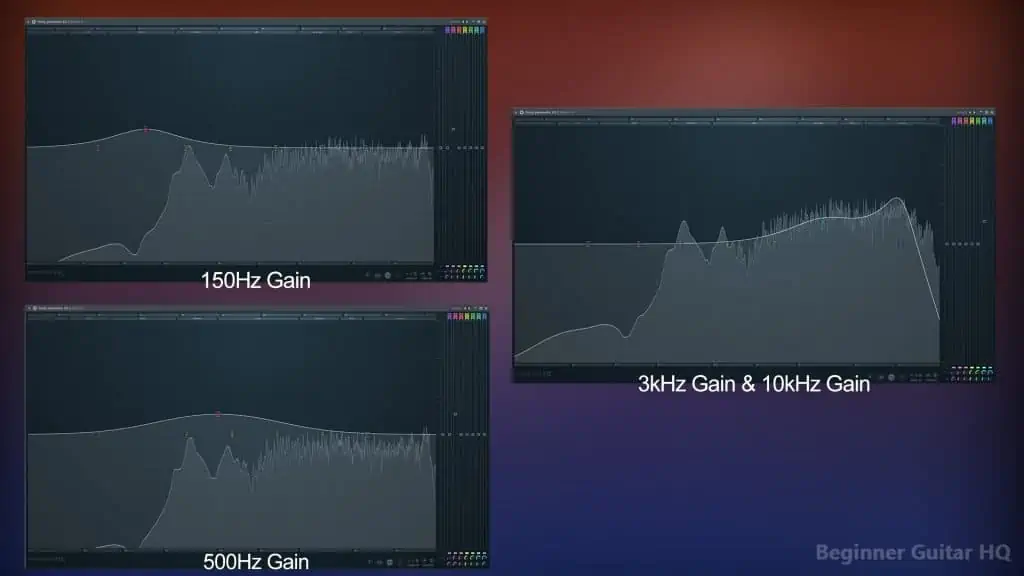
Starting from around 150Hz, if your drum snare is sounding too thin, adding db to the frequency here can help give the drum snare more body. You may even add to this around the 500Hz mark to round out the sound.
The transient is something that really sticks out with our snares, and we can make it sound more impactful when we add to our high end. To achieve this, you may increase it around the 3kHz mark. A subtle way of adding more “air” or brightness to your snare can be to increase it around 10Khz or greater.
Equalizers displaying the different types of equalization you can apply to a drum snare.
Hi-Hats
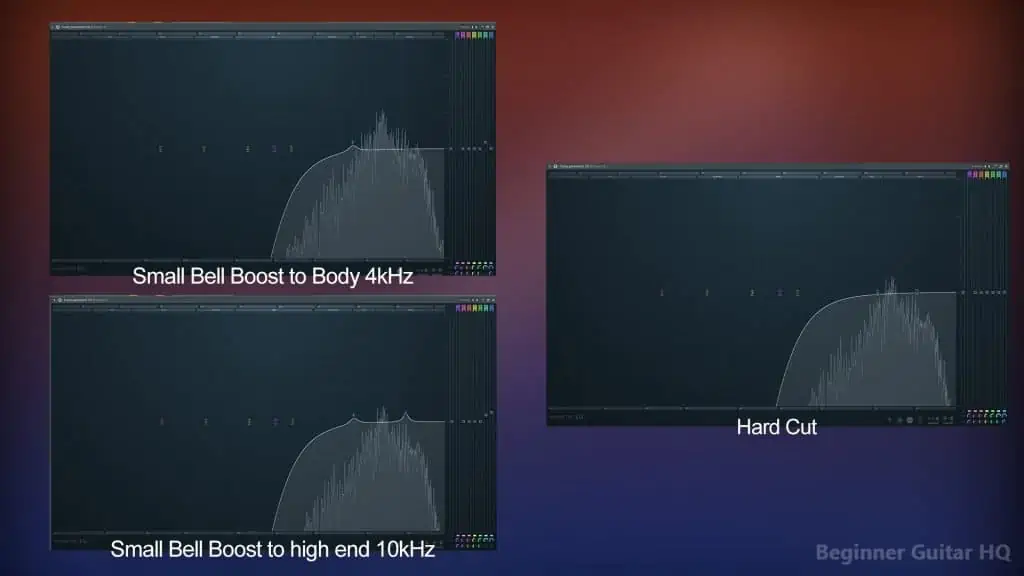
Hi-hats are mostly heard in the high end, but do contain some minor frequencies in the mid to mid-low, depending on the hi-hat you’re working with. However, due to its nature of having a fairly crisp high end frequency, it’s important to be mindful of its volume level. Starting at -20db – -25db is a good place to start within your mix. Of course, however, this can change over time if required. The body of the hi-hat can be increased a little around the 4kHz range. To add more clarity to your hi-hats, you can increase it around 10kHz with a minor bell boost. Aside from that, you want to cut any unnecessary noise and information, that may conflict with other instruments.
Equalizers displaying the different types of equalization you can apply to a hi-hat.
Another cool trick you can use with your drums, is by implementing a de-esser to decrease the harshness of any high frequencies. Normally, this is a plugin associated with vocals, however, it’s affective on drums, and electric guitars as well!
When Do You EQ?
When to use equalization within your mix is always a concern amongst many new artists/music producers. The important thing to realize, however, is there’s no straight answer. Within the mixing and mastering phases, everyone has their own process, and over time, you too will have your own. That isn’t to say, however, there aren’t any tried and true methods used within others’ processes. Here are a few examples:
Pan then EQ
This typically comes after setting your levels for the individual tracks. Planning for where certain instruments will sit in the overall mix before applying any EQ and processing is something that many mixing engineers prefer. Sometimes it helps to give yourself a visual by drawing out where all the instruments and different pieces of your mix will sit within the stereo soundstage. You may even decide to pan the entire mix the way it was recorded, and from whose perspective. Are you panning the recording from the performer’s perspective, or the listener’s? It’s also important in this stage to separate tracks that sound close to each other (similar frequencies and timbres). One way to achieve this is to pan them away from each other.
EQ then Pan
Other mixing engineers prefer the EQ before panning method. As mentioned before, EQ and panning both have an influence on where different tracks sit within the mix. If you have two guitars within the same space of the mix, where one is EQ’d high, and the other low; you may not need to separate them with panning in the mix.
With either of these two approaches, you’d typically worry about applying any further effects later (reverb, delay, chorus, flanger… etc.) The main reason for this, is that you want to only hear the dry signal from your track before changing anything with equalization. If your track is drenched in reverb, it might make hearing all of the subtle details more difficult. You may also decide, based on how the dry track was EQ’d, that you might not need as much reverb, or perhaps it may influence your decision making in regards to how much decay, or latency it might have.
However, not everyone follows these methods. In fact, sometimes you may encounter a recording that already has these effects applied to it, but hasn’t been panned or equalized. In which case, you make do with what you’ve got.
Use For Problem Solving
There may even be times where you have recorded something great, but there’s some annoying feedback lingering within the background. Equalization can be an excellent means to saving a recording, so you don’t have to do it over. Of course, this isn’t foolproof. Not every recording can be saved or restored – however, it helps knowing that EQ can give you a fighting chance, by reducing some of those pesky frequencies!
With all of that said, however, not every track needs to be panned one way or another. In fact, it can’t hurt to even leave some things in the dead center. EQ can help with finding these tracks their place in the middle.
When mixing with either of these methods, make sure you start with a mono soundscape (unlike stereo, mono does not involve any panning. Everything comes dead center). After everything has been set for mono, give it a listen. Play around with the levels, if needed. Then after, going through each track, make decisions and adjust their panning accordingly.
EQ For Different Scenarios
Equalization falls under the umbrella of all things involved with mixing. It’s important to consider, however, where your listeners will be hearing your final mix, as different qualities of your mix may be more or less present on different sources. This will involve a lot of “test listening” and trial and error. A good rule of thumb is to test a song professionally mastered, similar to your own mix and see how it compares on these different sources of playback.
It’s important to not mix specifically for your headphones, studio monitors, car speakers… etc. If you’re a beginner, you’ve likely mixed your entire song for your headphones or studio monitors in an untreated space. This is why you probably won’t enjoy your mix when played from your car, for instance. While it might be tempting when you hear your mix in your car, to make big adjustments, this can hurt your mix. It’s important to realize two things:
- Unless you’re listening and tweaking your mix from studio monitors in an acoustically treated environment, you likely don’t have the most accurate representation of your mix.
- Take other sources of playback with a grain of salt. Many speakers, and headphones exaggerate the high/low end frequencies, or have a lack thereof.
The best thing you can do is find a “happy medium”. You’re not mixing only for your car’s speakers, or for your smartphone, earbuds, headphones… etc. You want a mix they can be enjoyed from any playback device. This is something that takes time, and a lot of trial and error.
Tying in Other Elements
Now, let’s consider some of the other elements that might be in your mix, all of which can effect the frequencies of your individual tracks, and how they fall into the mix.
Reverb is a common effect designed to give the music an atmospheric effect, or a “sense of space and depth”. In fact, there are many excellent plugins for reverb that can simulate concert halls, bathrooms, cathedrals… etc. However, while it may be able to create that atmospheric effect, it can easily clash with other elements in your mix. It’s important to use reverb sparingly.
Delay has a similar effect as reverb. Except it gives you a sort of “echoing” sound, much like yelling from a top of a mountain. With delay you can adjust the latency and panning, allowing you to create a sense of depth. It can also be used for rhythmic effect, for instance, throwing delay on a hi-hat set to a 4/4 rhythm, on every beat and having the delay trigger in the middle of each beat. It gives a nice illusion of depth as the delayed hi hats sound somewhat quieter. However, what you’re getting with delay is more noise added to your mix, which can make things somewhat hectic when used too often.
Distortion can add a lot of color to your mix, and give your instruments, even vocals, more character. One thing to be careful of, however, is to make sure you don’t end up clipping, therefore its important to use it subtly. The last thing you want in your mix is to hear pops, and broken up sound upon playback. This occurs when your mix is overdriven and your system cannot support it, it’s breached its limit. A solution to avoid clipping is to always make sure you have enough headroom in your mix, which can be done by dropping the individual levels of each track to a reasonable amount. The second solution is to use a limiter, or at the very least, a compressor. This will help level out volumes that breach a certain db limit.
Chorus creates a copy of a signal, for instance, somebody singing, detunes the voice, and gives you a wider effect around the source. The depth, spacing, and delay of these voices can be tweaked to give you different feelings. This effect is oftentimes included with vocals to emphasize an important part of the song, however, it’s not uncommon to see it on other instruments as well, like electric guitars, synthesizers and pianos.
Flanger is a really neat effect you can apply that creates a somewhat of a “chorus effect”, however, imagine that second voice constantly shifting around. Sounds a little psychedelic! This can be used to add more character to certain instruments, primarily guitars.
Phaser creates an interesting modular sweeping effect to give a sound a completely different vibe. Compared to the chorus and flanger, this effect is far more subtle, as it doesn’t sound like there are clones of the audio moving at different timings, but that its individually moving through a filter.
Mistakes Beginners Make
Having all these tools at our disposal can make it very tempting to over indulge in them, drowning tracks in reverb, adding too much distortion, EQing the low end and making a very bassy track. It sounds cool – but it doesn’t make for a good mix. When it comes to equalization, the important thing is you first want these tracks to sound good on their own. If you have to add EQ to make your recording sound good, you might want to record again. It’s best to use equalization in regards to what the greater whole of your mix is.
Another pitfall beginners make, but don’t often realize at the time is ear fatigue. It can sneak up on you after listening to your mix for hours on end, which ultimately leads to you making poor judgements about your mix. This is why we can really enjoy our mix in the moment, only to come back to it later and feel badly about how it sounds. It’s important to take short 10 – 15 minute breaks every hour or so to keep your ears fresh.
If you can’t thnk of any other adjustments to make with equalization, there’s probably a good chance you’re done. Chasing perfection is like chasing a rainbow looking for a pot of gold, its an endless goal without a real destination. Many great and experienced mixing engineers and producers face the same struggle. At the end of the day, there are more projects to work on, deadlines to meet, and eventually you have to move on. Remember, perfect is the enemy of good.
Conclusion
Now you got some helpful tools to get started in your journey of mixing, and making the most out of your equalizer. Mixing takes a lot of practice. In fact, most new producers don’t often get enough practice with mixing, as it’s typically the final stage in finishing your song. It’s important to see your work through to the end, and to not throw it away because it doesn’t sound good. In fact, it’s important to write bad music! Each project you finish, gets you one step closer to writing and producing the music you can be proud of. Even more so, each time you make it to the end, it gives you all the more experience with every step of the music production process.
The important thing is having a love for the craft, and enjoying the process. Don’t aim to be perfect, just aim to be better with every mix you complete. The next step is yours, what will you do with it?

