So you’ve just dropped a bunch of clean bars, recorded them using your best gear, and you’re ready to put the whole track together.
But there’s something wrong:
Your vocal tracks don’t seem to fit as well as you’d expect.
It’s like, they’re in there, but they feel kind of separate from the rest of the track.
That’s where vocal mixing comes in, and though there are a bunch of different aspects to mixing vocals (compression, editing, effects), EQ is definitely one of the biggest ones.
So, how do you EQ vocals? Where the heck do you start, and how do you know if you’re doing it right?
That’s what we’re going to take a look at today.
Let’s start nice and simple.
What is EQ?
EQ is short for equalization and is the process of manipulating the frequency range of a vocal performance to achieve the desired sound.
2. What is EQ?
Think about it like this:
Your vocal performance is like a fine oil painting. It’s not just a single dot in a single color, pressed there on the canvas.
Rather, it’s a glorious selection of colors, strokes, swishes, contrasts, and hues.
Similarly, every note you’ve laid down in your vocal track isn’t just one frequency, it’s made up of a tonne of different overtones that span the entire frequency range.
When you sit in front of the canvas and subtly adjust the depth of the blue or the brightness of the red you’ve used, you’re changing the look and feel of the painting, but it’s still the same painting.
This is exactly what you’re doing when you EQ a vocal track.
You’re subtly manipulating various aspects of the frequency range in your performance, which tastefully adjust the sound and feel of your performance, whilst retaining the essence of the performance itself (it’s still the same recording, after all).
EQ can be performed using plugins in your DAW, or with outboard gear such as this unit:
Why do you need to EQ vocals?
A common question around EQing is whether there is only a need to EQ vocals if something has gone wrong during the recording phase.
The short answer is no, and actually, if you’re using EQ to fix problems stemming from the recording phase, you should really just go back and record the damn thing again, and properly this time.
I highly doubt you’ve ever heard a professional recording where the vocal tracks haven’t been EQd, it’s just a natural part of the process, as it is for all other instruments in a recording.
The main reason you need to EQ vocal tracks is that you need them to fit into the context of the whole performance.
Most instruments have energy right across the frequency range or at least spanning a fair chunk of it. That means they are competing for the same ground.
EQ helps you to get all of the different tracks sitting together.
It also helps you to bring a bit more air to vocals, remove any boxiness, bring vocals forward in the track, and gives you the ability to implement a huge number of artistic decisions in the mix.
So, what’s involved in EQing a vocal track?
The 11 step process to perfectly EQd vocals
There’s a lot involved in EQing vocal tracks, for sure. I mean, we’ve got 11 steps right here, so it’s not exactly a short and sweet process.
So, listen up.
1. Choose some reference tracks
Before we even touch a dial on our EQ, we need to have an idea in mind of what we’re trying to achieve with our vocal track.
Our goals will differ from track to track, and hugely between genres, so a good first step is to identify a few reference tracks with vocal sounds you really like.
You’ll use these throughout the EQing process, referring back to them as you go to make sure you’re on the right path to nailing that same sound.
Note: this doesn’t mean you’re aiming to copy that vocal sound 100%, nor does it mean you should even try, it’s just a way to reference whether the changes you’re making are taking you where you want to go.
2. Understand EQ principles
Okay, we’re nearly there.
But let’s talk about how to EQ, before we talk about how to EQ.
Let me explain:
There are a few ground rules you need to pay attention to, otherwise, you’ll probably go overboard and just end up making things worse.
Here they are:
Never ‘fix it in the mix’
I said it just before, and I’m going to say it again.
EQ is not here to fix your crappy recording or your poorly delivered lines. It’s about making a great take even greater.
So, if you can fix a problem by recording it again, do it. THEN get back in the mix.
And maybe grab yourself a pop filter, if the problem is excessive plosives.
Try to cut more than you boost
Boosting is when you raise the level of a given frequency, cutting is the opposite.
Boosts sound quite obvious and unnatural to our ears, cuts are a lot more subtle.
Wherever possible, we want to cut rather than boost. Firstly, we’ll be cutting out frequencies we don’t like. This should be your first port of call.
But even more than that, try to use cuts when you would use a boost.
For example: if a track is lacking in top-end, try cutting out some of the low-end, rather than boost the highs. It often gets you to the same place but sounds a lot nicer.
Listen, don’t look
One of the problems with digital mixing is it’s a lot more visual than its analog counterpart.
Why is this a problem?
Because we end up mixing with our eyes rather than our ears. The absolute power of modern plugins also gives us a tonne of analysis tools, which further complicates things.
The point is this:
Don’t make EQ changes based on what you see in an analyzer, or on the EQ dials. Make changes based on what you hear.
Heck, close your eyes if you have to.
Some people prefer to work with analog gear for this reason, as you can’t see the boosts and cuts you’re making in the same way that you can with a plugin parametric EQ.
Only make changes that are actually required
You’re about to get a bunch of dope tips for EQing vocals, but don’t go thinking you need to follow them to the letter or apply them in every circumstance.
If a vocal track doesn’t need more presence, then don’t boost the presence. If there are no problems with sibilance, then you don’t need to de-ess.
Simple as that.
Make EQ changes in context
It can be tempting to want to EQ a vocal track in solo.
Obviously, it makes your changes easier to hear, and brings you closer to the action.
Don’t do it man, it’s a trap.
Why? Because your listeners aren’t going to be hearing your vocal tracks in solo, and all you’re going to do is make your vocals sound even less like a cohesive fit with the rest of the track.
I’m not saying to stay away from that solo button entirely, but use it sparingly, and definitely make any changes to the EQ with the entire track playing, so you can hear any changes in context.
Alright, let’s get into the actual EQing.
4. Drop the low end
Okay, so the first thing we need to do when EQing vocals is to cut out the extreme low end of the frequency range.
I’m talking about at least below 60Hz, but maybe up as high as around 120Hz if your voice performance doesn’t have a whole lot of low notes.
The human voice doesn’t have any energy down here, so the only thing that might be coming through in a recording is noise, probably from knocking the mic stand or some rumble traveling up and vibrating the mic capsule.
Here’s what I mean:
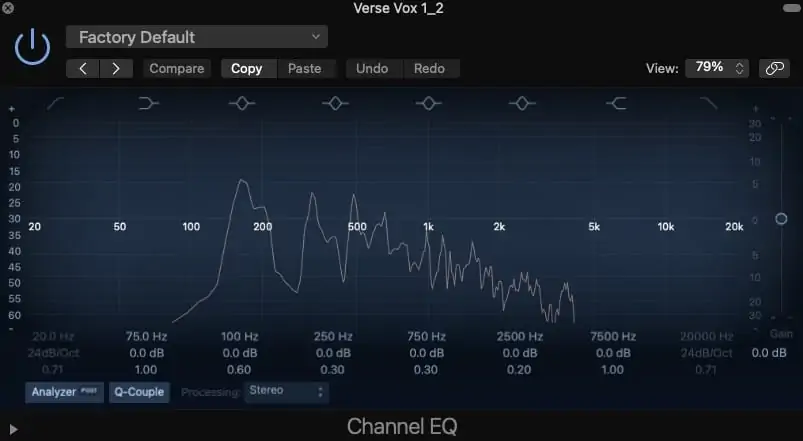
3. Vocal low end
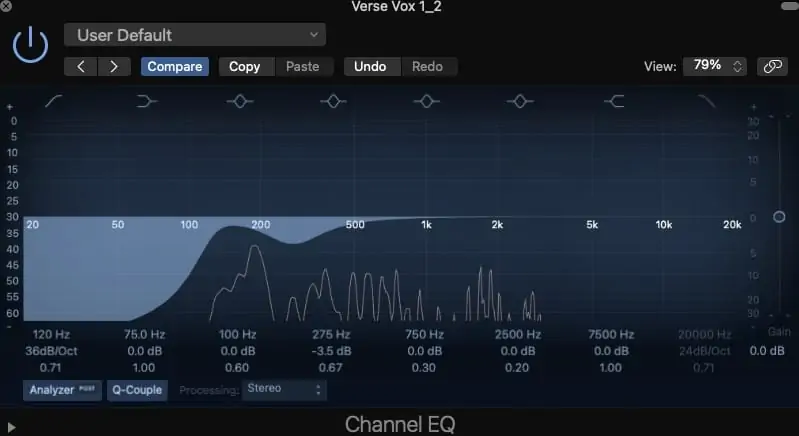
You can see from the analyzer that my vocal recording reaches a low at about 150Hz, at least at the part I’m listening to.
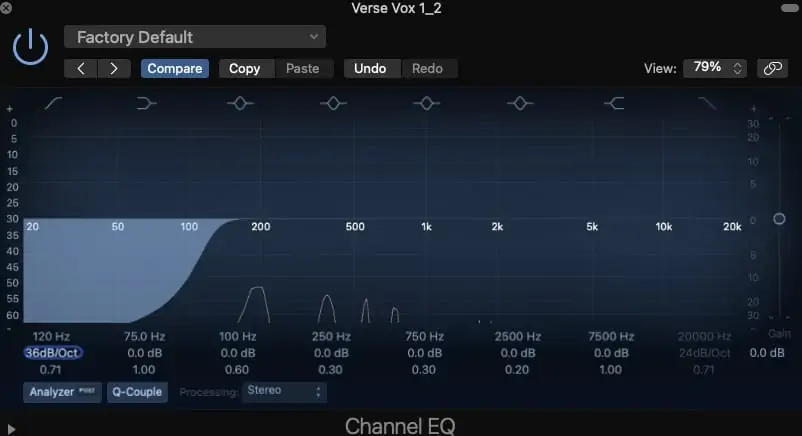
This is the lowest note I have in this vocal recording, so I’m gonna pull my high-pass filter right up to 120Hz, with a medium-aggressive roll-off of 36dB/oct.
4. Vocal low cut
First step done, easy.
5. Remove sibilance with a de-esser
Okay so this one is technically not an “EQ” tip, but it’s something you want to get going in your vocal chain pretty early on, as you may end up accentuating stuff you don’t like as you EQ the mid/top end of the frequency spectrum.
I’m talking about de-essing, which is exactly what it sounds like: we’re going to take a bunch of the S-ness (technically called sibilance) out of the vocal performance.
Now, remember, we only do what’s necessary. If you don’t have any S sounds in your recording, or they aren’t causing a problem, then you don’t need to do this.
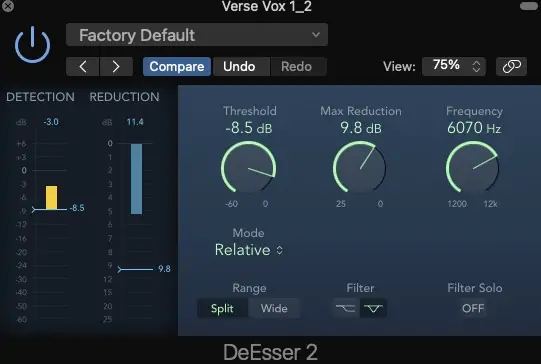
But in my case, a few of my S sounds are coming in a little harsh, so I’m gonna clamp down on them to keep things clean.
5. Vocal de-esser
Here’s what I’ve done:
- Opened up the max reduction all the way, so my de-esser is really pumping
- Adjust the frequency knob so I find the perfect center frequency where my S sound lies
- Roll the threshold back so it’s only jumping in on the harshest S sounds, as opposed to every single one (because otherwise you can end sounding like you have a lisp)
- Dial the max reduction down so you are nailing the hell out of things
6. Cut out any boominess and muddiness
Next, we’re going to deal with any boominess or muddiness in our vocal recording.
In my instance, I’ve recorded in a fairly small room, right up close to the mic, and in all honestly the mic I’ve used tends toward the muffled and muddy side of things anyway.
As a result, I don’t have a tonne of clarity in my vocal record.
By the way, remember before how we talked about cutting and not boosting? Well here’s a great example of that in action.
Rather than cranking up the upper mids to try and gain some clarity, I’m going to cut the lower mids to get rid of a bit of muddiness and bring my vocals to life.
Boominess lives in the 100-400Hz are in vocals, and so the exact place to max your cut depends on your voice, microphone, recording environment, and performance.
Tricky, right?
Don’t worry, I’ve got a handy little trick to help you identify the right frequency to make your cut.
Basically what we’re going to do is boost the hell out of the EQ to overemphasize the problem, and this will help us determine where it’s worst (which we call the offending frequency), so we can cut it out nice and neatly.
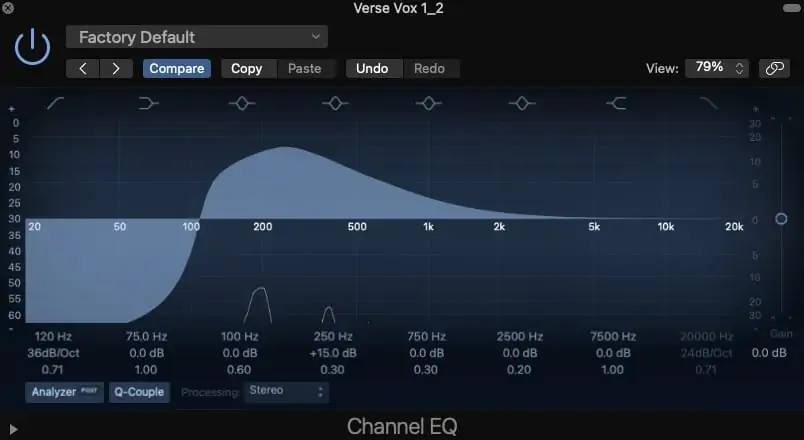
So, step 1: Pull up a bell curve EQ node and boost it up a good 15dB or more.
6. Vocal muddiness
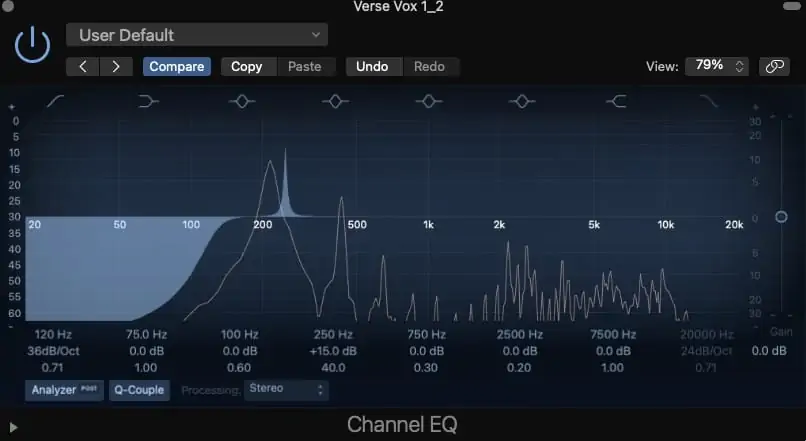
Then, pull your Q factor in nice and tight, so we have a sharp, narrow, and aggressive boost.
7. Vocal boominess
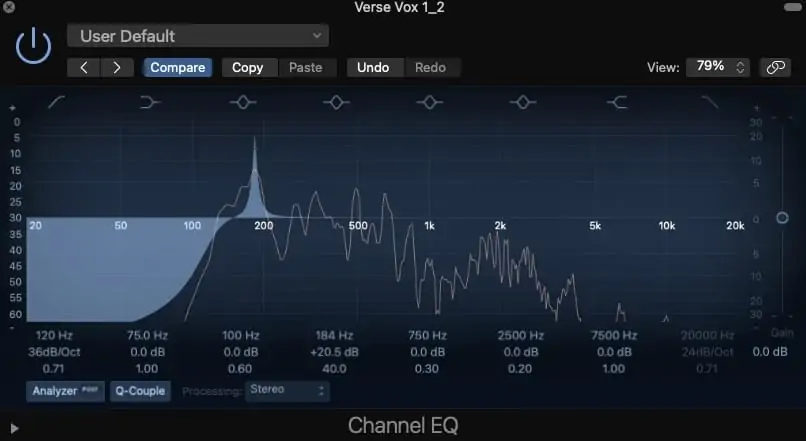
Now what we’re gonna do is slowly sweep our frequency dial up and down in that range until we find the spot where the boominess or muddiness really jumps out at us. It should be pretty obvious.
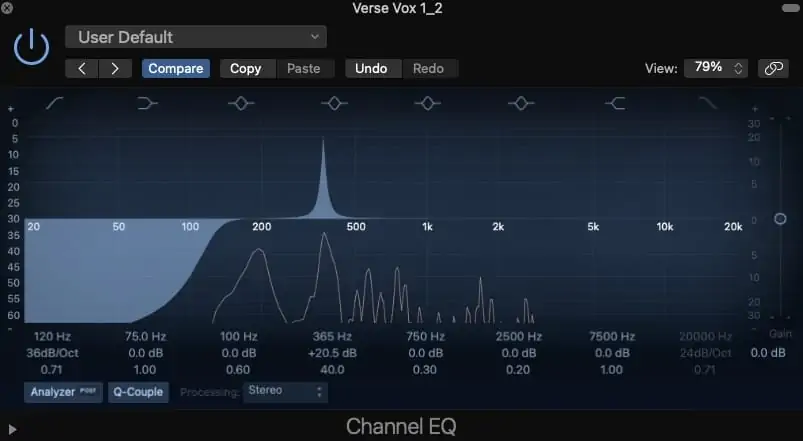
8. Vocal mud EQ
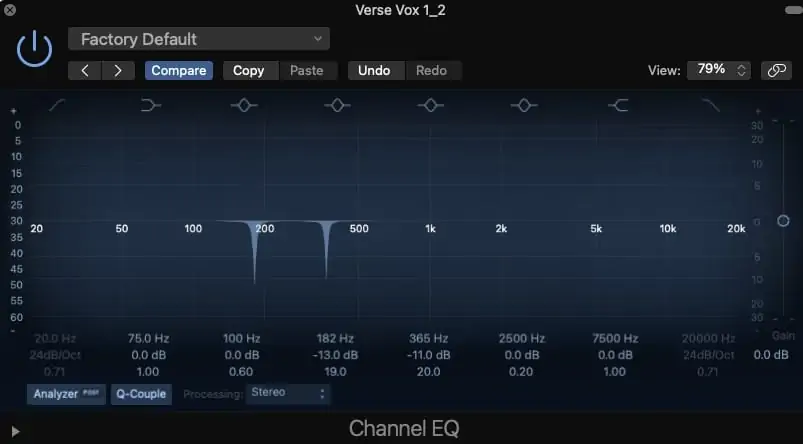
In my case, I’ve got two ugly frequencies: 182Hz and 364Hz. This is pretty normal, since 364Hz is an octave higher than 182Hz, so it’s a harmonic overtone, probably a result of the parallel walls in my room.
9. Vocal boom EQ
So, I’m going to take a two-pronged approach.
This first is what we’d usually do when trying to remove muddiness, which is to carve out a wide and subtle chunk of the lower mids, like this:
10. Vocal EQ broad cut
Second, I’m going to make two precise, narrow, and aggressive cuts, and each of the frequencies I’ve found to be problematic.
In my case, I like to make these super aggressive and surgical cuts on a separate EQ plugin. It just helps me keep things nice and organized.
11. Vocal sharp cut
Cool, now we’ve dropped a bunch of muddiness out of the equation.
7. Get rid of boxiness
So I’ve managed to get a bit of clarity back in the recording, but things are still sounding a little boxy.
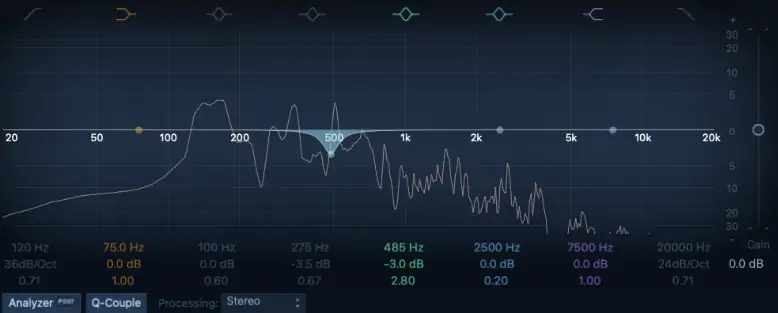
Boxiness tends to hang around the 400-500Hz range, so that’s the area I’m going to target.
We’ll keep things nice and subtle, again:
12. Vocal boxiness
8. Dial down the nasality
Alright, one last space to do some cutting we get into a few subtle boosts.
My voice in this sound is sounding particularly nasal, and I’m not a huge fan of it.
Nasality or honkiness sits in the 1-4.5kHz range, so we’re going to need to apply the same approach as with the muddiness cut down in the lower mids.
We want to be careful here, as this same frequency range is where a lot of the intelligibility is in speech, so we don’t want to drop out too much clarity.
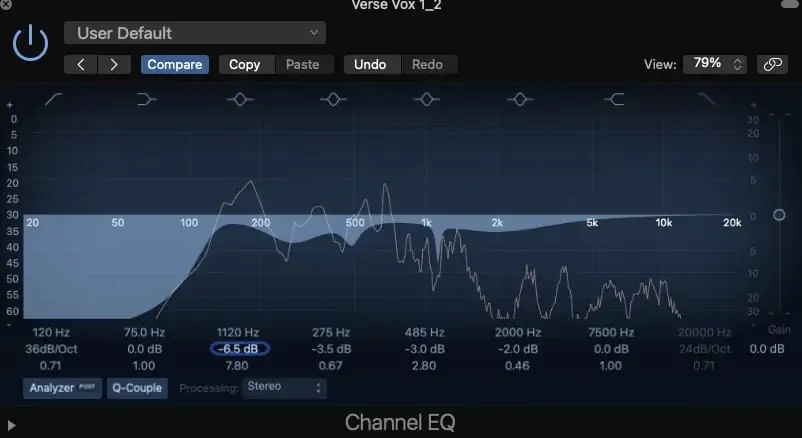
In my case, I’m going to deal with this with a sharper cut around 1100Hz and a broader one with a center frequency at 2kHz.
9. Add some air in the top-end
Alright, let’s have a bit of fun.
I like to do my subtractive EQ with a transparent graphic like the one you’ve been seeing, and my additive with something a little more colorful, but you can use any EQ and achieve very similar results.
I’m going to use the Logic plugin that’s based on the famous Neve EQs.
So, we’re going to get a bit of top-end air happening with a nice high shelf, boosting anywhere from around 10kHz upwards.
Season to taste, but be careful not to go overboard.
13. Vocal EQ air
10. Push the presence if required
Similarly, we can bring the vocal performance forward in the mix and provide presence and clarity by boost around 5kHz.
14. Vocal EQ presence
Again, keep this fairly light.
If you find yourself need to boost more than around 6dB, then you might need to do some subtractive work in the low end, generally speaking.
11. Use the tongue and groove to glue your vocal into the mix
Okay, one last tip.
This one is less about making the vocal performance sound great in isolation and more about reducing the friction between instruments in competing spaces of the frequency range.
The track I’m working on is pretty guitar-heavy, and the thing with guitars is that they occupy a lot of the same frequency space as voice.
So, we get a lot of clashing, or often find it difficult to set the levels right in the mix. Sometimes to the vocals sound too loud, other times too quiet.
Assuming you’ve got vocals adequately compressed, then the culprit may be conflicting instruments.
<iframe width=”560″ height=”315″ src=”https://www.youtube.com/embed/O5BFoY-jUW8″ title=”YouTube video player” frameborder=”0″ allow=”accelerometer; autoplay; clipboard-write; encrypted-media; gyroscope; picture-in-picture” allowfullscreen></iframe>
To deal with this, we’re going to use what I call the tongue and groove method.
Basically, we’re going to create small and sharp boosts on one instrument, cutting the same frequency on the opposite.
Then, we’ll do the same thing but the other way around with a different frequency.
Note: we’re not just going to be choosing frequencies willy-nilly for this. We want to find areas that are problematic.
A great way that I find to do this is to use the analyzer in our EQ plugins (yes, this is one time when it’s okay to use your eyes).
15. EQ tongue and groove method
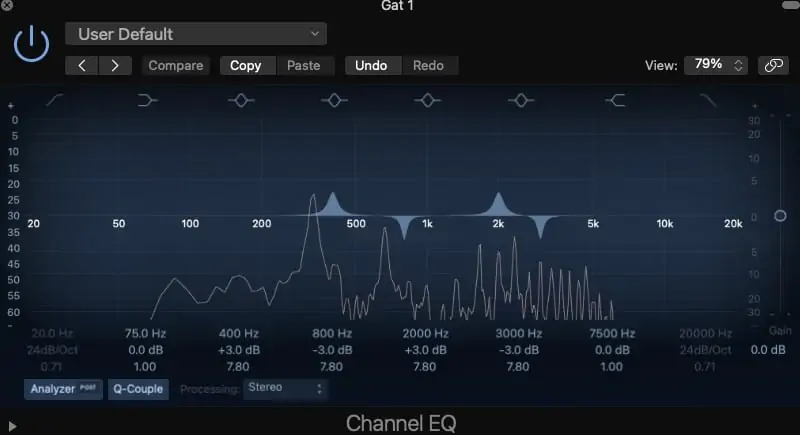
Comparing these two graphs, we can see that the vocals and guitars are competing in a few areas:
- Around 400Hz
- Around 800Hz
- Around 2kHz
- Around 3kHz
So, what we’re gonna do is pretty simple:
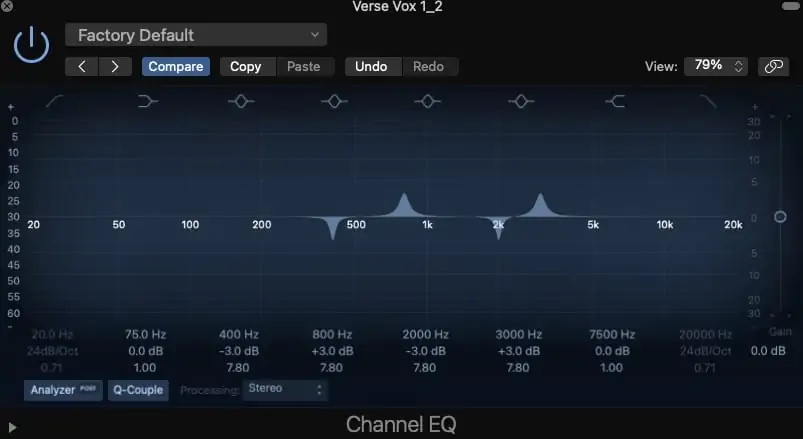
- Cut the vocals at 400Hz and 2kHz
- Boost the vocals at 800Hz and 3kHz
- Cut the guitars at 800Hz and 3kHz
- Boost the guitars at 400Hz and 2kHz
We want to do this fairly subtly, as not to disturb the tonality of the instruments themselves too much.
Our vocal EQ:
16. Vocal EQ tongue and groove method
And the guitars:
17. Guitar EQ tongue and groove method
And now, everything is sitting nice and beautiful together. Awesome.
Conclusion
So, there you have it.
11 fairly simple steps to an epic sounding vocal mix.
Of course, there are a few other things you’ll want to do to get your vocals sound perfect (compression, tuning, reverb), but those are stories for another day.
Until then, remember:
- Don’t fix it in the mix
- EQ with your ears, not your eyes
- Don’t boost when you can cut
And one last rule:
Break the rules if you wanna, as long as it sounds good in the mix!

