I’m sharing with you a comprehensive article guiding introducing you to the blues genre and giving you the tools to play blues guitar.
If you’re a complete beginner guitar player or don’t know much about this genre, this guide is for you. It’s not hard to play and not hard to learn because it both follows a strict formula and gives you a lot of room to jam alone or with your friends.
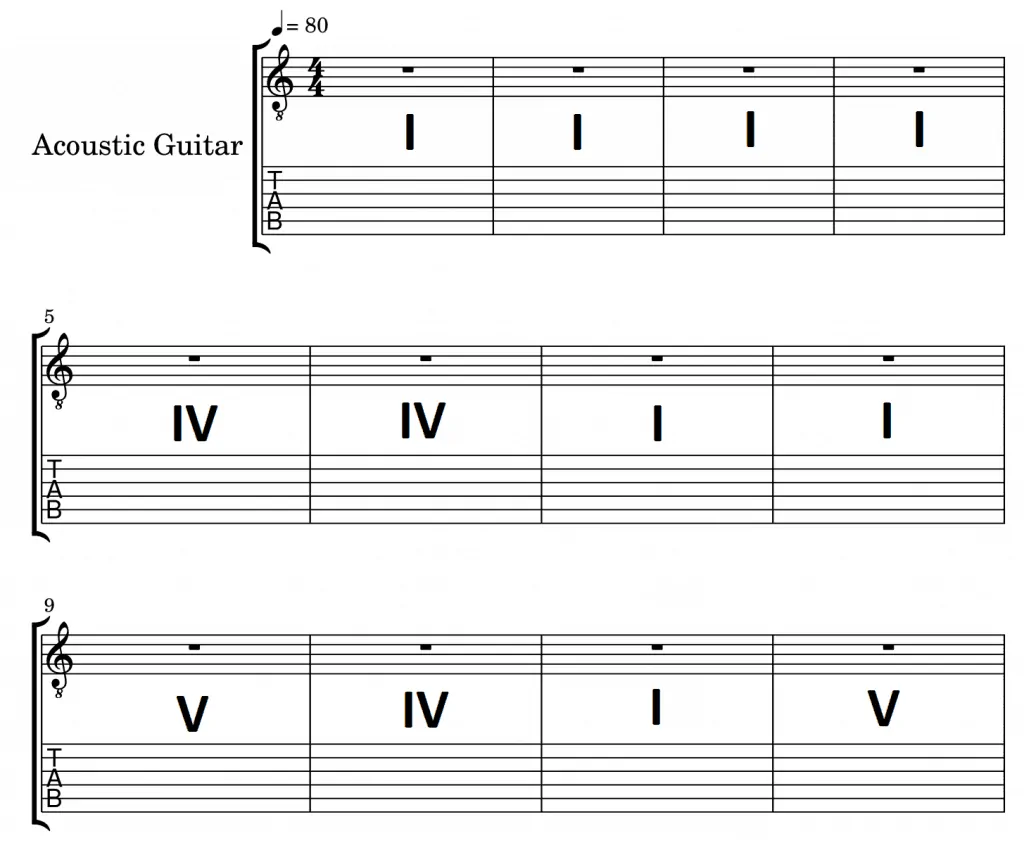
Before we begin, here’s the genre you’re looking at:
That’s a full-on “12-Bars-Blues,” and you’re about to learn all about it.
However, I think let me give you some context:
Contents
A brief history of blues
Blues is the ultimate feel-the-music genre. It deals with personal hardships, adversity, heartbreak, frustration, and a whole ordeal of human emotions translated into lyrics and, first of all, chord progressions, walking bass lines, and leaks.
According to the BBC, African Americans created the blues at the end of the 19th Century. They brought the musical style to America when slavers transported them across the Atlantic Ocean.
Blues are call-and-response songs, where the lead singer does phrases to and is followed by the other singers and baked by rhythmical and formulaic guitar chords.
Blues became popular in the US between 1940 to 1950 with the influence of jazz music. Early jazz musicians include B.B. King, Elmore James, and T-Bone Walker.
Of course beneath the typical blues guitar, even South Park has mocked, there’s a ton of ornaments. However, let’s first learn how the rhythm guitar works, and then maybe you can work it out towards the lead guitar.
Following this guide, you will learn:
- The basic blues formula;
- The 12-bar blues;
- How to play 7th chords for blues guitar;
- How to make it sound like a blues guitar (strumming patterns and more);
- How to play a blues lead guitar.
Blues is a mathematical formula
The bass guitar and the rhythm guitar follows a tight rhythmic section that follows a series of basic formulas.
Standard blues feature either the E or A chord progressions. Remember, if we’re not noting the minor suffix of the note, it means the note is major, and we’re playing on major scales.
Let’s remember the basic Emajor chord:
You can number your left hand’s fingers from 1 to 4 from your thumb, while your strings are numbered from the 6th (which is the deep E string); to the 1rst (which is the thin E string).
If you don’t know how to learn the image above, maybe you can read the following guide detailing the parts of a guitar.
For the moment, let’s remember the string notes, from the 1st string (the thinner one), to the 6th:
e (1st) – B (2nd) – G (third) – D (fourth) – A (fifth) -E (sixth)
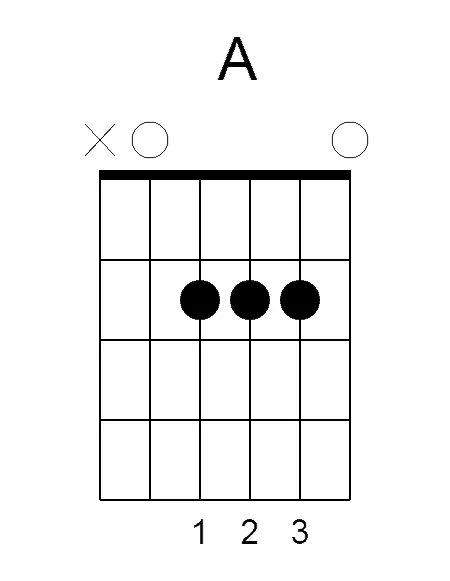
And now, let’s review the A major chord:
You can see more about the E chord here, or more about the A chord here. You’ll be needing this later on…at least open the tabs and keep it as further reference!
The basic blues chord progression follows this rule: I, IV, and V.
The formula refers to playing the I, IV, and V degree-notes of any given scale. In this case, we’re playing on major scales. I give you a refresh on major and minor scales further down bellow.
So let’s dive into it:
How to play the blues rhythm guitar
The rhythm guitar is all about chords, not single lines or licks. Your job is keeping the groove tight and stable. It’s the mantle in which the lead guitar dances.
Playing blues means playing the I, IV, and V chords during the whole song while following the beat. I’ll explain further.
First, take a look at the formula to build any major scale, with any note:
Major scale formula: whole, whole, half, whole, whole, whole, half (2,2,1,2,2,2,1).
WH (whole step and a half / 3 steps on the fret) ; W (whole step / two steps on the fert) ; H (Half a step (1 step on the fret)
The step refers to the distance between one key to the other. A half step is the closest distance. For example, from D# to E, there’s half a step. However, from B to C#, there’s a whole step as well.
As you go up the frets on each string, you go up 1/2 a tone or 1 tone, like this:
E – F – F # – G – G # – A – A # – B – D – D # – C – C # – E
Keep this is mind as we go on this blues guitar lesson.
Emajor blues chord progression for guitar
So, if you’re playing on Emajor, it means the scale is: E (I) – F♯ (II) – G♯ (III) – A (IV) – B (V) – C♯ (VI) – D♯ (VII).
- I: E (tonic chord)
- IV: A (subdominant chord)
- V: B (dominant chord)
You can play the chord pressing three strings with your third finger (by using a bar), or you can use your four fingers to play the chord. Remember not to play the 6th and the 1st strings as they are not part of the chord.
Amajor blues chord progression for guitar
Whereas if you’re playing on A, it means: A(I) – B(II) – C♯(III) – D(IV) – E(V) – F♯(VI) – G♯(VII).
- I: A (tonic chord)
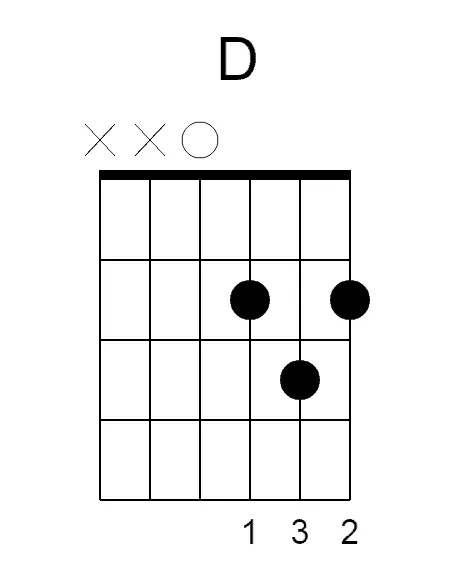
- IV: D (subdominant chord)
- V: E (dominant chord)
You can follow the I, IV, V rule for any key you want, any tonic you choose. However, I strongly recommend you stick with the E and A keys as you learn.
Early blues started in the Mississippi Delta and New Orleans. Because of the weather conditions and the poverty of the musicians, it was tough to keep guitars in tune, let alone play complex chord progressions. This is why blues was invented with standard chords.
Let’s begin playing your first blues, then:
The “12- Bar Blues”
The most common blues pattern is a 12-bars formula with a 4 by 4 time signature. You can read more about time signatures in this guide.
I’m talking about a 12-bar progression we know as the “12-Bar Blues.” A bar is a time measure. In a 4/4 time, a bar is when 4 beats go by. You can count them, of course, but it’s best if you use a metronome.
The blues song repeats a 12-bar cycle with the I-IV-V chord progression until it ends. Typically, it goes through this about 20 times, and it might feature an instrumental medley with some variations, mainly playing the same chords on higher frets while the solo rages on.
Playing the 12-Bars Blues
You can play blues in any key you want. In other words, you can choose your preferred chord or note as your tonic. No matter the key you play, 12-bar blues uses the same sequence of I, IV, and V chords.
You can think of it as three different sections of 4 bars:
- Section 1: 4 bars using the I chord (I-I-I-I);
- Section 2: 4 bars using the IV and the I chords (IV-IV-I-I);
- Section 3: 4 bars using the three chords of the progression (V-IV-I-V).
We’re naming each section a “phrase”. You can think of musical phrases as the sentences of music. It gives the sensation of “beginning to an end,” or the feeling there’s is some hidden punctuation separating different melodic portions of a song.
Notably, in blues, the first section refers to the verse, the second section refers to the bridge, while the third section often becomes the chorus.
How the 12-Bars Blues looks on a bass guitar pentagram (4/4 – Fa Clef).
So, the blues genre has a BPM (beats per minute) ranging from 40 to 100 bpm. Get your metronome (even if its an app) and set the speed you want, because it’s time to begin playing the basic blues rhythm guitar pattern in either the E key or the A key.
If you’re a beginner, you can play semibreve figures. It means you strum the note -downwards- on the first beat of each bar and leave the sound linger until the next beat, when you strum again.
If you feel more confident to play with more complex rhythms, that’s okay, go ahead. We’ll explore strumming patterns and musical figures later on.
12-Bars Blues in the E key. 40 to 100 bpm on a 4/4 time signature:
| Phrase 1 (4 bars) | E (tonic) | E (tonic) | E (tonic) | E (tonic) |
| Phrase 2 (4 bars) | A (subdominant) | A (subdominant) | E (tonic) | E (tonic) |
| Phrase 3 (4 bars) | B (dominant) | A (subdominant) | E (tonic) | B (dominant) |
12-Bars Blues in the A key. 40 to 100 bpm on a 4/4 time signature:
| Phrase 1 (4 bars) | A (tonic) | A (tonic) | A (tonic) | A (tonic) |
| Phrase 2 (4 bars) | D (subdominant) | D (subdominant) | A (tonic) | A (tonic) |
| Phrase 3 (4 bars) | E (dominant) | D (subdominant) | A (tonic) | E (dominant) |
Legendary musicians like B.B. King., John Mayer, and John Lee Hooker use this rather simple progression formula.
Of course, there’re variations of the structure, but here is where you start. Your next step is to learn the “bluesy” chords we know as the “7th” chords.
You can either play only 7th chords or use these alternatives in cadence. A cadence is the final bar of a phrase that sounds slightly different from the previous three bars. The cadence wants to give way to a new section. Consider it as the “hidden punctuation” of music.
You can also improve your rhythmic guitar with slides and hammer-ons and pull-offs as you transition across chords. But that’s for another time.
Let’s instead dive into the 7th chords.
How to play 7th chords for blues guitar
Check the video below for the end result, although it’s a spoiler. And keep reading if you need to understand further.
A blues rhythm guitar typically plays specific chords with a bluesy sound. These are the “7” chords. You’re going to learn the “7” chords for both the E key and the A key progression.
As a beginner guitar player, you’ll come across these chords in many songs, so it’s best if you understand where they come from and how you can use them.
“7” chords will give you the bluesy feeling to keep the groove going.
What are “7” chords?
“7” chords are built with triads, which are chords made of three notes. A triad is the pillar of musical harmony for many genres, which includes blues, jazz, classic rock, hard rock, and reggae.
A seventh chord is a result of combining a triad with an interval of seventh. Triads are intervals of 1st, 3rd, and 5th-degree notes of any given scale.
There’re two kinds of “7” chords:
- Major7 chords (like for example Emajor7)
- Dominant 7 chords (like for example E7)
For instance, let’s look at the C note:
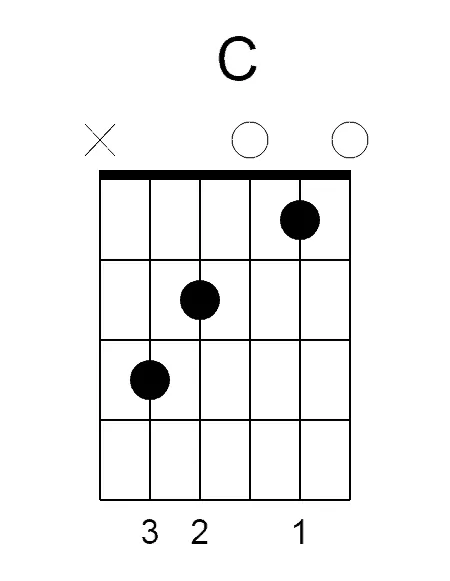
Leaving out the 6th string (E), you’re playing:
MUTED – C (5th string) – E (4th string) – G (3rd string) – c (2nd string) – e (1st string)
It means the triad for Cmajor is C – E – G. Looking at the Cmajor scale (which is a scale that doesn’t require flat or sharp notes), we realise:
C (I) – D (II) – E (III) – F (IV) – G (V) – A (VI) – B (VII) – c (VIII)
The Music Theory portal explains you can form a “major 7” chord by adding the 7th-degree note of the major sale to the triad.
Major scale formula: whole, whole, half, whole, whole, whole, half (2,2,1,2,2,2,1)
For example, a Cmajor7 would need the B note and it look like this:
A dominant 7 chord is the result of combining the major triad with the minor 7th interval. Before we go on, let’s remember the formula for any major and minor scales.
So the Amajor scale would be: A – B – C♯ – D – E – F♯ – G♯ – a. And the major triad includes A – C♯ – E.
As for intervals and degrees, it would look like this (you can read more about it in this keyboard guide)
Intervals:
- Tonic: A
- Major 2nd: B
- Major 3rd: C#
- Perfect 4th: D
- Perfect 5th: E
- Major 6th: F#
- Major 7th: G#
- Perfect 8th: A
Scale Degrees
- Tonic: A
- Supertonic: B
- Mediant: C#
- Subdominant: D
- Dominant: E
- Submediant: F#
- Leading tone: G#
- Octave: A
Amajor7 would include its triad (A – C♯ – E) plus the 7th note (G#):
Strumming from the A string downwards, you would get: A – E – G# – D# – E.
Minor scale formula: whole, half, whole, whole, half, whole, whole (2,1,2,2,1,2,2).
The Am scale goes: A – B – C – D – E – F- G. Its 7th note would be G.
Intervals:
- Tonic: A
- Major 2nd: B
- Minor 3rd: C
- Perfect 4th: D
- Perfect 5th: E
- Minor 6th: F
- Minor 7th: G
- Perfect 8th: A
Scale Degrees
- Tonic: A
- Supertonic: B
- Mediant: C
- Subdominant: D
- Dominant: E
- Submediant: F
- Leading tone: G
- Octave: A
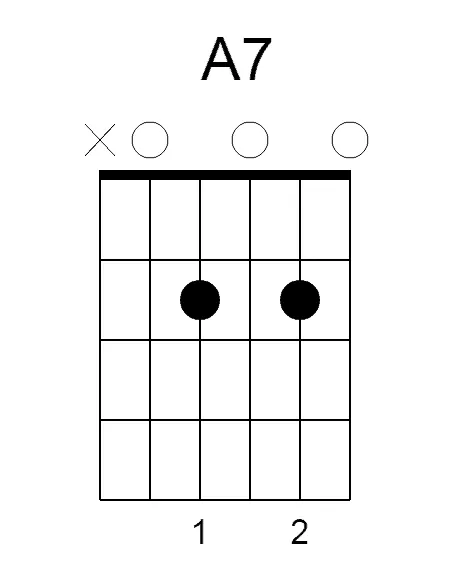
It means A7 would include A – C# – E – G#. Now, the common A7 chord looks like this:
Strumming from the A string downwards, you would get: A – E – G – C# – E.
That’s all you need to know about “7” chords, so let’s move on.
Playing the “7” chords for blues guitar in the E7 key and the A7 key
Let’s start, as usual, with E.
- Tonic: E7
Your second finger goes on the 2nd fret of the 5th string. Your first finger is on the 1st fret of the 3rd string. Your third finger goes on the 2nd fret of the 4th string. And, lastly, your fourth finger pressing the 3rd fret of the 2nd string.
As you can see, it’s almost the same as E with the addition of the fourth finger pressing the D note on the B string. Be sure to play all of the strings.
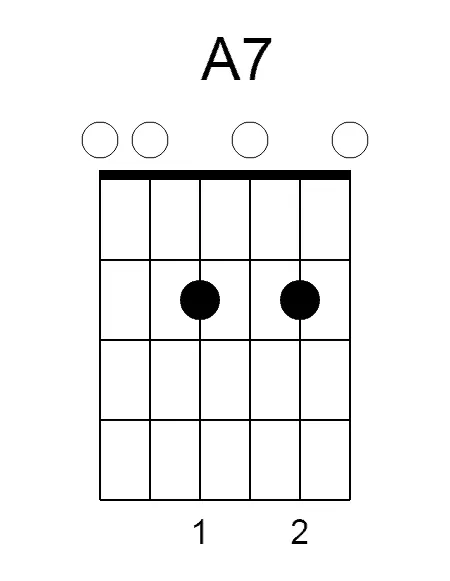
- Subdominant: A7
Your first finger goes on the 2nd fret of the 4th string, while your third finger must press the 2nd fret of the 2nd string. Don’t strum the 6th string, but leave the rest of the notes open.
Playing A7 is even easier than playing A or Am, and it gives a jazzy feeling to your groove. I encourage you to experiment with this note and maybe play with some arpeggios during your practice sessions. But I digress, let’s keep going.
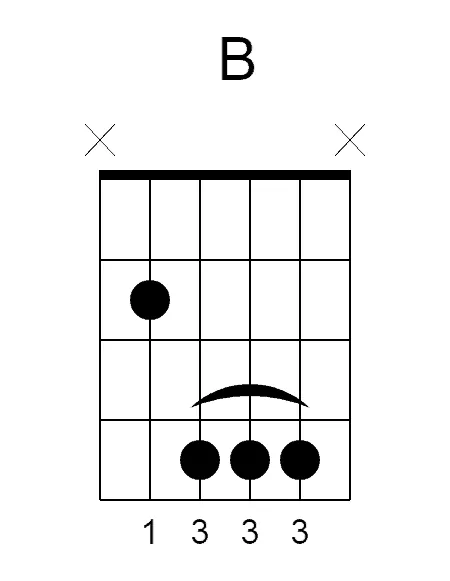
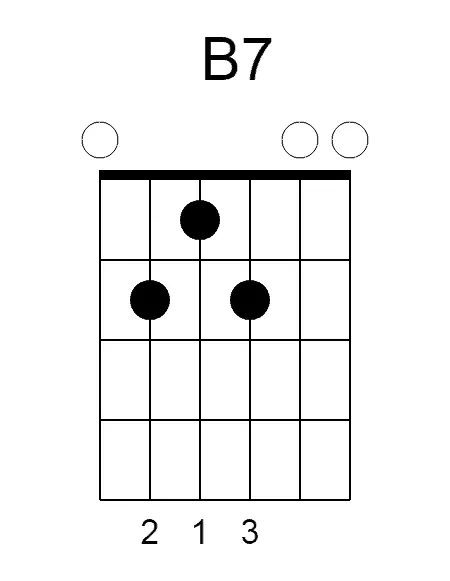
- Dominant: B7
Make a bar with your first finger for the 2nd fret while you stretch your third and fourth finger for the 4th fret. Don’t touch the 6th string.
The B chord tends to be quite hard for beginner guitar players. You would need an intermediate level to play it or, in essence, to play any chord that includes a bar. For other B alternatives, you can check this article.
In the meantime, I can give you an easier way to play the chord:
Your 1st finger on the D string, 1st fret. Your second finger on the A string, 2nd fret. And the third finger on the G string, 3rd fret. Don’t string the 6th and the 1st strings.
For the A7 progression, there’s an extra chord you need to know:
Your second finger on the 3rd string, 2nd fret. Your 1st finger on the 2nd string, 1st fret. And your third finger on the 1st string, 2nd fret.
Now that you know the chords for the 12-Bar-Blues progression in E7 and A7, t’s time to get your metronome and start playing again.
I’ll refresh your mind with the formula and, more so, I encourage you to play the “7” chords in the first and fourth bar of each phrase to create a cadence.
12-Bars Blues in the E7 key. 40 to 100 bpm on a 4/4 time signature:
As I said before, you can play semibreve notes for now or experiment yourself with other rhythms. Either way, I’m about to teach you something better below.
| Phrase 1 (4 bars) | E7 (tonic) | E (tonic) | E (tonic) | E7 (tonic) |
| Phrase 2 (4 bars) | A7 (subdominant) | A (subdominant) | E (tonic) | E7 (tonic) |
| Phrase 3 (4 bars) | B7 (dominant) | A (subdominant) | E (tonic) | B7 (dominant) |
And the A7 key:
12-Bars Blues in the A7 key. 40 to 100 bpm on a 4/4 time signature:
| Phrase 1 (4 bars) | A7 (tonic) | A (tonic) | A (tonic) | A7 (tonic) |
| Phrase 2 (4 bars) | D7 (subdominant) | D (subdominant) | A (tonic) | A7 (tonic) |
| Phrase 3 (4 bars) | E7 (dominant) | D (subdominant) | A (tonic) | E7 (dominant) |
As the rhythm guitar player, you can repeat the progression, and I promise you won’t get bored.
Meanwhile, the bass will walk beneath your guitar, mainly with legato notes and following specific scales that harmonize with your guitar. More often than not, both the bass guitar and the lead guitar use either a major or a minor blues scale, which are very similar to the pentatonic scales. More on that later.
And even though it already sounds great, you need to add some rhythm, some personality to the chords.
So let’s learn some essential strumming patterns to improve your blues guitar skills.
How to make it sound like a blues guitar
Playing blues is all about a tight rhythm and a proven formula.
As we’re going into more complex territory, I advise you to read this guide that may help you significantly improve your guitar skills within a week. In return, your right -or left- hand will be much more skilled to strum the strings.
The 12-bars-Blues must create a build up as it goes through its phrases, so let’s talk about intensity.
As I said before, the first phrase corresponds to the first verse, so it’s typically quieter. The second phrase goes in-crescendo as it’s the bridge building up to the chorus. And, lastly, the third phrase rages in full power for the chores. However, the last bar gives the beat a rest for it to restart.
Now, rhythm is paramount for blues guitar. The easiest strumming pattern to create a steady rhythm is just to strum downwards on each bar in crotchet figures. This one is called a “straight groove.”
| Figure | Time duration |
| Whole note | 4 bars |
| Half not | 2 bars |
| Crotchet | 1 bar |
| 8th note | ½ bar |
| 16th note | ¼ bar |
| 32th note | ⅛ bar |
| 64th note | 1/16 bar |
A “shuffle groove” mixes crotchets and 8th notes for bouncy feeling. For further reference, it’s best if you check the video below, which is a 12-Bar-Blues in Emajor.
Make sure you watch the full video and practice the patterns it shares:
As you can see, shuffle blues patterns plays with the palm muting technique.
Palm muting for blues guitar
Palm muting means damping the strings to create a dynamic rhythm.
In an acoustic guitar, palm muting adds a sense of percussion and pause to your chords. It’s a common and powerful technique in country and blues music, amongs other genres.
On an electric guitar, palm muting makes chords sound grungy and mysterious, which is why it’s often used in rock and metal genres.
To palm mute, you need to place your side of the strumming hand as close to the bridge as possible without completely muting the sound.
The goal is gently resting your hand on top of the 6th, 5th, and 4th strings. You can open the strings by lifting your hand to get a brighter sound. My personal recommendation is that you lift your hand in cadence, which you open the sound just as you’re about to change chords.
Also, you can open the strings if you’re doing any leak in between the chords. You can learn more about this with guitar improvisation skills and by following our guide towards the lead guitar.
Blues Guitar Fills
My favorite part of playing blues is feeling the music and letting it direct what you do. It means you must play around the scales of the song and hit the right emotions whenever the song asks you to.
Adding fills between chords makes it sound likes there’s much more going on than a simple strumming pattern. However, you need to add notes that make sense within the scale.
Now, the blue scale is widespread in modern music, and it’s similar to the pentatonic scales.
The blues scale contains 6 notes, 5 from the pentatonic and one chromatic note. The chromatic merely is going up and down the fret or the piano board to the most adjacent note.
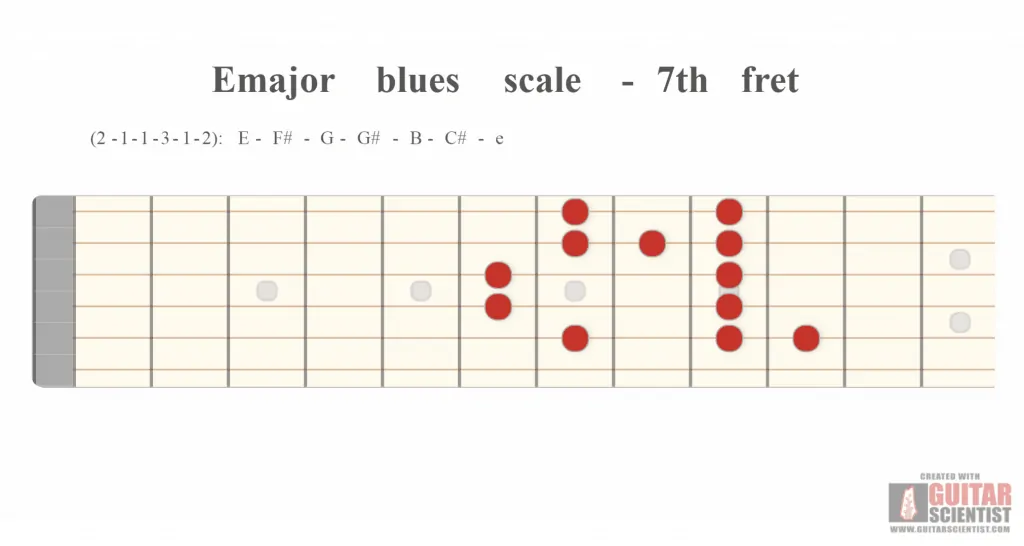
Blues major scale formula: W – H – H – WH – H – W (2-1-1-3-1-2)
Whereas the minor scale, which combines better with “7” chords, goes:
Blues minor scale formula: WH – W – H – H – WH – W (3-2-1-1-3-2).
The best way for me to explain this is to refer you to another video, because mixing fills between chords is all about timing and feeling the music to play the right notes – notes on the scale – at the right time.
For the moment, I’ll leave you a video showcasing further shuffle blues that mixes both the chord progressions and guitar fills.
How to play a blues lead guitar
The lead guitar player’s job is playing single notes to accompany the rest of the band. It could be a leak, a riff, or a solo.
Learning the lead blues guitar is the fun part of it all, and I hope you read the theory above so you have a better idea of what I’ll talk about now.
Let’s practice this on the Emajor blues scale. I advise you to learn the notes below before you continue.
You can use this shape starting from any root. For example, here’s how this scale would look in the key of A:
Just as the fills between chords, you can play notes within the scale of the song as your guitar leak or solo.
Let’s review:
- Lick: a tasty and often cyclical set of notes adorning a phrase;
- Riff: a backing chord progression that gives an extra layer to the rhythm;
- Solo: the guitar’s time to shine.
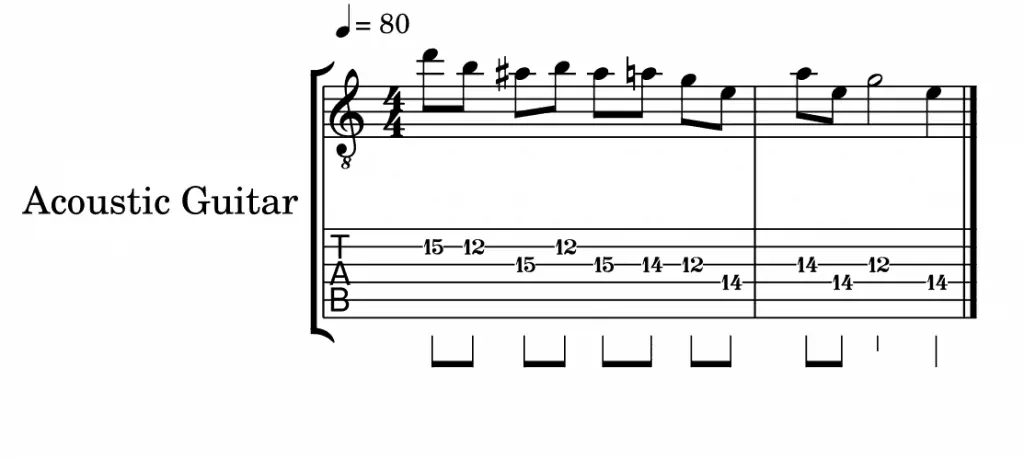
It’s time to learn, and you may begin with a typical blues lick:
A blues lead guitar leak based on the blues Emajor scale.
You can play with it above the backing track below. Try other simple combinations of the scale. Remember, a lick must be smooth, repetitive, and catchy.
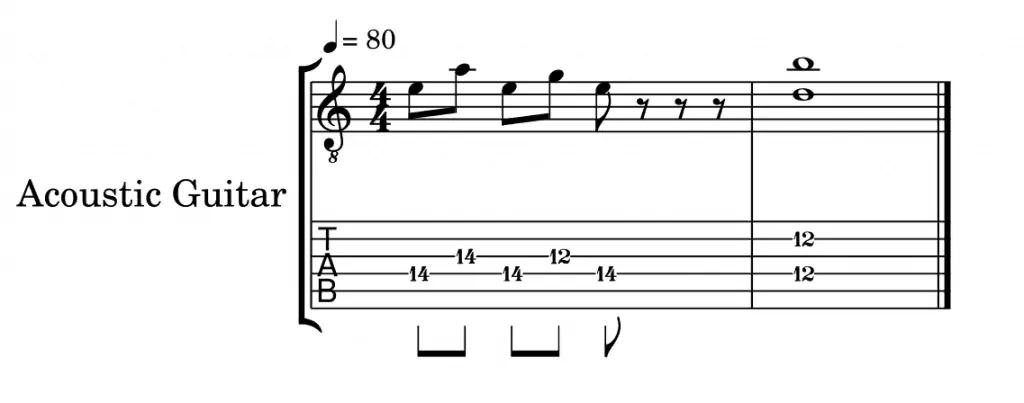
Here’s a riff example which sounds great on a palm-muted electric guitar. It pertains to a classic 12-Bars-Blues riff which you can also practice with the backing track.
A blues lead guitar riff based on the blues Emajor scale.
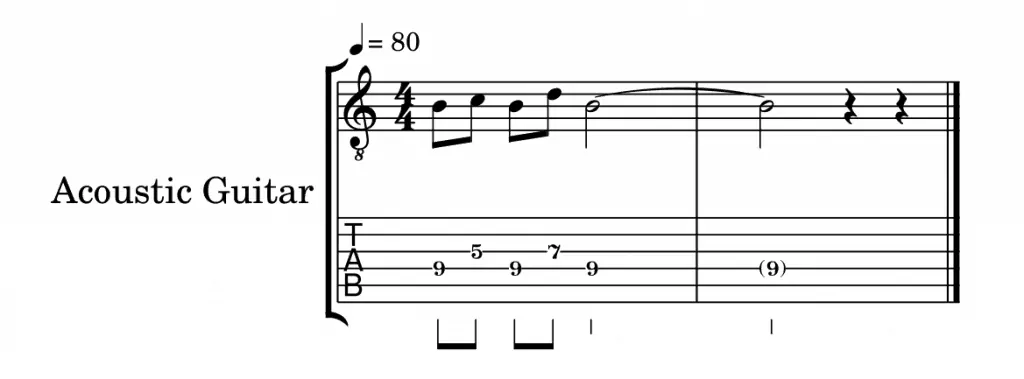
You need to change the riff when the chord progression goes to A (or A7) and B (or B7) like this:
Move the lick to the 7th fret when it goes to A7.
Move the lick to the 9th fret when it goes to B7.
So far, you have learned:
- Where does blues come from;
- How to play the standard 12-Bars Blues with the I, IV, V chord progression;
- How are the “7th” chords for a bluesy sound;
- How can you strum the guitar to make it sound smooth and groovy;
- What are the blues scales;
- How can you add fills between chords;
- And what you can do as a lead blues guitar player.
That’s enough for now.
Final considerations
Don’t overload yourself with music theory and consider all of this as things that have been proven to work. It’s nothing more.
You may always think outside of the box and create your compositions and versions of the songs you like. Here’re 7 songwriting tips that might help you.
The blues genre is more about jamming and feeling the music than following a strict set of rules. Why, you ask? Because the progression feels natural and, as you play through it, the music will guide you to the right places. However, playing a solo on top of it might be another story for you, so be careful there.
If you want to compose your ideas, you can begin playing a small beat either alone or in a band. If you’re alone, you’re going to need some fills to make it sound more interesting.
After you have repeated your progression for a while, give each member of the band -or yourself- some time to jam and improvise. But keep things simple and the rhythm tight. Quality will improve as you practice and get better ideas, so don’t overextend yourself.

