As a beginner guitarist, it’s tempting to pick every single note in a downstroke. But experienced players know that alternate picking is the best way to up your game.
This classic, staccato style picking uses a combination of alternate downstrokes and upstrokes. This way, you can easily play at lightning speed. It’s also more versatile than other styles, like hybrid or economy picking. You can find it in almost any guitar genre –– from metal to surf rock to bluegrass to jazz.
Unlike some other styles, alternate picking sounds equally great on acoustic and electric guitars
Best of all, it isn’t all that difficult to master. All you need is a solid right hand technique and some useful practice exercises to guide you.
Contents
The Basics
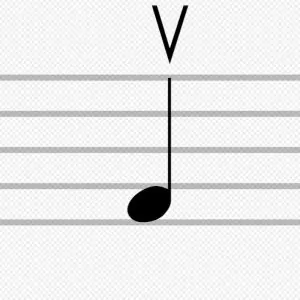
In many guitar tabs, the direction you pick notes is up to you. Other times, you’ll see them marked with symbols. The downstroke symbol looks like a table, while the upstroke symbol looks like a V.
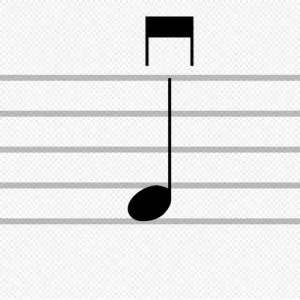
You can recognize the downstroke symbol (left) by its downward opening and the upstroke symbol (right) by its upward opening. It’s the same notation used by other string instruments, like violin and cello (Left: “Musical notation for down bow” by Denelson83 / CC BY-SA 3.0. Right: “Musical notation for up bow” by Denelson83 / CC BY-SA 3.0).
Most alternate picking licks and riffs start with a downstroke. Still, it’s helpful to get comfortable with starting on an upstroke too –– especially for syncopated rhythms.
Types of alternate picking
There are three main types of alternate picking. This includes:
- Double picking: playing a downstroke then an upstroke (or vice versa) on a single string. When you double pick the same note multiple times, it’s also called tremolo picking.
- Outside picking: playing downstrokes on a lower string and upstrokes on a higher string. Your pick should travel from the outside edge of one string to another.
- Inside picking: playing downstrokes on a higher string and upstrokes on a lower string. Your pick should stay in the space between two strings.
This video illustrates the key differences between outside and inside picking.
Most guitarists find outside picking easier, especially when string skipping. This is when you pick one string, then cross over one or more strings to pick another. For example, you might pick your low E (6th) string, then cross over the A (5th) to pick your D (4th) string.
Still, with the proper technique, you can conquer both styles like a pro.
Technique
The left hand technique for alternate picking is similar to other styles. You want to press your fingertips just above the fret, while straightening your wrist and relaxing your shoulder.
The biggest challenge for your left hand will be fretting notes at the exact same time that your right hand picks. Start out with slow, simple exercises. Before you know it, both hands will be moving as one.
The right hand technique, of course, is a bit more complicated than the left. Let’s break it down…
Pick
First things first, it’s important to choose the right type of pick for your style of playing.
For beginners, I’d recommend a standard pick with a slightly rounded tip. Any regular gauge (0.8-1.2 mm) thickness will do. However, if your guitar has medium or heavy gauge strings, you’re better off with a heavy (1.2-1.5 mm) or extra heavy (1.5-2 mm) pick.
Most picks that you find at music stores are standards in either a regular or heavy gauge.
If you’re a jazz or metal guitarist, you might prefer a jazz pick. These types have an extra sharp tip –– perfect for crazy solos.
Grip
If you hold your pick at the wide end, the tip will be floppy and useless. That’s why it’s important to keep your thumb and index just above the point. This way, you gain more control of your picking motion.
When you want to play fast, it seems natural to tense up your hand to control the movement. But ironically, this slows down your alternate picking speed.
Instead, keep a relaxed but steady grip. Not so tight that you bust a tendon. But not so loose that your pick goes flying mid-performance!
Angle
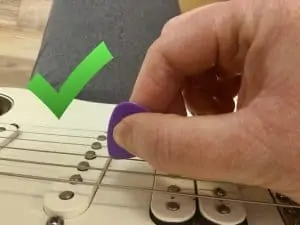
Another common beginner mistake is to hold your pick straight down, with the tip flat against the string. You’re less likely to hit any neighboring strings by accident. But this actually makes it harder to switch quickly from one string to another.
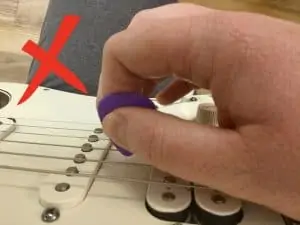
Holding your pick straight (left) also makes you tense your grip. Meanwhile, the angled position (right) helps you relax your hand (Self-taken).
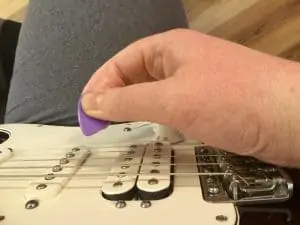
Instead, try holding your pick at a slight angle. The tip should just barely graze the top of the string. Now, imagine it as a pendulum, with the tip swinging back and forth from one side of the string to the other.
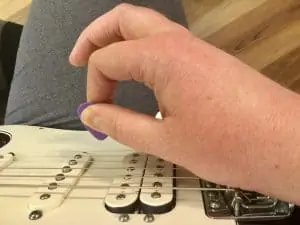
Even on a single string, it might help to over-exaggerate as you alternate between downstrokes (left) and upstrokes (right). Then, you can tighten the movement to speed things up.
The same principle applies to inside and outside picking. Only, you’ll have to swing your pick in a wider arc to hit each string – especially when you skip strings. The higher you swing, the less likely you’ll hit any inside strings by accident.
This pendulum movement will feel weird at first. But it will come more naturally after a few days of practice. Pinky promise!
Hand, wrist and arm
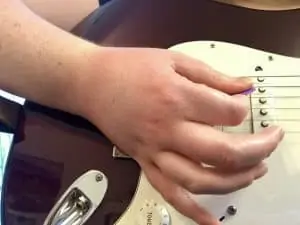
For the perfect pick pendulum, you’ll also need to twist your hand each time. Again, it’s helpful to over-exaggerate at the start until you get used to the movement.

As you flick the tip of the pick down (left), your thumb joint should bend slightly. Your other fingers should swing out, away from your strings. As you flick up (right), your thumb joint should straighten. Your other fingers should swing in, toward your strings.
Ideally, this motion should come from your wrist instead of your elbow. The less unnecessary arm movement you have, the faster (and more efficiently) you can pick. But if you’re having trouble, it’s okay to move your entire arm until you get the hang of it.
For an even steadier hand, try anchoring the heel of your palm against the bridge of your guitar. This will give you the support you need to shred at warp speed.
Speed
Like any guitar skill, accuracy is more important than speed. Focus first on the rhythm of your alternate picking, keeping your downstrokes and upstrokes steady and even. Then, you can think about increasing the tempo.
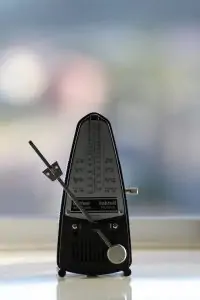
No matter what stage you’re at, it’s a good idea to practice with a metronome. The incessant clicking noise may be annoying. But it’s the best way to keep a constant rhythm.
If you’re a beginner, I’d recommend starting somewhere around 60-80 beats per minute (bpm). Then, you can slowly work your way up to 208 bpm.
Once you’re comfortable playing at a slow speed, you have two options.
- Increase the tempo by 10 bpm and practice until you get it right. Then, increase it by another 10 bpm.
- Overshoot and aim for a 20 bpm increase. Play it through a couple of times. Then, decrease the tempo by 10 bpm.
Some players find that the 2nd option is more effective. Others prefer the 1st. Try both and see which one works best for you.
Additional Tips
Here are some other things to keep in mind when learning to alternate pick:
- Breathe: this is essential. The more relaxed you are, the better you’ll play.
- Alternate each note: focus on adding an upstroke after every single downstroke and vice versa. Once you’re comfortable with the movement, you can think about adding extra downstrokes or upstrokes to make certain licks easier. But for now, keep it constant.
- Record yourself: aim for one short audio file each practice session. Listening to yourself play will help you judge your speed, accuracy and rhythm. This way, you can make adjustments for your next session.
- Listen to the masters: John McLaughlin, Al Di Meola, Paul Gilbert, Steve Morse and John Petrucci are all famous for their killer alternate picking. Listen to their songs for inspiration as you work on your own skills.
John McLaughlin shows off his signature rapid-fire alternate picking in “Lockdown Blues”.
Exercises
Now comes the fun part –– putting alternate picking into action.
For starters, try practicing double and tremolo picking. Then, move on to simple outside and inside licks, with the pentatonic scale as your starting point. Once you’re feeling confident with each alternate picking style, you can start string skipping and covering more complicated scales and arpeggios.
Exercise #1: Chromatic walkup
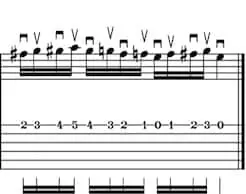
One of the easiest alternate picking exercises (and a favorite among metalheads) is to do a single string walkup to the 12th fret. It involves using your index, middle, ring and pinky finger to walk up four frets at a time. For an extra challenge, you can alternate between four-note walkups and four-note walkdowns.
Try to accent the first beat in every 16th-note grouping. This way you’ll know when to shift your index or pinky to a new position. And don’t forget to maintain a steady down-up rhythm!
On your high E (1st) string, position your index finger on the 1st fret, middle finger on the 2nd fret, ring finger on the 3rd fret and pinky on the 4th fret. Starting with an open string, walk up one fret at a time to the 3rd fret.
In the next beat, walk up one more step to the 4th fret, then down to the 1st fret. Slide your index to the 2nd fret and walk up to the 5th fret. Slide your pinky to the 6th fret and walk down to the 3rd fret. Repeat this motion until you reach the 12th fret with your pinky. Walk down to the 9th fret, then slide your index finger to the 8th fret for your next walk up. Repeat this backward motion to your open E.
These 16th notes are quite fast, so I wouldn’t worry about playing them up to speed just yet. Set your metronome to a low bpm and treat them as quarter or 8th notes first.
Variations:
- Start with an upstroke instead of a downstroke
- Play the exercise on your low E string
- Pick the open E string three times (down, up, down). On the fourth count, play the 1st fret with your index (up). Pick the open string three more times, then play the 2nd fret with your middle finger. Repeat this walkup pattern all the way to the 12th fret. Then, walk up to the 1st fret again
Exercise #2: Tremolo shuffle
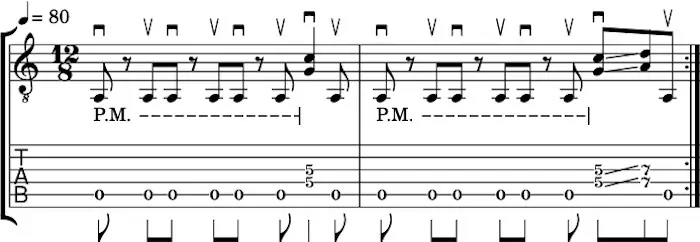
Tremolo picking is a mainstay of blues, surf rock, metal and other genres. For blues shuffles, it sounds especially authentic when you palm mute and add doublestops.
This shuffle consists of an open A tremolo gallop, with a doublestop barre on the D (4th) and G (3rd) strings.
Once you’re comfortable with alternate picking on a single string, move on to two string patterns
Variations:
- Shift the gallop to the low E string and your doublestops to your A and D strings.
Exercise #3: Outside picking
Paul Gilbert’s 1988 Intense Rock video had a big influence on many Gen X guitarists. The video’s alternate picking lick is still popular today as an outside picking drill.
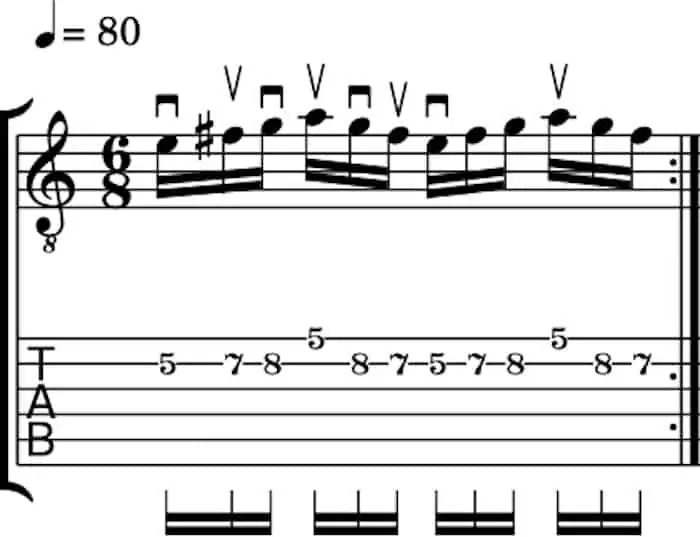
The lick is way easier than it looks. It consists of four notes in two triplet patterns –– the first ascending, the second descending. Once you get into the rhythm, your fingers will flow in a figure 8-type pattern across your B (2nd) and high E (1st) strings.
This variant of the Paul Gilbert exercise starts at the 5th fret. But you can raise or lower it to any position.
Variations:
- Substitute the second note with your middle finger instead of your ring finger
- Start with an upstroke to practice your inside picking
- Shift it to another set of strings (ex: E and A, A and D or D and G)
You can also use this variation of the Paul Gilbert lick to practice outside AND inside picking.
Exercise #4: Inside picking
One of the easiest ways to practice inside picking is to anchor one finger in place on one string, while using the other to walk up your fretboard on an adjacent string. Once your pinky reaches its limit, slide the doublestop up to a new position.
The best way to play this lick is to barre the B and E strings with your index and to fret the E string notes with your other fingers.
Variations:
- Play the B string upstroke before the high E downstroke
- Start on an upstroke to practice your outside picking
- Try it on another set of strings (ex: D and G)
Exercise #5: Arpeggio freestyle
It’s harder to play arpeggios with alternate picking than with other types. Still, virtuosos like Steve Morse prove that you can arpeggiate a single chord with rapid up- and downstrokes across different strings.
To start off, you might want to stick to basic three-string chords, like D, A and E. Experiment with different note sequences and combinations of up- and downstrokes. Add open strings for a bit of flavor. Then, move on to the other open chords. Finish off with some barre chords for good measure.
Arpeggios are one of those instances where you might find it easier to add extra down- or upstrokes. This way, you won’t interrupt the flow of notes across your strings.
For this arpeggio riff, I found it easier to add an extra downstroke when switching between the Am and E7 (Created using Flat).
Exercise #6: Spider exercises
Spider exercises are another prime example of alternate picking. They involve a combination of walkups and walkdowns across your strings and up and down your fretboard. By mixing horizontal and vertical movements, spider exercises are all-around workouts for both your left and rights hands.
You can find hundreds of different spider exercises online. Some involve a simple 1-2-3-4 walkup on all six strings. Others include string skipping. Some even mix up the 1-2-3-4 order.
This intermediate spider exercise uses a 2-4-1-3 pattern with a single string skip. Once you’ve finished, you can shift up to the next position. Play the 6th fret of the low E string, then the 8th fret of the D string, and so on.
Variations:
- In his book Rock Discipline, John Petrucci demonstrates two of his favourite advanced spider exercises
Exercise #7: Pentatonic scale runs
Aside from the chromatic scale, the pentatonic scale is the best scale to use when practicing alternate picking. Because it only has two notes per string, it creates a comfortable down-up picking pattern, where you change strings on each downstroke.
For an extra challenge, try switching strings on each upstroke instead.
Test your upstroke skills with this B minor pentatonic run.
The pentatonic scale is an essential tool for any lead guitar player. Once you’ve mastered alternate picking runs, try adding string skips, hammer-ons, pull-offs, slides, bends and other techniques. Who knows? You may discover the perfect solo!
Variations:
- Switch to another pentatonic shape
- Alternate strings (ex: 7 on low E, 9 on A, 10 on low E, 7 on A, etc.)
- Alternate between walkups and walkdowns (ex: 7 -10 on Low E, 9 on A, back to 10 on Low E, 7-9 on A, 7 on D, back to 9 on A, etc.)
Exercise #8: Other scale runs
Once you’ve mastered alternate picking over a pentatonic pattern, you can shake things up with more complex scales.
With an uneven number of notes per string, it may be more difficult to adapt non-pentatonic patterns to 16th notes in 4/4 time. However, you can even things out by…
- Playing triplets
- Switching to 3/4 or 6/8 time
- Repeating notes
- Adding legatos
To keep it simple on three-note strings, it’s best to start your walkups on a downstroke and walkdowns on an upstroke. Keep a steady rhythm by accenting the first note in every 16th-note group.
Once you get more comfortable with the pattern, you can experiment with syncopation.
Based on the A Dorian scale, this exercise has a triplet feel, with three ascending notes followed by three descending notes. Still, the extra root notes (5th fret of low E) and octaves (7th fret of D) help it fit comfortably in 4/4 time.
Like the pentatonic scale, you can use your alternate picking skills on the Dorian scale (and others) to inspire your solos and licks!
Variations:
- Start with an upstroke instead of a downstroke
- Adapt the pattern to the A Major scale, A Blues scale, etc.
Final Thoughts
Alternate picking may not get as much street cred as its flashier sweep and economy cousins. But it’s a practical alternative that can help you play anything from a basic blues shuffle to a 9-minute metal solo.
With the right technique points and practice exercises to guide you, you can adapt it to your own playing style. Before you know it, you’ll be shredding like the pros!


