You’ve likely heard of the various kinds of seventh chords you can play on the guitar, but what exactly makes a ninth chord different? As you read on, we’ll be diving deeper into the C9 guitar chord, and its composition, and revealing how we can play it right away! Let’s dive in!
Contents
How to Play the C9 Chord
Cutting straight to the topic at hand, let’s go over how to play the C9 chord on the guitar. As you’ll notice, we’ll be covering only six variations of this chord, as there are many other ways of playing it. It’s useful to know of different chord variations, given that you may prefer to use one variation over another under different circumstances. These conditions can include difficulty, playability within a chord progression, tonal qualities, or personal preference, as we all have our favorite chords!
Without further ado, let’s take a look at each of these chord charts for the C9 chord:
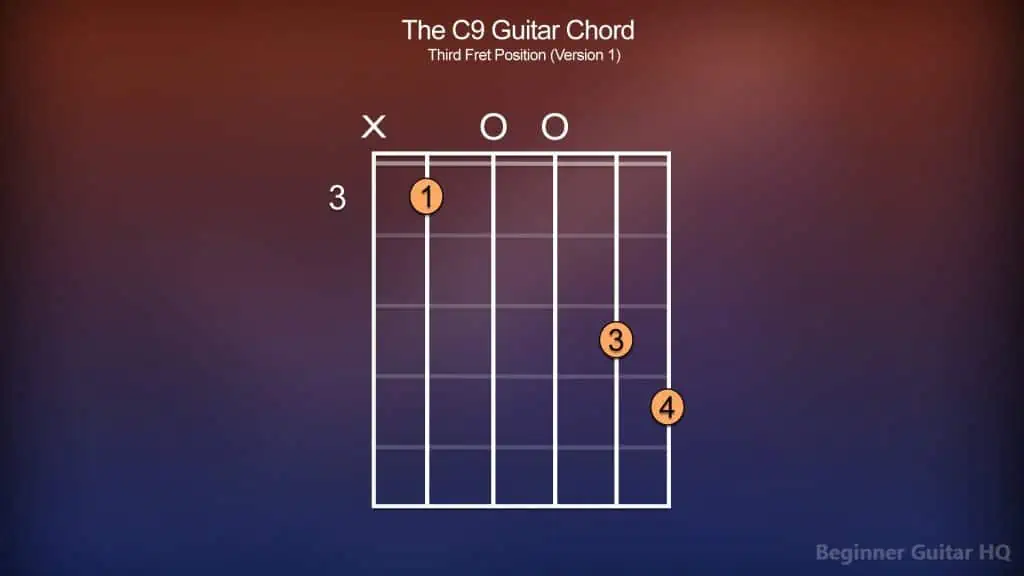
Chord chart of the C9 chord, being played from the third fret position. Version 1.
For the first chord, we’ll be playing from the third fret position. You can tell that it starts from the third fret, as the number to the left shows the number “3”, and that’s where are placing our first finger. However, it’s important to note that this chord contains open notes as well. As you can see above the D and G strings, they’re marked with an “O”, indicating an open note. An “X” on the other hand, indicates a muted string (a string we don’t play).
Moving on, we’ll take our index finger (1), and position it over the third fret of the A string. Next, we’ll be skipping over the D and G strings, leaving them open. Following that, we’ll take our ring finger (3), and place it over the fifth fret of the B string. Lastly, with our pinky finger (4), we’ll place it on the sixth fret of the high E string. The low E string, however, remains muted.
From the A string to the high E string, we can now give our guitar a strum. Our first variation is complete!
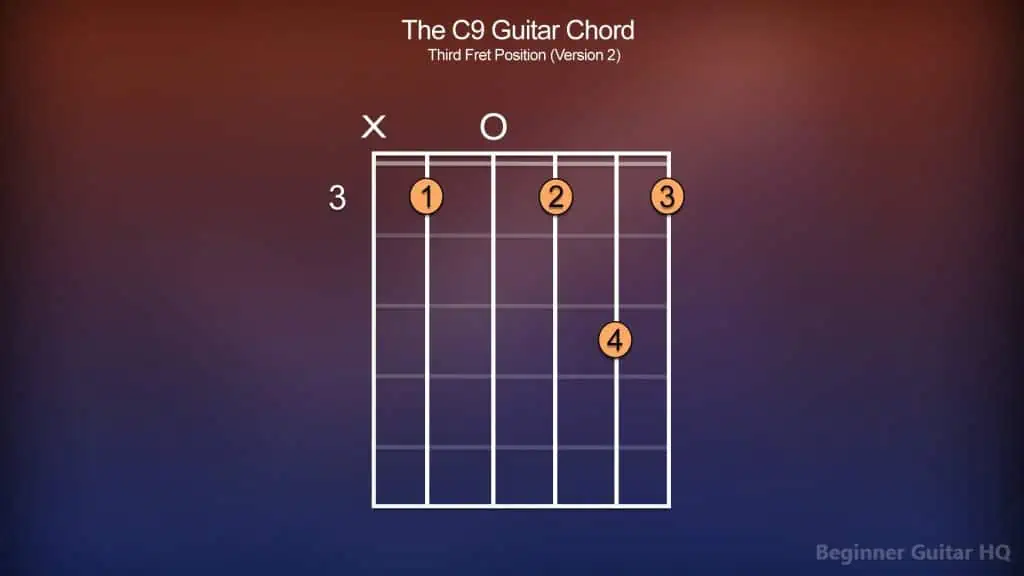
Chord chart of the C9 chord, being played from the third fret position. Version 2.
This chord variation, much like the last one, starts on the third fret, however, the finger positions are very different!
To kick things off, we’ll take our index finger (1), and place it over the third fret of the A string. Next, we’ll be skipping over the D string, leaving it open. Following that, our middle finger (2), will go on the third fret of the G string. Now, taking our pinky finger (4), we’ll place it over the fifth fret of the B string. Finally, with our ring finger (3), we’ll position it over the third fret of the high E string. Once again, the low E string remains muted.
From the A string to the high E string, let’s give the guitar a strum! Our second variation is now complete.
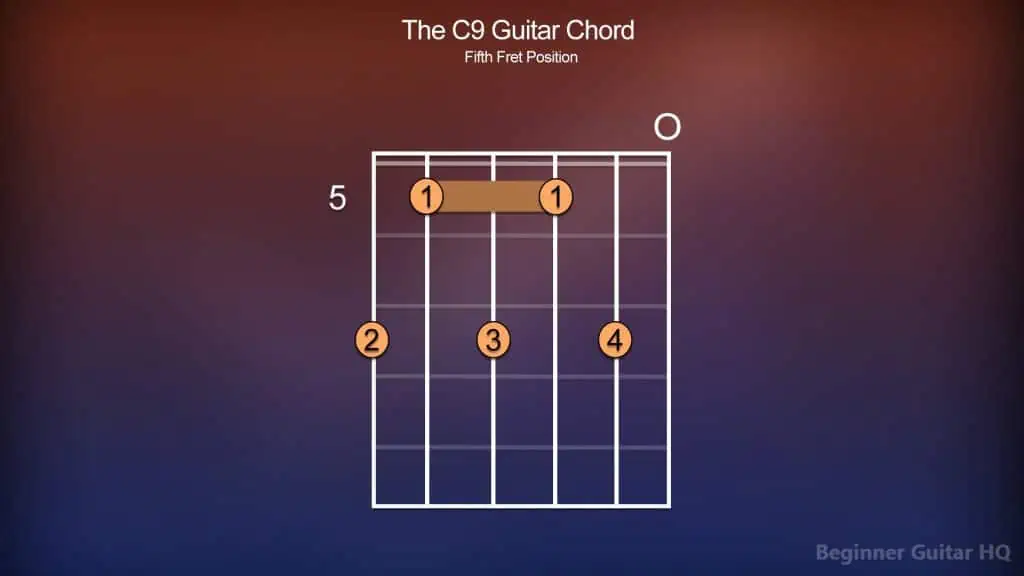
Chord chart of the C9 chord, being played from the fifth fret position.
For this variation, we’ll be starting from the fifth fret position. To start this chord off, we’ll be forming a partial barre with our index finger (1), over the fifth fret of the A, D, and G strings. To achieve this, simply drape your index finger over the grouping of strings, and apply pressure. Following that, we’ll take our middle finger (2), and place it over the seventh fret of the low E string. Next, we’ll take our ring finger (3), and position it over the seventh fret of the D string. To conclude this variation, we’ll now take our pinky finger (4) and place it on the seventh fret of the B string. We’ll leave the high E string open.
From the low E string to the high E string, we’ll give the guitar a nice strum. Our third variation is complete!
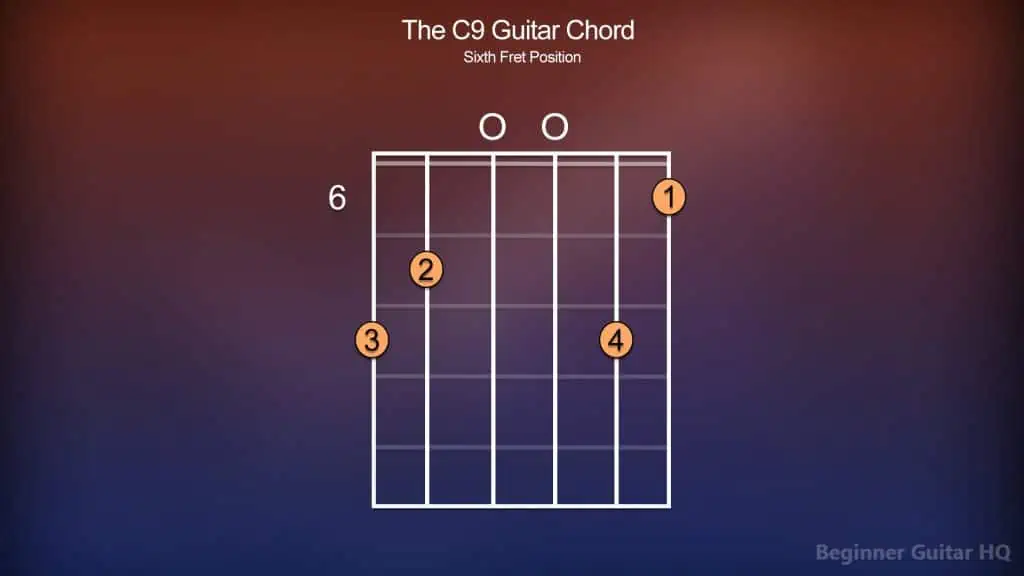
Chord chart of the C9 chord, being played from the sixth fret position.
This variation will begin from the sixth fret position. To make forming this chord a little easier, we’ll start with the low E string.
With our ring finger (3), we’ll place it over the eighth fret of the low E string. Next, with our middle finger (2), we’ll position it over the seventh fret of the A string. Now, we’ll be skipping over the D and G strings, leaving them both open. With our pinky finger (4), we’ll place it over the eighth fret of the B string. Lastly, with our index finger (1), we’ll put it on the sixth fret of the high E string.
From the low E string to the high E string, we can give our guitar a strum. This completes our fourth variation.
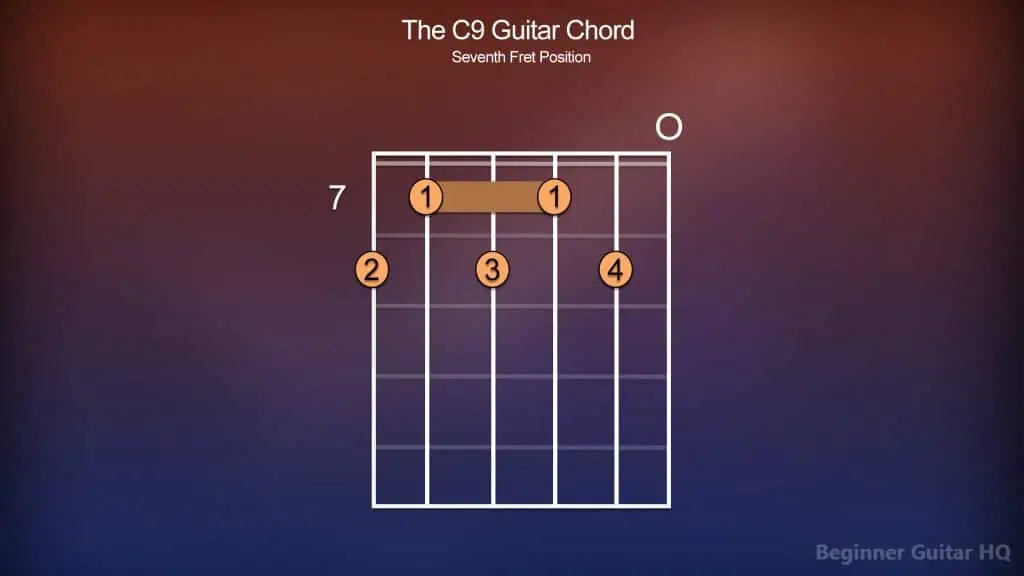
Chord chart of the C9 chord, being played from the seventh fret position.
Next up, we have our C9 chord, played from the seventh fret position. Let’s begin by taking our index finger (1), and forming a partial barre over the seventh fret of the A, D, and G strings. Following that, we can take our middle finger (2), and place it over the eighth fret of the low E string. Next, taking our ring finger (3), we can place it over the eighth fret of the D string. Finally, with our pinky finger (4), we’ll position it over the eighth fret of the B string. We can leave the high E string open.
Now, from the low E string to the high E string, strum the guitar. We’ve finished the fifth variation!
Chord chart of the C9 chord, being played from the eighth fret position.
For our sixth and final variation we’re covering, this might feel a little awkward. For this, we’ll be starting from the eighth fret position.
First, we’ll take our index finger (1), and place it over the eighth fret of the low E string. Following that, taking our ring finger (3), we’ll put it on the tenth fret of the A string. Next, we’ll be skipping the D string, leaving it open. Now, taking our middle finger (2), we’ll place it over the ninth fret of the G string. To conclude our chord, we can now place our pinky finger (4) on the eleventh fret of the B string. The high E string remains open.
From the low E string to the high E string, we can give the guitar a strum. We’ve finished the sixth variation.
Breaking Down the C9 Chord
The dominant ninth chord is simply an extension of a dominant seventh chord, commonly found in Jazz and Blues music. However, with the additional note, you’ll find that it saturates that jazzy aesthetic a little more.
So how do we better understand the C9 chord? A good starting point is to uncover the key, scale, triad, and intervals forming the foundation of our chord.
Let’s start by talking about the key of C Major. Our key is essentially a grouping of notes, that is no different than you would find in its corresponding scale. However, the notes within a key are defined by the key’s key signature. If you’ve ever seen a piece of sheet music, you’ve probably seen this appear after the clef as a grouping of sharps (#) or flats (b). When a note is marked sharp, then it’s raised by a semitone. However, when a note’s marked flat, it’s lowered by a semitone. To better understand our key signatures, it’s highly recommended to refer to the circle of fifths.
To simplify things, however, we’ll reveal that the key of C Major contains no sharps and no flats. Now, we can put together our C Major Scale:
C > D > E > F > G > A > B > C
Within our scales, each note plays an important part. We often refer to these individual notes as the different scale degrees. Each degree, 1 – 7 has a unique name, helping musicians refer to them more easily. Within our C Major scale, here are how the different degrees appear:
C = Tonic (1st Degree)
D = Supertonic (2nd Degree)
E = Mediant (3rd Degree)
F = Subdominant (4th Degree)
G = Dominant (5th Degree)
A = Submediant (6th Degree)
B = Leading Tone (7th Degree)
C = Tonic (1st Degree/Octave)
We’ll cover these degrees in more depth later, however, they are important to know for building triads. A triad is a type of chord, containing three notes which are played simultaneously. A Major triad, in particular, consists of the tonic, mediant, and dominant degrees (1st, 3rd, and 5th degrees) being stacked on top of each other. Within the C Major scale, this gives us the notes: C, E, and G.
However, what makes a C dominant ninth chord (C9) different than a standard triad, is the inclusion of a flatted 7th degree, as well as an interval of a ninth stacked on top. Therefore, the notes within our chord are C, E, G, Bb, and D.
Here are the different intervals that form the foundation of our C9 chord from the tonic note:
- Major 3rd – Between the first and third notes. C > E.
- Perfect 5th – Between the first and fifth notes. C > G.
- Minor 7th – Between the first and seventh notes. C > Bb.
- Major 9th – Between the first and ninth notes. C > D.
Now, of course, our scale only consists of seven notes, landing on the root note again, the tonic. However, when it goes around once more, these intervals can expand to something greater, like our Major 9th interval. In any case, understanding the intervals within a chord can help you identify the type of chord without needing to hear it!
Making Chord Progressions
We know that dominant ninth chords are used in Blues and Jazz music, however, there are a few popular hits outside those domains that use our C9 chord as well! For instance, “Billy Joel’s – It’s Still Rock N’ Roll To Me” incorporates the use of a C9.
However, there are a few different methods you might choose for creating your own chord progression. To keep things simple, we’ll be discovering chords compatible with the key of C Major. In order to do so, we’ll need to use what we’ve learned about triads, forming a triad on each degree of the C Major scale:
C Major = C, E, G (Tonic/1st Degree)
D minor = D, F, A (Supertonic/2nd Degree)
E minor = E, G, B (Mediant/3rd Degree)
F Major = F, A, C (Subdominant/4th Degree)
G Major = G, B, D (Dominant/5th Degree)
A minor = A, C, E (Submediant/6th Degree)
B diminished = B, D, F (Leading Tone/7th Degree)
This method shows you all of the chords that work in the key of C Major. In fact, having a general understanding of the scale degrees can assist you with building your own progression. Let’s briefly run through each scale degree:
- Tonic – This is our root, our home, providing a sense of calm and resolution. In our key, this would be the C Major triad.
- Supertonic – This degree acts as a “predominant degree” holding some tension. You’ll find that it shares two notes with our subdominant triad (F Major Triad), the notes F and A.
- Mediant – Our mediant typically acts to draw our tonic out further, as you’ll see the triads share the two notes, E and G.
- Subdominant – A degree withholding some mild tension, which typically shifts to one of greater tension.
- Dominant – Our most important degree, next to the tonic. This degree is typically the climax, the peak of our tension. Naturally, this will want to resolve home to our tonic.
- Submediant – Acts as a predominant degree, sharing two notes with our tonic triad (C Major), C and E, and our subdominant triad (F Major), A and C.
- Leading Tone – A degree of great tension, being right beneath the tonic. This degree is also important for building our seventh chords, as well as an important piece of our ninth chords.
After our leading tone, you fall back on the tonic, just an octave higher from where you began!
While it’s great to know the various scale degrees and how they function within a chord progression, it might leave you feeling stuck as to where to start! This is where it might help to study some chord progressions of your favorite songs or to simply use some tried and true structures for building your own progression. Here are a few you might look to try!
I – IV – V
The one-four-five chord progression is one of the most commonly used chord progressions in music. This progression involves starting from the tonic, C Major. Things feel relatively calm, before shifting to slight tension, the subdominant, F Major. Next, we’ll be shifting to the peak of our tension in our chord progression, the dominant, G Major. Naturally, from here we’ll want to resolve our chord progression, therefore, we’ll return home to our tonic, C Major.
Chord Progression: Cmaj > Fmaj > Gmaj
I – vi – IV – V
This chord progression involves four chords, unlike the aforementioned one. For this one, we’ll once again be starting from our tonic, C Major. Moving forward, we’ll be shifting to our submediant, A Minor. This chord shares two notes with our tonic, and our subdominant, creating an excellent bridge to greater tension. Now, we’ll shift to our subdominant, F Major, adding further tension. Shifting to greater tension, we’ll move to the dominant, G Major. Lastly, we’ll shift to the tonic, providing a sense of resolve.
Chord Progression: Cmaj > Amin > Fmaj > Gmaj
I – V – vi – IV
The one-five-six-four chord progression is used widely across several genres of music. An excellent example of a song that uses this structure is “Journey’s – Don’t Stop Believing”, following a G > D > Em > C progression.
To get started with this progression, we’ll begin with the tonic, C Major. Next, we’ll be jumping to great tension, landing on the dominant, G Major. Easing the tension off a little, we’ll shift to our submediant, A minor. Next, we’ll shift to our subdominant, F Major, containing some slight tension, before resolving home to our tonic C Major.
Chord Progression: Cmaj > Gmaj > Amin > Fmaj
Incorporating the C9 Chord
These chords can be inserted just about anywhere you would insert a dominant seventh chord in your chord progressions. Typically you’ll notice chords like this be inserted into the points of greatest, tension, like our dominant, and leading tone degrees. However, sometimes these chords may be inserted into degrees of lesser tension, such as our supertonic, and subdominant degrees.
Exploring Other Ninth Chords
We’ve covered quite a bit about how to play the C9 chord, and how we put it together. However, what lies beyond that are other kinds of ninth chords you might wish to explore and add to your chord repertoire. Here we’ll be covering a couple of ninth chords, played in a single variation:
Cmaj9 – We may also call this chord, the “C major ninth” chord. This chord contains the intervals: major 3rd, perfect 5th, major 7th, and a major 9th from the tonic. We’ll find the collection of notes: C, E, G, B, and D within this chord.
To kick things off, let’s place our middle finger (2), over the third fret of the A string. Next, taking our index finger (1), we’ll position it over the second fret of the D string. Our pinky finger (4), will now go over the fourth fret of the G string. Finally, our ring finger (3) can be placed on the third fret of the B string. We’ll leave the low E and high E strings open. From the low E string to the high E string, let’s strum the guitar.
Cm9 – Otherwise known as the “C minor ninth” chord, contains intervals of a minor 3rd, perfect 5th, minor seventh, and a major ninth from the tonic. This gives us the collection of notes: C, Eb, G, Bb, and D forming our Cm9 chord.
To start this chord off, let’s take our index finger (1), and place it over the third fret of the A string. We’ll be skipping over the D string, leaving it open. Next, we’ll take our middle finger (2), and place it over the third fret of the G string. Following that, we’ll take our ring finger (3), and place it on the third fret of the high E string. To conclude our chord, we’ll now take our pinky finger (4), and place it on the fourth fret of the B string. We can leave the low E string muted. Now, let’s give our chord a strum from the A string to the high E string.
Cmin/maj9 – This chord is also known as the “C minor major ninth” chord. This chord contains intervals of a minor 3rd, perfect 5th, major 7th, and a major 9th. This gives us the grouping of notes: C, Eb, G, B, and D, forming the foundation of our Cmin/maj9 chord.
To begin playing this chord, we’ll be taking our index finger (1), and placing it over the third fret of the A string. Next, we’ll be skipping over the D string, leaving it open. Following that, We’ll be forming a partial barre with our ring finger (3), covering the fourth fret of the G and B strings. Lastly, we’ll take our middle finger (2), and place it on the third fret of the high E string. We will leave the low E string muted. From the A string to the high E string, we can give our guitar a strum.
Conclusion
That’s all there is to it when it comes to our dominant ninth chords! As you can see, they aren’t overly complicated, especially if you have prior experience with playing seventh chords. If you wish to take things even further, you might even choose to learn eleventh chords, or perhaps look into “major or minor add 9” chords. Expanding on chords can be a really useful way of broadening your horizons to all of the colors and harmonies that can be achieved on the guitar. With your newly learned 9th chords, where will your practice sessions take you? Keep on rockin’.

