Learning diminished guitar chords can be a very fun and effective way of broadening your horizons, improving your finger strength, muscle memory, fretboard knowledge, and the list goes on! The Cdim guitar chord is a nice and challenging chord that can work as an excellent segway into other diminished, or augmented guitar chords. As you read on, we’ll cover how to play the Cdim chord, and uncover some music theory behind it, allowing you to understand how it works. Let’s dive in!
Contents
How to Play the Cdim Chord
Let’s get right to the main point: how do we play the Cdim chord on the guitar? Well, the Cdim chord, like many other chords on the guitar, has several variations to choose from. Each variation offers you something different, between the difficulty, tonal differences, fingering, position… etc. Today, we’ll be walking you through five of these:
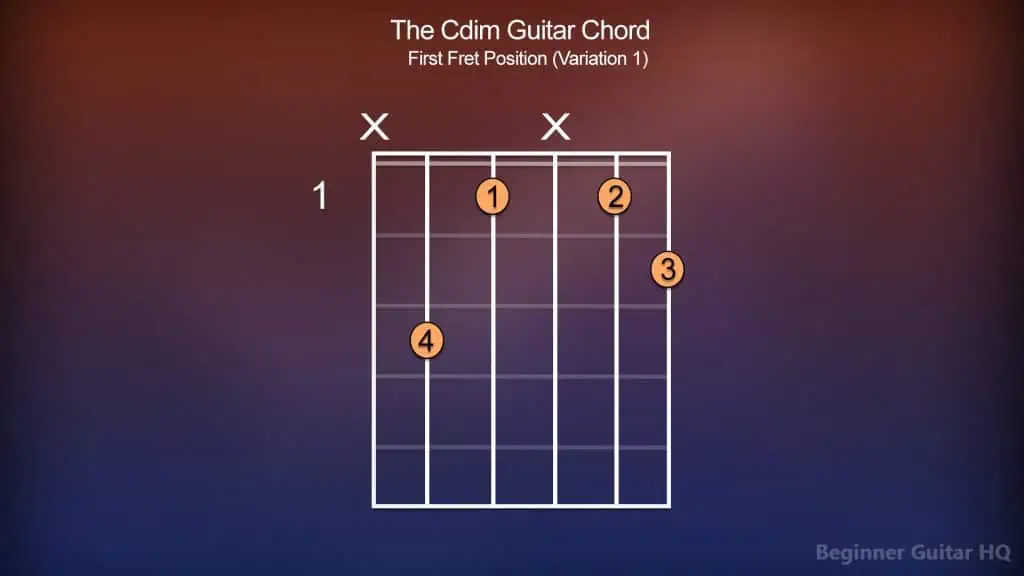
Chord chart of the Cdim guitar chord played from the first fret, variation one.
For our first variation, we’ll begin from the first fret position. We can tell it’s from the first fret, given the number “1” off to the left side of our chord chart. It also helps to see that above our low E, and G strings we have an “X” marker, indicating muted strings. In fact, had those been replaced with “O” markers, indicating open notes, this chord would instead be from the open note position.
Without further ado, to begin forming our chord, we’ll take our index finger (1), and place it over the first fret of the D string. We’ll now skip over our G string, as it contains the “X” marker above, indicating that it’s muted (not to be played). In fact, it can help to slightly angle your index finger, that’s on the D string downwards over the G string to mute it. Next, we’ll place our middle finger (2) over the first fret of the B string. Taking our ring finger (3), we’ll place it on the second fret of the high E string. Finally, with our pinky finger (4), we’ll place it on the third fret of the A string.
From the A string to the high E string, let’s give the chord a nice strum! We’ve successfully completed our first variation!
Chord chart of the Cdim guitar chord played from the second fret, variation two.
For our second variation, we’ll be starting from the second fret. We’ll begin by placing our index finger (1) on the second fret of the high E string. Next, taking our pinky finger (4), we’ll place it over the fourth fret of the B string. We’ll skip over the G string, leaving it muted. Following that, we’ll take our ring finger (3), placing it over the fourth fret of the D string. Finally, we’ll take our middle finger (2), and put it over the third fret of the A string.
From the A string to the high E string, give the guitar a nice strum! There’s your second variation!
If placing your fingers on the fretboard in this sequence feels too awkward, you may even change the order, as long as it feels comfortable! For instance, you may decide to start with your middle finger on the A string, then slot your index on the high E, then worry about your ring and pinky fingers after.
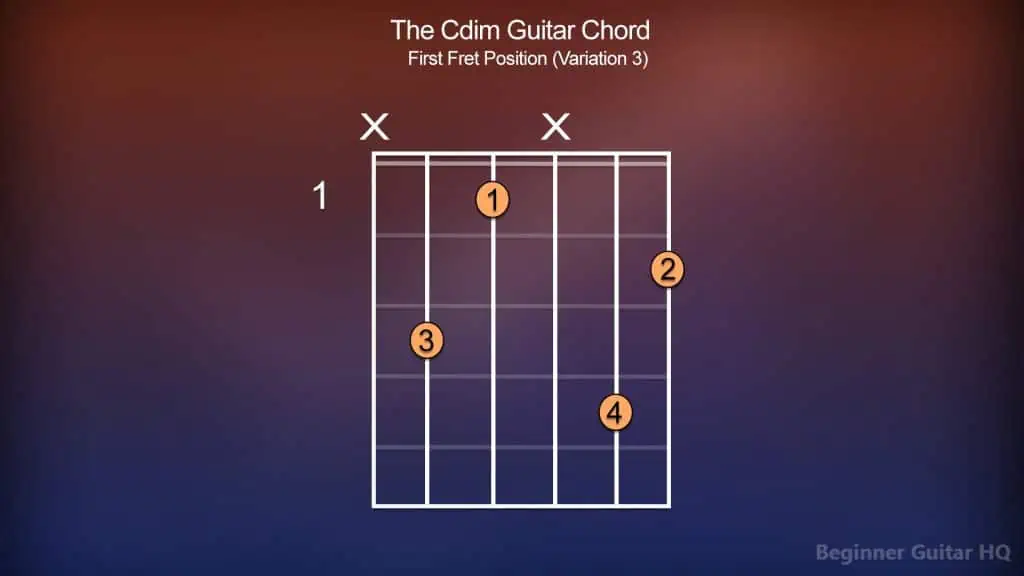
Chord chart of the Cdim guitar chord played from the first fret, variation three.
For our third variation, we’ll be starting from the first fret again, however, this time the fingering is a little different! First, taking our index finger (1), we’ll place it over the D string on the first fret. Next, we’ll take our middle finger (2), and place it on the second fret of the high E string. With our ring finger (3), we’ll position it over the third fret of the A string. Finally, taking our pinky finger (4), we’ll place it over the fourth fret of the B string. We’ll skip over the low E, and G strings, leaving them muted.
From the A string to the high E string, giving the guitar a nice strum, we’ve successfully completed our third variation.
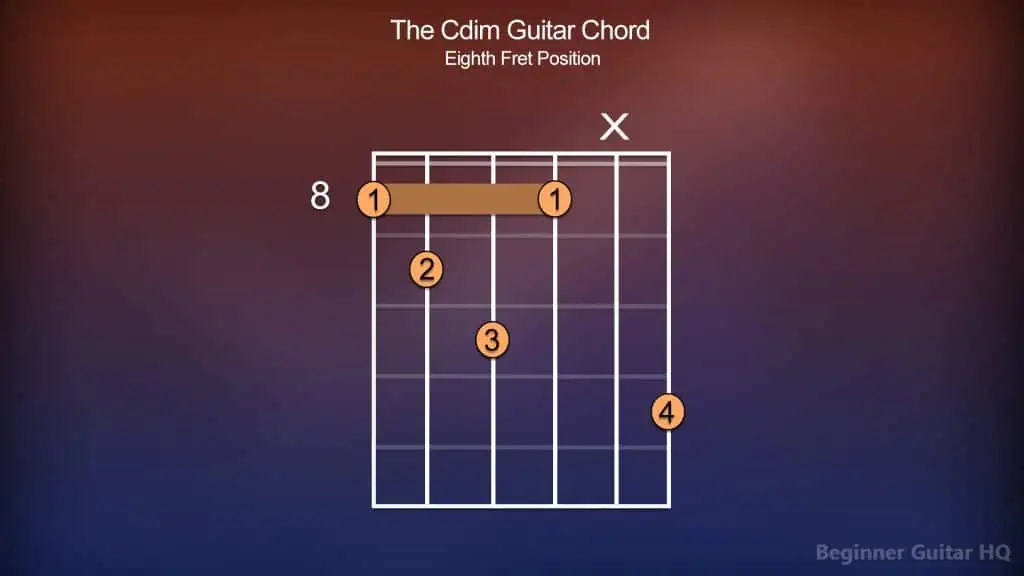
Chord chart of the Cdim guitar chord played from the eighth fret.
For our fourth chord variation, we’ll begin from the eighth fret. This particular variation requires the use of a “partial barre”, which may be difficult, or a little uncomfortable to some. Let’s begin by taking our index finger, and draping it over a grouping of strings, from the low E, string to our G string. Once, that’s done, we’ll apply pressure; this is our partial barre. Next, we’ll take our middle finger (2) and place it on the ninth fret of the A string. Afterward, taking our ring finger (3), we’ll place it upon the tenth fret of the D string. Finally, taking our pinky finger (4), we’ll place it on the eleventh fret of the high E string. We’ll leave the B string muted.
Let’s give the guitar a nice strum from the low E string to our high E string! Our fourth variation is complete.
Chord chart of the Cdim guitar chord played from the tenth fret.
For our fifth and final variation, we’ll be starting from the tenth fret. Taking our index finger (1), we’ll place it upon the tenth fret of the D string. Next, with our middle finger (2), we’ll place it on the eleventh fret of the G string. Finally, with our ring finger (3), we’ll place it on the eleventh fret of the high E string. The low E, A, and B strings remain muted.
From the D string to the high E string, give the guitar a good strum. Our final variation is complete!
What is a Diminished Chord?
The Cdim chord, otherwise known as the “C diminished chord”, carries a lot of tension, and dissonance within. Oftentimes, you can find diminished chords being used to bridge chords together, for instance, being used as a step towards our destination chord, creating an excellent sense of “tension” to “resolution”. This can be more easily achieved by finding two chords a “whole step” apart, then inserting a diminished chord between. For instance, the chords “F and G”, can include an F#dim chord between.
So what exactly is a diminished chord?
We can understand our diminished chords as a minor triad, with a flattened fifth, giving our chord its very tense, and dramatic harmony. However, if this sounds confusing, we’ll cover it in more depth as you read on!
Building a Cdim Chord
The C diminished chord is built on a few fundamentals that give it its characteristically dark and tense sound. These things include the key, scale, and triad.
Diminished chords are based on minor keys, so it only makes sense to start with our key “C minor”. We can think of our key as a collection of notes, no different than the ones you’d find in its corresponding scale. However, to understand these notes a little better, it can help to consult the Circle of Fifths for some insight.
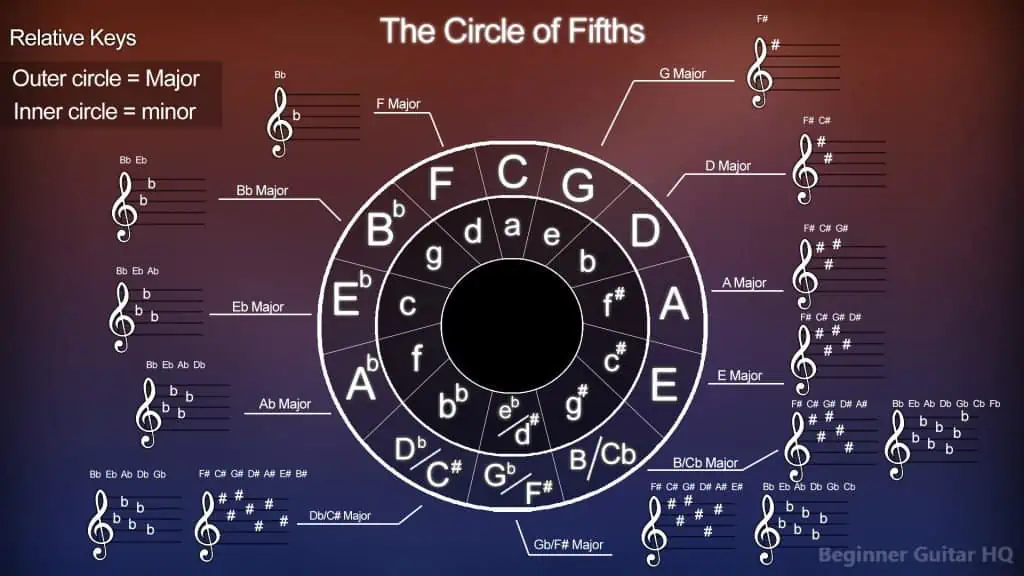
Diagram of the circle of fifths, showing the most commonly used keys.
This wheel-shaped diagram helps us find the most commonly used keys and their corresponding key signatures. Within, you’ll notice two rings; the outer ring houses all of our Major keys, while the inner ring contains all of our minor keys, within the same column, you’ll find that they are relative to one another. Starting from C Major/A minor, going clockwise, you’ll see that each key gains an additional sharp to its key signature. However, going counter-clockwise, you’ll notice that each key gains an addition flat to its key signature.
For the purposes of our Cdim chord, we’ll be focusing on the left half of the wheel, containing our flat key signatures.
Looking at our Circle of Fifths, you’ll see that the key C minor, contains three flats in its key signature. To figure out which notes are flat, we may use the saying:
“Battle, Ends, And, Down, Goes, Charles’, Father”
Each word in sequential order represents a different note that’s to be made flat. Knowing that the key of C minor contains three flats, using our fingers, we’d say “Battle, Ends, And…” therefore, C minor contains the flats Bb, Eb, and Ab in its key signature. With this information, we can throw our C minor scale together:
C > D > Eb > F > G > Ab > Bb > C
Each note within our C minor scale plays an important role. We may refer to these different notes as our scale degrees. Each scale degree contains a unique name that helps us refer to them with ease. Here are the different names within the C minor scale:
C = Tonic (1st Degree)
D = Supertonic (2nd Degree)
Eb = Mediant (3rd Degree)
F = Subdominant (4th Degree)
G = Dominant (5th Degree)
Ab = Submediant (6th Degree)
Bb = Leading Tone (7th Degree)
C = Tonic (1st Degree/Octave)
A triad is a type of chord containing three notes played simultaneously. When forming a minor triad, we take the tonic, mediant, and dominant degrees (1st, 3rd, and 5th degrees) of our scale, and stack them on top of each other. This gives us the notes: C, Eb, and G, forming our C minor triad. Within a minor triad, you’ll notice these intervals giving them their characteristically sad harmony:
- Minor 3rd – Between the first and third degrees. C > Eb.
- Major 3rd – Between the third and fifth degrees. Eb > G.
- Perfect 5th – Between the first and fifth degrees. C > G.
To convert this to a C diminished triad, the only remaining step is to flatten the dominant degree, giving us the notes: C, Eb, and Gb. This alters our intervals to:
- Minor 3rd – Between the first and third degrees. C > Eb.
- Minor 3rd – Between the third and fifth degrees. Eb > Gb.
- Diminished 5th – Between the first and fifth degrees. C > Gb.
Building Chord Progressions
There are many ways you might choose to go about building a chord progression. However, one of the more common ways involves the use of our triads. The C diminished chord falls in the key of C minor, therefore, using our triads, we’ll form them on each step of our C minor scale:
C minor = C, Eb, G (Tonic/1st Degree)
D diminished = D, F, Ab (Supertonic/2nd Degree)
Eb Major = Eb, G, Bb (Mediant/3rd Degree)
F minor = F, Ab, C (Subdominant/4th Degree)
G minor = G, Bb, D (Dominant/5th Degree)
Ab Major = Ab, C, Eb (Submediant/6th Degree)
Bb Major = Bb, D, F (Leading Tone/7th Degree)
Let’s talk a little more about each degree:
Tonic – The home and tonal center. In C minor, this would be the note, C. Things will return here for a sense of resolution.
Supertonic – Acts as a pre-dominant degree, carrying tension, as it shares two notes with the subdominant triad, F, and Ab.
Mediant – Sharing two notes with our tonic triad, Eb, and G, this degree is excellent for drawing our tonic out.
Subdominant – A light tension-building degree, sharing a singular note with the tonic triad, G, and will typically progress to greater tension.
Dominant – Typically the climax, the peak of our tension. This degree typically will resolve back home to our tonic.
Submediant – Acts as a pre-dominant degree, sharing two notes with our subdominant triad, Ab, and C, as well as two notes in our tonic triad, C and Eb.
Leading Tone – A degree holding a great deal of tension, also vital in forming seventh chords. Try playing the C major scale, and ending on B; your ears will want to hear it resolve home to C.
Other C Chords to Explore
If you’re looking to expand on your chord repertoire, there are plenty of other chords you might choose to explore. Let’s briefly go over some of the various diminished, augmented, seventh, and sus chords:
Cdim7 – The C diminished 7th chord contains the same notes as our Cdim chord, however, with the inclusion of a diminished 7th from the tonic. This gives us the collection of notes: C, Eb, G, and Bbb.
To play this chord, we’ll start on the seventh fret, taking our index finger, and forming a partial barre from the D string to the B string. Next, taking our middle finger, we’ll place it over the eighth fret of the low E string. With our ring finger, on the same fret, we’ll place it over the G string. Finally, on the same fret again, our pinky will go over the high E. The A string remains muted.
Caug – The C augmented chord, different than our C diminished chord, uses the key of C major. This gives us the base triad of notes: C, E, and G#, as we raise our fifth note by a semitone, making G, G#.
To play this chord, we’ll start from the open note position. Taking our index finger, we’ll form a partial barre over the first fret of the G and B strings. Next, moving to the second fret, we’ll take our middle finger, placing it over the D string. Finally, with our ring finger, we’ll place it on the third fret of the A string. The high E string remains open, while the low E string remains closed.
Caug7 – The C augmented seventh chord is an extension of the aforementioned Caug chord. The only difference is that we throw an interval of a minor 7th on top of the tonic. This gives us the notes: C, E, G#, and Bb.
To start this chord off, we’ll move to the third fret, taking our index finger, and forming a partial barre over the A, D, and G strings. Next, taking our pinky finger, we’ll place it over the sixth fret of the D string. Finally, with our ring finger, we’ll place it over the fifth fret of the B string. The high E string remains open, and the low E string remains muted.
Csus2 – The C suspended second chord is a little unorthodox compared to other chords, you’ve likely learned. While it may contain a triad, it’s not your traditional triad of notes containing the tonic, mediant, and dominant, but rather, the tonic, supertonic, and dominant. This gives us the notes: C, D, and G in our chord.
To form this chord, we can start from the open note position. First, let’s take our ring finger, placing it over the third fret of the A string. We’ll skip over the D, and G strings, leaving them open. Next, we’ll place our index finger over the first fret of the B string. Lastly, our pinky finger will go over the third fret of the high E string. We’ll leave the low E string muted.
Csus4 – Much like the prior sus chord we talked about, the C suspended fourth chord changes the mediant in our triad, but instead to a subdominant. This gives us the notes in our triad: C, F, and G in our chord.
For this chord, we’ll start from the open note position. First, we’ll form a partial barre with our index finger over the first fret of the B and high E strings. Next, we’ll skip over the G string, leaving it open. Our ring finger will go over the third fret of the A string, and our pinky finger will go over the third fret of the D string. The low E string stays muted.
Cm6 – The C minor sixth chord contains our base grouping of notes found within a C minor triad with the inclusion of a submediant stacked on top, which gives us the notes: C, Eb, G, and A.
To form this chord, we’ll start from the first fret. Taking our index finger, we’ll form a partial barre over the first fret of the D, G, and B strings. Next, taking our middle finger, we’ll place it over the second fret of the G string. Finally, with our pinky finger, we’ll place it over the third fret of the high E string. We’ll leave the low E, and A strings muted.
Cm9 – The C minor ninth chord takes our base C minor triad, but instead includes a minor seventh along with an interval of a 9th above the tonic. This means that we’ll get the notes: C, Eb, G, Bb, and D forming our chord.
We’ll move to the open note position, first, placing our index finger on the third fret of the A string. Next, we’ll skip over the D string, leaving it open. With our middle finger, we’ll place it on the third fret of the G string. Our pinky will now be placed over the fourth fret of the B string. Finally, our ring finger will go over the third fret of the high E string. We’ll leave the low E string muted.
Cm11 – Just when you thought it couldn’t get crazier! The C minor eleventh chord contains all of the notes from our Cm9 chord, but with the inclusion of a minor third, being stacked over the minor ninth interval. This gives us the collection of six notes: C, Eb, G, Bb, D, and F.
To begin playing this chord, we’ll start from the sixth fret. First, let’s place our ring finger over the eighth fret of the low E string. Next, taking our index finger, we’ll place it on the sixth fret of the A string. We’ll skip over the D, and G strings, leaving them open. Next, with our middle finger, we’ll form a partial barre, covering the sixth fret of the B and high E strings.
Conclusion
Learning new chords is always a fun and challenging way to develop as a musician. You may even choose to take your practice to new heights, learning the CAGED system, inversions, practicing along with a backing track, or testing out other variations on the guitar. Many of these non-traditional chords will require interesting and new ways for you to position your fingers, which is heavily encouraged to help you develop your finger strength and muscle memory. The important thing, above all, is that you have fun, and keep on rockin’.


