Maybe you’ve just listened to a great song like, “Tom Petty’s – Free Fallin’”, “The Beatles’ – Hey Jude”, or even “The Police – Roxanne”, hearing these really sweet-sounding sus chords, fueling your desire to learn more about them. Thankfully, you’ve come to the right place! Today we’ll be going over the Gsus4 chord, how it works, and how you can start using it immediately. Let’s dive in!
Contents
How to Play the Gsus4 Chord
The Gsus4 chord comes in a number of variations, as many chords on the guitar do. The choice between these variations may come down to a few different factors:
- Your playing ability.
- How it enables you to maintain flow within the chord progression.
- Tonal qualities/characteristics.
- Personal preference.
You may even have another reason not mentioned above. The important thing is to play what works for you. We’ll be covering six of these variations, walking you through how each of them is played. Let’s begin:
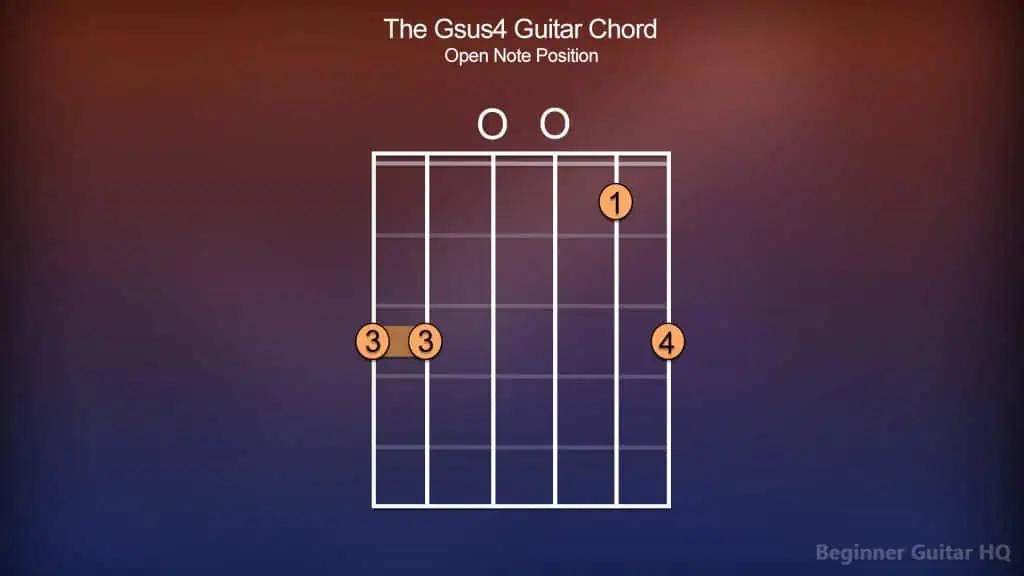
Chord chart of the Gsus4 chord played from the open note position.
Our first variation starts from the open note position. Open note position refers to when we have a number of open notes within our chord and isn’t fretted higher up on the neck. Another way to tell that we are playing from the open note position is by looking to the left of the chord chart; there are no numbers indicating the starting fret for our chord.
Let’s begin by placing our pinky finger (4) on the third fret of the high E string. Next, we’ll place our index finger (1) on the first fret of the B string. We’ll notice our G, and D strings are marked with an “O” over top, indicating that these are open notes (strings to be played, but not fretted). Therefore, we’ll skip over these two strings. Finally, with our ring finger (3), we’ll be forming a partial barre on the third fret of the low E and A strings. To form this partial barre, simply take your ring finger, drape it over these two strings, and apply pressure. This might feel awkward if this is your first time, but it will get easier!
You’ve successfully formed the Gsus4 chord from the open note position!
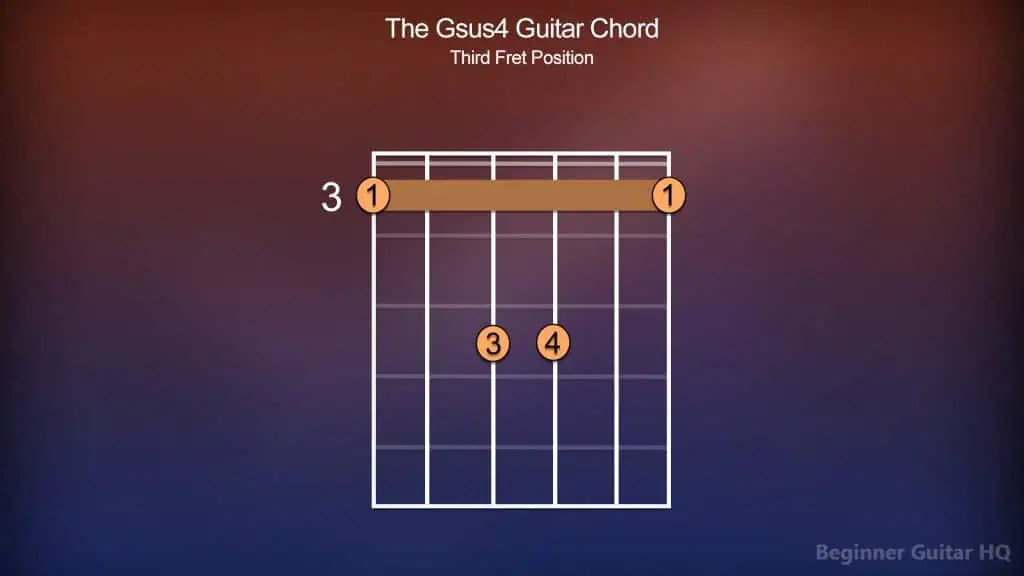
Chord chart of the Gsus4 chord played from the third fret position.
For the second variation, we’ll be starting from the third fret position. You can easily tell it’s from the third fret, given the number “3” to the left of our chord chart. This variation will be a little trickier, as it requires you to form a barre chord. This differs slightly from our last variation, where we formed a partial barre, as this takes up much more real estate on the fret. You may not get this your first time, but be patient, and over time you’ll develop the necessary finger strength to nail this chord.
Let’s begin with tackling the elephant in the room, and forming our barre. To achieve this barre, we’ll be taking our index finger (1), draping it over all six strings on the third fret, and applying pressure. Next, we’ll take our pinky finger (4), and place it on the third fret of the G string. Finally, we’ll take our ring finger (3), and place it on the third fret of the D string.
Give it a nice strum, and you’ve successfully played your second variation!
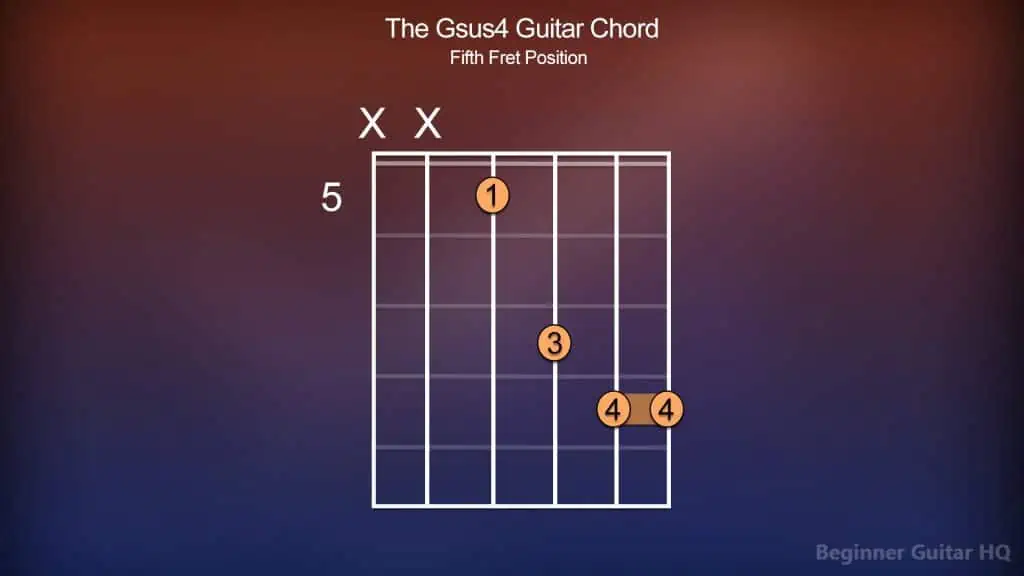
Chord chart of the Gsus4 chord played from the fifth fret position.
For our third variation, we’ll be starting from the fifth fret position. Let’s begin by taking our pinky finger (4), and forming a partial barre on the eighth fret’s high E, and B strings Next, we’ll take our ring finger (3), and place it on the seventh fret of the G string. Finally, taking our index finger, we’ll place it on the fifth fret of the D string. Since our low E and A strings have an “X” marker over top, we’ll not play, or fret these strings; our chord is finished.
Give it a good strum, and you’ve successfully played the third Gsus4 variation!
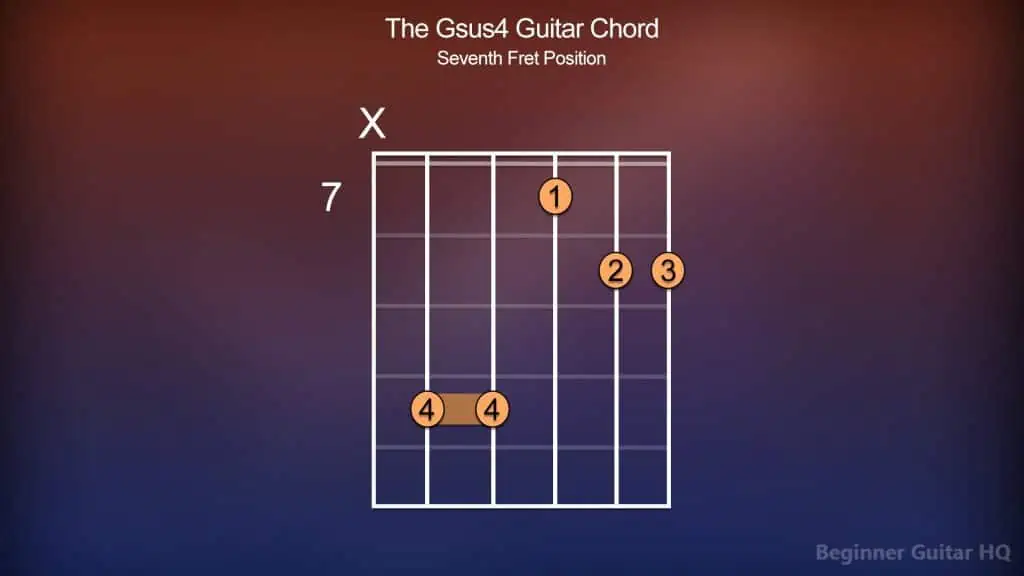
Chord chart of the Gsus4 chord played from the seventh fret position.
The fourth variation here will be starting on the seventh fret position. This one will be a little trickier, and require more flexibility with the fingers.
First, we’ll be taking our ring finger (3), and placing it on the eighth fret of the high E string. Next, we’ll take our middle finger (2), and place it on the eighth fret of the B string. Following that, we’ll take our index finger (1), and place it on the seventh fret of the G string. Finally, we’ll be taking our pinky finger (4), forming a partial barre over the tenth fret of the A and D strings. We’ll leave the low E string muted.
From the A string to the high E string, we’ll give the guitar a nice strum. We’ve successfully played the Gsus4 chord from the seventh fret!
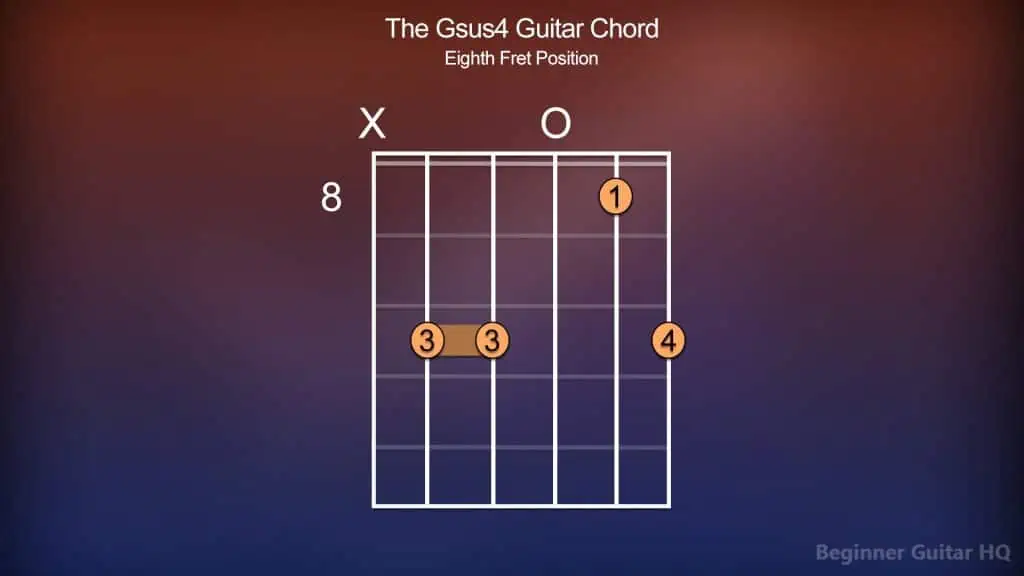
Chord chart of the Gsus4 chord played from the eighth fret position.
For the fifth variation, we’ll be playing the Gsus4 chord from the eighth fret. We’ll start by placing our pinky finger (4) on the tenth fret of the high E string. Following that, we’ll place our index finger (1) on the eighth fret of the B string. We’ll skip the G string, as it’s an open note. Finally, we’ll take our ring finger (3), forming a partial barre over the tenth fret of the A and D strings; the low E string remains muted.
From the A string to the high E string, you can give the guitar a strum, completing our fifth variation.
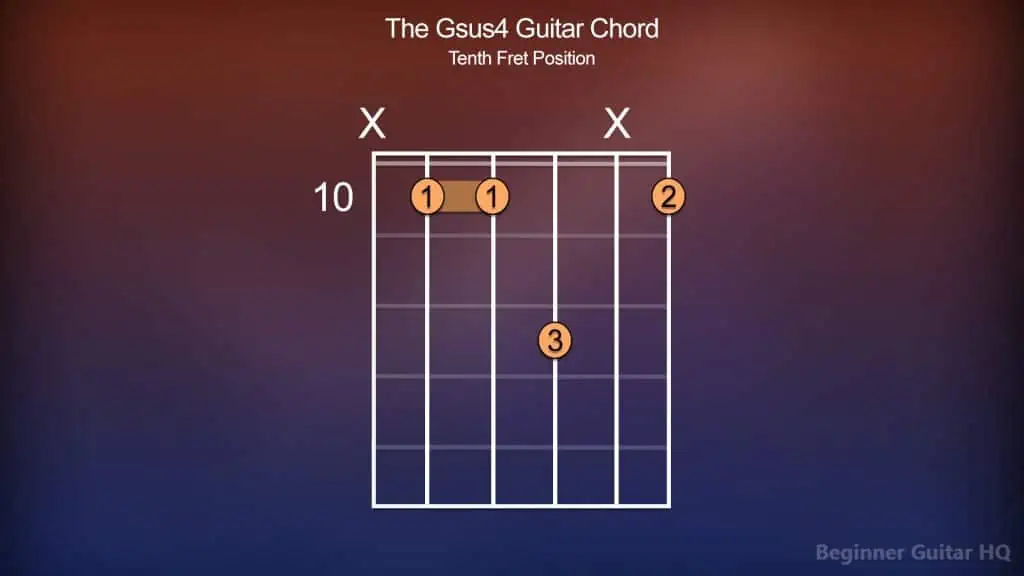
Chord chart of the Gsus4 chord played from the tenth fret position.
For our sixth, and final variation, we’ll be starting on the tenth fret. First, we’ll take our middle finger (2), and play the tenth fret of the high E string. The B string remains muted, as this is in the middle of our chord, this can be a slight problem. Therefore, it can help to use the middle finger pressed down on the high E string, and shifting it slightly to cover the B string, muting it. Next, we’ll take our ring finger (3), and place it over the twelfth fret of the G string. Finally, with our index finger, we’ll form a partial barre on the tenth fret of the A and D strings; the low E string remains muted.
From the A string to the high E string, we’ll give the guitar a nice strum; this completes our final variation.
What is a Sus Chord?
Much like our various seventh chords, sus chords, otherwise known as “suspended chords”, have an excellent way of bringing an air of tension, holding some mild dissonance. However, unlike our seventh chords, sus chords tend to sound more open, and cannot be classified as a major or minor chord/key.
Chords are typically built upon the foundation of a triad. Major and minor chords, use the 1st, 3rd, and 5th notes of their respective scale to build their triads. In fact, it’s that 3rd note that’s so vital, defining whether or not the chord is major or minor. For instance, in a major triad, the interval between the 1st and 3rd degrees is a major 3rd, but in a minor triad, this interval is instead a minor 3rd. What happens, however, when this degree is taken away from our triad? It sort of loses its identity and cannot be classified as major or minor, leaving an interval of a perfect 5th.
In the case of our sus4 chords, we take this third degree of our scale and move it to the fourth degree; this makes the interval a perfect 4th. The same occurs within a sus2 chord, which instead becomes a major 2nd. The absence of our major/minor 3rd is what gives our sus chord its open sound.
How Does the Gsus4 Work?
Now that we have a pretty decent idea of what a sus chord is, we should go over what makes a Gsus4 chord what it is. To further understand the Gsus4 chord, it’s important that we understand the fundamental pillars that form this chord: the key, scale, and its foundational triad.
When we talk about the key, this refers to the collective bunch of pitches that you’d find within its associated scale. The pitches within a key, however, are defined by the key’s key signature. A key signature is visually represented by a collection of sharps (#) or flats (b) that come after the clef on a piece of sheet music. However, this will not be visible when you’re playing in the key of C major, or A minor, where they contain no sharps or flats.
When a note is marked sharp, we increase its pitch by a semitone, however, when it’s marked flat, we lower its pitch by a semitone. When starting out with key signatures, it’s highly recommended to utilize the circle of fifths.
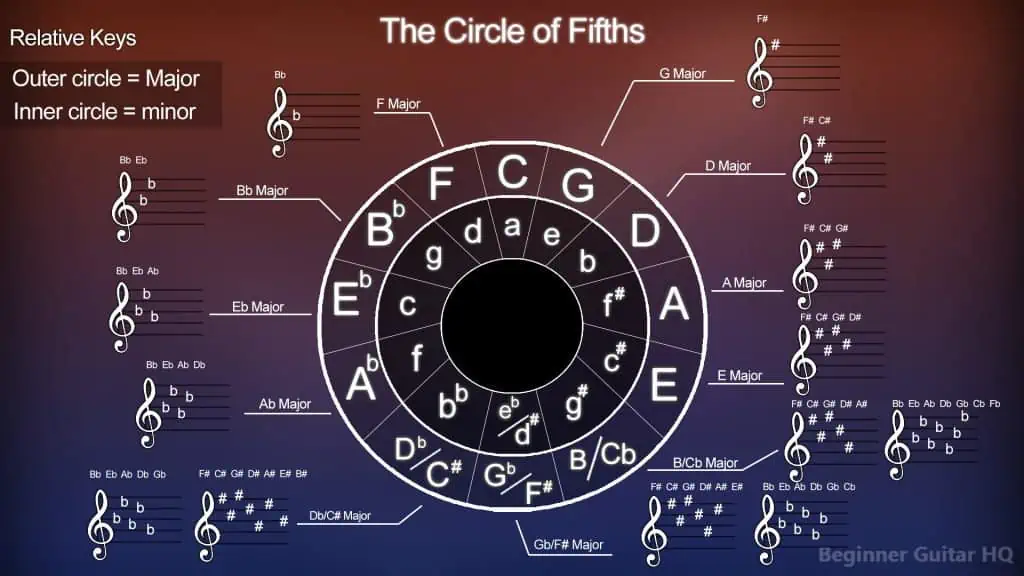
Diagram of the circle of fifths, showing the most commonly used key signatures.
The circle of fifths you see above displays numerous keys with their corresponding key signatures. The outer ring contains all of our major keys, while the inner ring contains all of our minor keys. Using this helpful diagram, we can understand the key signature associated with the key of Gsus4. There are two helpful sayings you might use to determine these exact notes:
Major keys: “Father, Charles, Goes, Down, And, Ends, Battle”
Minor keys: “Battle, Ends, And, Down, Goes, Charles’, Father”
Let’s look at the key of G Major, containing 1 sharp. Using our fingers and the saying, we’d go: “Father”. Therefore, the sharp note within G Major is F#. Taking a look at G minor, on the other hand, we can see that it has 2 flats. Using our fingers, and the other saying, we’d go: “Battle, Ends”. Therefore, the flats within G minor are Bb and Eb.
Let’s throw both scales together:
G Major – G > A > B > C > D > E > F# > G
G Minor – G > A > Bb > C > D > Eb > F > G
Every note within our scales plays an important role; these are known as our scale degrees. Each of them has a unique name, helping musicians to distinguish them with ease:
1st Degree (Tonic)
2nd Degree (Supertonic)
3rd Degree (Mediant)
4th Degree (Subdominant)
5th Degree (Dominant)
6th Degree (Submediant)
7th Degree (Leading Tone)
1st Degree (Tonic/Octave)
Normally, Major and minor triads are built by taking the tonic, mediant, and dominant degrees of our scale (1st, 3rd, and 5th degrees), and stacking them on top of each other. However, Gsus4 does not associate itself with a major or minor key signature. For a sus4 chord, we instead take the tonic, subdominant, and dominant degrees (1st, 4th, and 5th degrees). This gives us the notes: G, C, and D.
In fact, using our examples, G major, containing one sharp, F#, and G minor containing two flats, Bb, and Eb, we can see that this does not impact the chord in any way.
Making Chord Progressions
When making chord progressions that flow within the same key, triads are a helpful tool for revealing which chords are compatible. To keep things relatively simple, we’ll form triads on each degree of the G Major scale.
G Major = G, B, D (Tonic/1st Degree)
A minor = A, C, E (Supertonic/2nd Degree)
B minor = B, D, F# (Mediant/3rd Degree)
C Major = C, E, G (Subdominant/4th Degree)
D Major = D, F#, A (Dominant/5th Degree)
E minor = E, G, B (Submediant/6th Degree)
F# diminished = F#, A, C (Leading Tone/7th Degree)
To get a better understanding of our various scale degrees, let’s briefly sum up each one:
- Tonic = Our tonal center where things come to resolve after great tension, the note, G.
- Supertonic = A predominant degree, holding some mild tension, sharing two notes with
the subdominant triad, C and E.
- Mediant = A good degree for drawing out our tonic, as they share two notes, B and D.
- Subdominant = Holds some mild tension, and will typically shift to greater tension, the
dominant.
- Dominant = Our most important degree, next to the tonic. This is typically our climax,
and our greatest peak in tension, which begs for resolve.
- Submediant = Acts as a predominant degree, sharing two notes with our tonic, and
subdominant.
- Leading Tone = Our greatest point of tension, just one note before our tonic.
When incorporating sus chords into your chord progression, there are a couple of ways you might go about it. For instance, we know that sus chords hold some tension and dissonance, which makes more sense to use them at points in your progression where the most tension might be; the dominant, and leading tone. You may decide to use it as a nice and smoother transition to something of greater tension, or you may decide to use it to draw out the point of greatest tension, where your ears will expect resolve. In Jazz music, drawing out tension using this method is fairly common, except it might resolve to the leading tone more often than the tonic.
Understanding when to use sus chords in your chord progression can take some time, but it’s definitely a good chord to keep in your pocket. Practicing with different sus chords, and trying to slip them into progressions can be a good place to start! This will help you learn what works well, and what holds less desirable results for you.
Other Gsus Chords
- Gsus2 = This chord takes very little effort to get started with. First, we’ll take our middle finger (2) and form a partial barre over the third fret of the high E and B strings. Next, we’ll skip over the A, D, and G strings, leaving them open. Finally, we’ll place our index finger (1) on the third fret of the low E string.
- G7sus2 = The G dominant seventh suspended 2nd chord from the open note position is relatively simple! Let’s begin by placing our index finger (1) on the second fret of the high E string. Following that, we’ll be placing our ring finger (3) on the third fret of the B string. Next, we’ll be skipping over the A, D, and G strings, as these are all played open. Finally, we’ll be placing our middle finger (2) on the third fret of the low E string. That’s all there is to it!
- G7sus4 = The G dominant seventh suspended 4th chord is slightly more challenging than the prior G7sus2 chord. First, we’ll be forming a partial barre with our index finger (1) on the first fret of the high E and B strings. Next, we’ll be skipping over the D and G strings, as these are played open. Following this, we’ll place our pinky finger (4) on the third fret of the A string. Finally, we’ll place our ring finger (3) on the third fret of the low E string. Give it a strum, and our chord is complete.
- G6sus2 = First, we’ll leave our high E string open. Next, we’ll take our ring finger (3), and place it over top of the third fret of the B string. Following this, with our index finger (1), we’ll form a partial barre over the second fret of the D and G strings. Next, we’ll leave the A string open. Finally, we’ll place our middle finger (2) over the third fret of the low E string.
- G6sus4 = To start this chord off, we’ll skip over the high E string, leaving it open. Next, we’ll take our ring finger (3) and place it on the third fret of the B string. We’ll now skip over the G string, leaving it open as well. Following this, we’ll take our index finger (1), and place it on the second fret of the D string. Finally, we’ll take our middle finger (2), and form a partial barre on the third fret of the low E, and A strings.
- Gmaj7sus2 = To start this chord, we’ll first place our index finger (1) on the 2nd fret of the high E string. Following this, we’ll place our ring finger (3) on the third fret of the B string. We’ll now skip over the A, D, and G strings, leaving them all open. Finally, we’ll place our middle finger (2) on the third fret of the low E string.
- Gmaj7sus4 = Let’s begin with placing our middle finger (2) on the second fret of the high E string. Next, we’ll take our index finger (1), and place it on the first fret of the B string. Following this, we’ll skip over the D, and G strings, leaving them open. Next, we’ll place our pinky finger (4) on the third fret of the A string. Finally, we’ll take our ring finger (3), and place it on the third fret of the low E string.
Conclusion
Sus chords can be a great addition to an otherwise lacking or dull chord progression. In fact, there are many fun chords you might choose to throw into the mix, like seventh, ninth, diminished, augmented or any other variation of those chords. There are so many possibilities!
Incorporating chords into your daily routine, even for 10 – 15 minutes, can be very beneficial, allowing you to build your finger strength, and possibly improve your fretboard knowledge in the process. Building on fretboard knowledge, you may even want to look into the CAGED system, and see how the fretboard is just a series of patterns and shapes; it’ll blow your mind! How will you move forward with sus chords? What other chords will you learn next? Wherever your musical endeavors take you, keep on rockin’!

