In music, patterns are a fairly common occurrence that brings some “order” to something that otherwise might seem pretty complicated! The CAGED System is no different and can be quite the resource for familiarizing yourself with chord shapes and how notes on the fretboard relate to one another. Let’s dive in!
Contents
The CAGED System in a Nutshell
There are five very important chord shapes you will want to remember:
- C Major Chord
- A Major Chord
- G Major Chord
- E Major Chord
- D Major Chord
This sequence of chord shapes forms the “CAGED System”. The purpose behind their specific order has more to do with how they lead into one another as you travel up or down the neck than making a pretty cool-sounding acronym.
The entirety of the CAGED System is about how we can relate from one chord shape to the next and still be playing the same chord.
In other words, if you took the C Major Chord, you could also play that same sounding chord higher up on the fretboard using the A Major Chord shape. As we know from the acronym CAGED, the letter C comes before the letter A.
Since the root note of the chord is still C, even though you changed the chord shape to A Major, it is still a C Major Chord.
This would continue through the acronym, A – G, from G – E, and from E – D. When you’ve run through all CAGED chord shapes, then you’ll be back on the C Major Chord shape, but an octave higher from where you began. It’s that easy!
Benefits That Come From Learning the CAGED System
You may now have some idea as to what the CAGED System is, but not any clue as to why you should really learn it. These are just a few reasons why it’s worth your time:
It Helps You Understand the Fretboard
Learning the fretboard can be the catalyst to learning much more about your guitar, including playing it better. These five letters in CAGED can be used to help you map out the different positions of the Major Chords.
You Can Build Chords On the Fly
The entirety of the CAGED System is built on the foundation of 5 basic chord shapes that every beginner should know. This is when you can start making things interesting and building different variations of these chords. Different variations could be anything from a D minor Chord to a D Major7 Chord. This helps since you know a handful of Major Chords, you only need to understand the intervals/triads involved for the variation you want to play.
It Will Add Value to Your Practice Routine
Sometimes our practice routine can get a little stale, it happens to the best of us. Fortunately enough, learning CAGED can be a gateway to developing a whole new routine. It can be anything from:
- Drilling Intervals
- Practicing CAGED Scales in Different Positions
- Playing Arpeggios to Improve Down/Up Picking Technique
- Improvising Along to Known Songs
- Practicing its minor Counterpart
When practicing, however, it’s recommended that you practice with a metronome! If you are in need of a metronome, you can always access them digitally as a smartphone app, computer software, or even on your browser. Otherwise, you can get a physical one for a relatively cheap cost.
How to Use the CAGED System
The foundation of the CAGED System is made up of the open chord shapes of C, A, G, E, and D Major. When we say, “open chord shapes”, these are chords that include open strings/unfretted notes within the chord.
The open chord shapes are as follows:
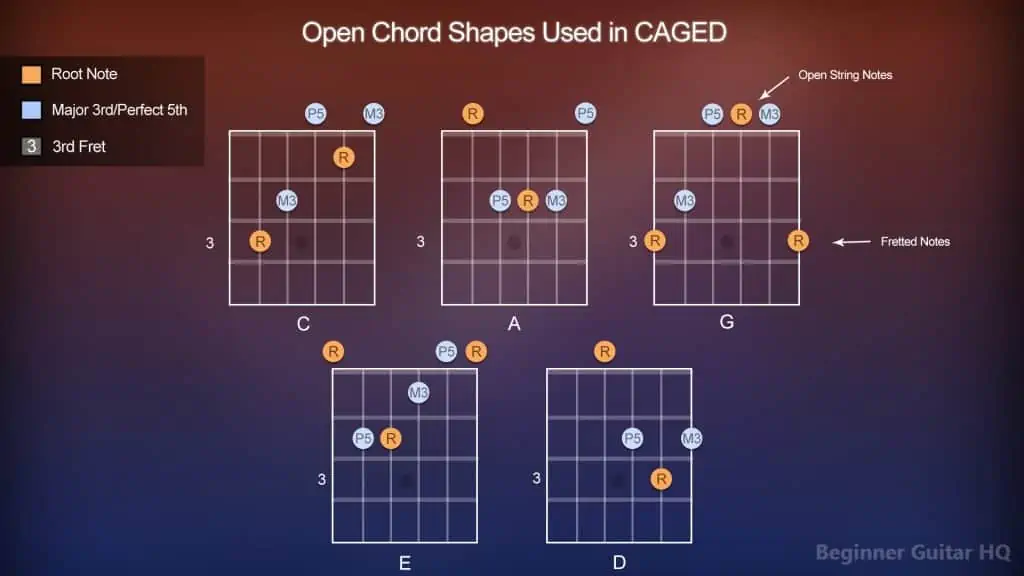
Diagram Explanation For Beginners
If you’re new to playing the guitar, this may be your first time seeing a chord diagram. Although it might seem intimidating at first, it’s relatively simple and will serve you for years to come.
There are five different boxes that you see in the diagram. Each of these boxes are representing a different chord or chord shape for the purpose of this topic. The name of the chord shape is below each box. We have C, A, G, E, and D chord shapes. Each box contains six vertical lines, which represent each string on the guitar, from left to right: E, A, D, G, B, and E.
The lines going horizontally represent fret bars, separating each fret from one another. The number 3 to the left is a quick indicator, that this is the 3rd fret, and directly above it are the 2nd and 1st frets. On some of these frets and strings, you will see a circle. For now, let’s not pay attention to each circle’s inside. These represent notes that must be pressed down in order to form the chord being displayed. However, you may notice circles hovering above the diagram. These circles represent open notes/open strings to be played to complete the chord.
Different Chord Positions
The purpose of the CAGED System is to show you how notes along the fretboard are related to one another. Here are some diagrams of the fretboard showing what happens when we take a C Major Chord shape and move it upwards, following the CAGED System:
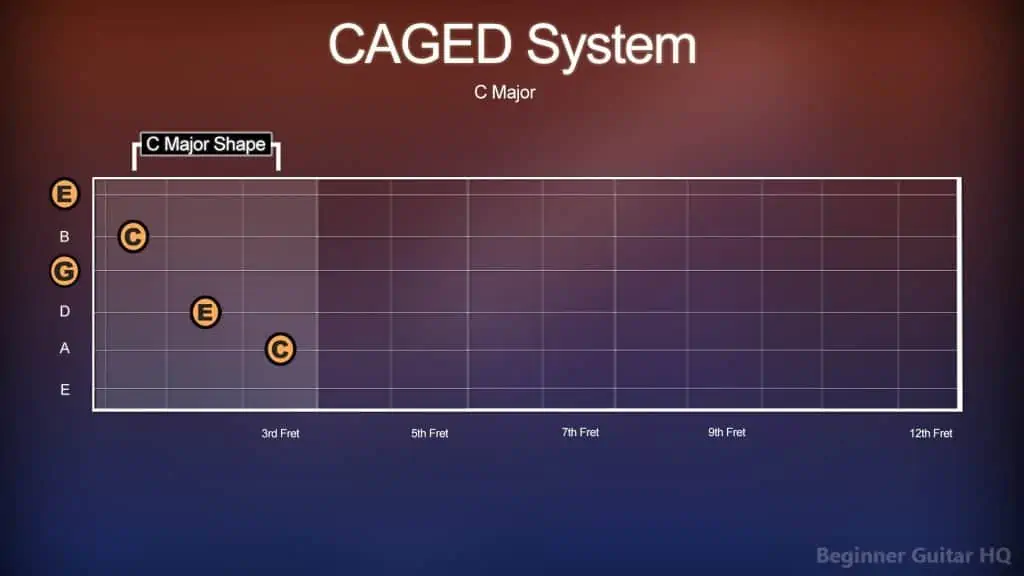
This is C Major at its primary chord shape, taking form in open position on the fretboard. If we start on the C played on the A string, and we move up four half steps, (two whole steps), we will land on the E. This interval is a Major 3rd. If we move from C to G, taking seven half steps, then we get what’s known as a Perfect 5th. If we take the distance from E to G, three half steps, then we get a minor 3rd. These three intervals are defining characteristics of a Major Triad, and you will notice the theme recur as we move up the fretboard into other chord shapes in CAGED.
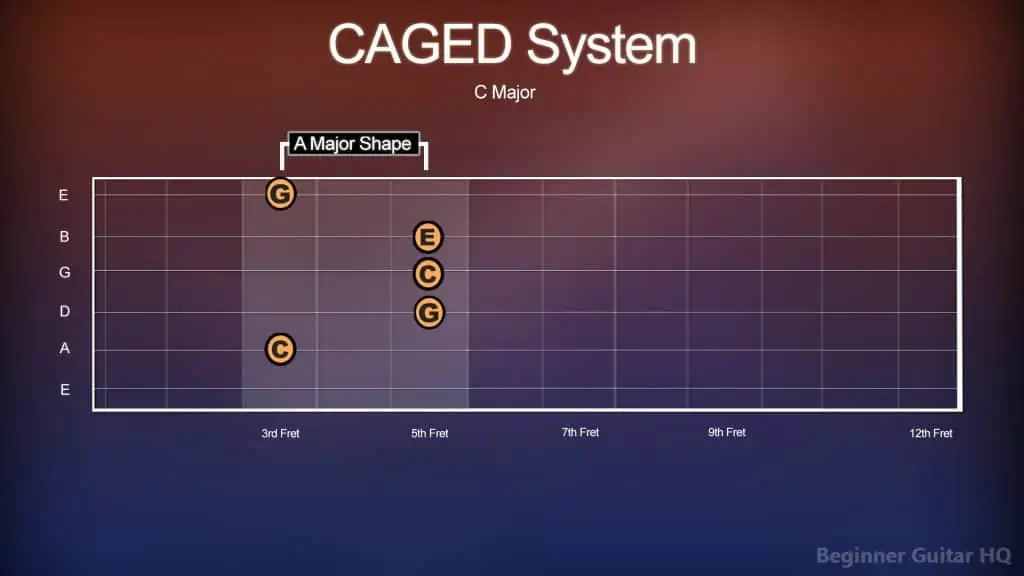
Here, we have the A Major Chord shape, yet we are still playing the C Major chord. Why is that? This is because our root note is still C, and we are forming an essential triad that makes it a C Major Chord. C Major’s triad consists of the notes C, E, and G.

We have hit the G Major Chord shape, but it still has the sounds of a C Major Chord. If you know what a G Major chord looks like in an open chord position, then this might look very different to you. Naturally, this is what would happen to the chord if you transposed it to a different root note. However, we’ll cover that more later.
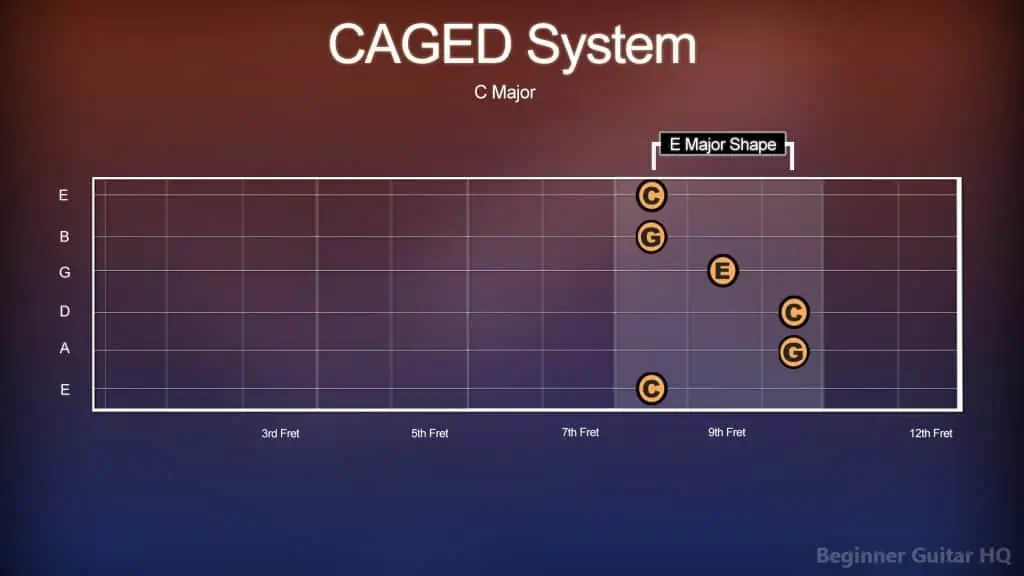
We’re now sitting on the E Major Chord shape, on the 8th fret and this is where it gets sort of interesting. If you are to look back at each of these chords we have passed through so far, you can see how they are entwined with one another.
The root of these chord shapes is C, therefore, that’s what binds them all together. If we look at the E Major Chord shape we have just made, you’ll notice how the C notes on the high and low E strings are on the 8th fret. Let’s go back to the G Major Chord shape we made just before this one. You’ll see that both the C notes on the high and low E’s are on the same fret as the ones used in the E Major Chord shape!
And if we continue looking at the G Major chord shape, the C note on the G string is also used in the A Major Chord shape. And that C note used in that chord shape, also happens to be the root note of the open chord used for C Major. It all circles back around.

Finally, we are on the D Major Chord shape, which is connected through the C note on the 10th fret. If you wanted to circle back around to the C Major Chord shape again, then you only need to put your index finger on the 13th fret’s C note and form your C Major Chord! Now you are exactly one octave higher from where you began the CAGED System!
If you’d enjoy an audio/visual example, here is another excellent example of the CAGED System in action:
A video demonstration of the CAGED System being utilized from the C Chord.
What Makes the CAGED System Work?
As mentioned before, music in its entirety contains many patterns. When we get down to it, the CAGED System is just another way of using these patterns to enhance our knowledge and memorization of our craft. So there has to be some reason it all works, right?
The root of why the CAGED System works all comes down to the placement of the root notes. If you remember their placement, remembering the CAGED System gets a lot easier!
Let’s go over some chord shapes:
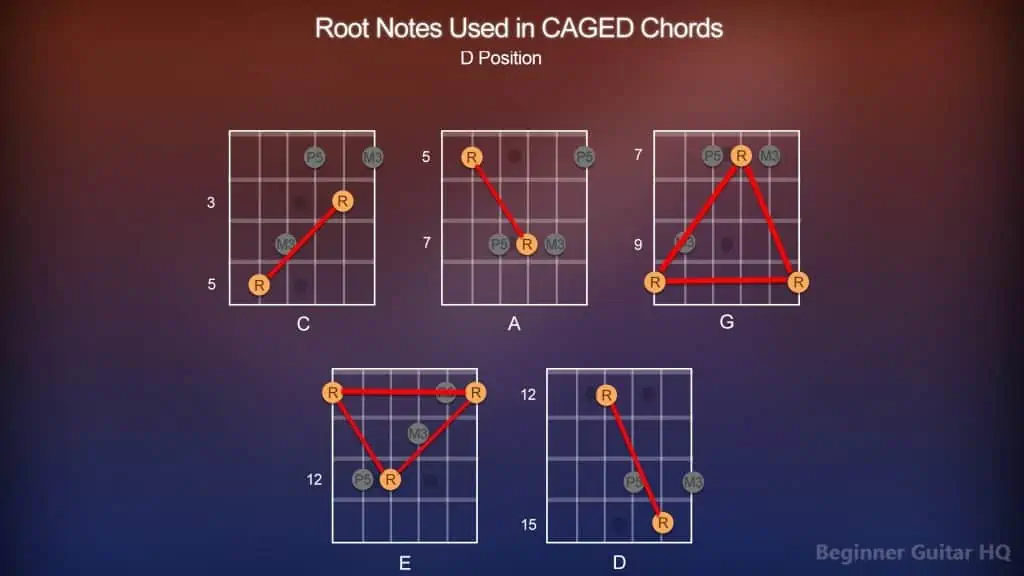
For this example, we’ll be using the root note of D Major. This means that instead of starting on C as we had done before with the C Major Chords, we will be starting on D to make D Major Chords. Following the CAGED System, this means that the first chord shape following D will be the C Major Chord shape. After that, it will be A, then G, E, and back home at D.
We had gone over earlier how these chord shapes are entwined with one another, this diagram is an easy way of seeing how that works.
For instance, we have our C Chord shape, rooted on D. Now, if you take a look at the A Chord shape it starts right where the C Chord shape had started, however, it progresses up the neck.
From A to G, the root note used on the 7th fret is also used to transition between these two chord shapes. From G to E, you have the D on the high and low E strings (10th fret), and then from E to D, with the D note on the 12th fret.
I think it’s kind of cool when you notice the pattern of shapes used in each of these chords. If you look at the lines used, connecting the root notes to one another, you have:
Forward slash, Back Slash, Triangle Up, Triangle Down, Back Slash, (Repeats) Forward Slash, Back Slash, Triangle Up, Triangle Down, Back Slash… etc.
Now that you have an idea of how these chords are all tied together, what makes chords what they are?
To further understand this, it’s helpful to learn what intervals and triads are, and the role they play in building chords.
Intervals
An interval is a gap between two different pitches. There are several different types of intervals, Major, minor, Augmented, Diminished, and Perfect. Falling under each type of interval, there are specific intervals identifying the gaps in a simplistic way. Major 6th, minor 2nd, Perfect 4th… etc. For the sake of this topic, we’re going to focus more on the Major 3rd, minor 3rd, and Perfect 5th, as these are the essential intervals used in forming a Major Triad/Major Chord.
What’s a Triad?
A triad is a grouping of three different pitches. In the case of a Major Triad, this would be the 1st, 3rd, and 5th degree of the Major scale. These degrees are otherwise known as the tonic, mediant, and dominant. The notes may vary depending on what note you are starting on, (your tonic), but they all share the same intervals.
From the tonic to the mediant, we have our Major 3rd. From our tonic to our dominant, we have our Perfect 5th. From the mediant to the dominant, we have our minor 3rd. These notes are the basis of the Major Chord.
What’s an Inversion?
An inversion is essentially a triad, containing the same notes, but in another order. In a Major Triad, we have the Root/3rd/5th, this is called root position. An inverted triad can look anything like 3rd/5th/Root, or 5th/Root/3rd. In other words, when we start from the 3rd, that’s called First Inversion, and when we start from the 5th, that’s called Second Inversion.
The reason we use inversions is to improve the quality of the sound and to provide flexibility. Different from the piano, you would have to change your grip a lot to play from the root position all of the time. Inversions are important for guitarists, as this allows you to play different forms of the same chord from anywhere you want on the fretboard. You’ll find that this ties into the CAGED System a lot. Inversions are your friend!
How Chords Are Built
Chords rely on a structure of notes to give them their proper sound. We know that the Major Chord is built up from a Major 3rd and Perfect 5th from the root note. Other types of chords have their own formulas, however:
- Minor Chords – Root Note/minor 3rd/Perfect 5th
- Augmented Chords – Root Note/ Major 3rd/Augmented 5th
- Diminished Chords – Root Note/minor 3rd/diminished 5th
- Major 7 – Root Note/Major 3rd/Perfect 5th/Major 7th
That’s only to name a few!
These help you define the notes that are needed for the chord that you are trying to build! An easy cheat to build the CAGED chords yourself is to follow these patterns:
- Root/5th/Root/3rd/5th/Root – For E, A, and D Chord Shapes – The last two are optional.
- Root/3rd/5th/Root/3rd/Root – For C, and G Chord Shapes – The last three are optional.
Optional notes for chord shapes refer to situations where a chord does not require them for the chord to be completed. For instance, D Major’s chord shape uses Root/5th/Root/3rd but doesn’t include the 5th and root note following that sequence. C Major is another case, where it uses Root/3rd/5th/Root/3rd, but doesn’t use the following root note after.
Transposing Chords
When we talk about transposition, it simply means that two or more collective notes are being moved up or down to a different pitch. This differs from the CAGED System because, in CAGED, we are taking a chord, and although we are moving somewhere else on the fretboard, we are completely altering the shape of the chord, which is a key difference.
When you transpose a chord from C Major to D, unlike the CAGED System, the chord will change to D Major.

The above diagram shows how the previous chords were affected by transposition and were made to become barre chords. The result of this change also influences the name of the chord. Notice how underneath each chord, as in the former diagram, we have the letters C, A, G, E, and D. The letter in brackets is what the chord has become, therefore:
- C Major has become D Major
- A Major has become B Major
- G Major has become A Major
- E Major has become F#/Gb Major
- D Major has become E Major
It is important to note, that when transposing up and down the neck with any of the open chord shapes, they will not completely operate the same. To elaborate, let’s imagine a scenario where you were wanting to transpose the C Major chord from its open chord position to the 5th fret, the D note. If you were to slide all of the fretted notes from C Major to D and play it as is, you might hear it and think, “Something is off here”. This is because you haven’t factored in the open strings, which also need to be transposed. This is when you start getting barre chords.
Barre chords are meant to compensate for open notes that must be transposed higher to complete the chord. In order to achieve this, a guitarist will form a barre over a grouping of strings on a single fret. In other words, they will press down/lay their finger vertically across the strings to achieve a barre chord.
Some songs contain a lot of these barre chords, in which case, they may call for the use of a capo. A capo forms a barre for you so you can focus on playing the open chords, making life a little easier.
Conclusion
The CAGED System supplies guitarists with a really profound way of experiencing the fretboard. Regardless, if you are trying to understand what makes it tick, or finding ways to improve your daily practice routine, the CAGED System offers no shortage in improving the time spent on your guitar.
There are plenty of options you may look into in order to spice things up. You may decide to practice:
- CAGED System Guitar Scales
- CAGED Chords
- Transposed Chords
- Intervals
- Triads/Inversions
- Going From Major to Minor
- Improvising in Different Keys/Scales or to Music in the Same Key
Perhaps something else? How will you put this method to use?
Always remember to take appropriate breaks, but more importantly, have fun and rock on!

