If you’re looking to add some new and colorful chords to your musical repertoire, then look no further! Your Cmaj7 chord is one of many seventh chords and is relatively easy for beginners to start using. As you continue reading, we’ll cover how to play it, how it works, and additional information that will help you with other chords. Let’s get started!
Contents
How to Play the Cmaj7 Chord
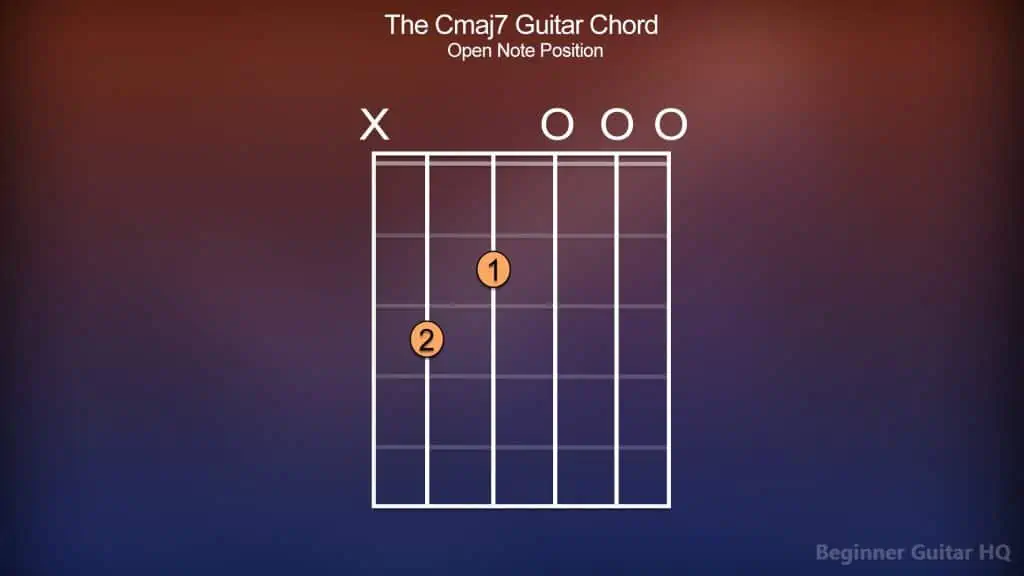
Our Cmaj7 chord, as with many other chords, comes in a few variations, some of which we will cover here. Why play in different variations? Firstly, as a beginner, you might want to first settle on a variation that fits your playing experience/ability. Another reason is to find a variation you enjoy! Chord variations all have slightly different sounds, and things they might make you feel, which may fit better for different songs/musical pieces. Lastly, you might even decide on a variation because of playability in a certain song. For instance, “why play it on the 8th fret, when you can play it from the open note position, with the rest of the chord progression?” Variations are something that comes down to personal preference, and what you feel is best. The goal here is to show you some of these options. Now, let’s get playing a few of these variations!
Chord chart of the Cmaj7 guitar chord in open note position.
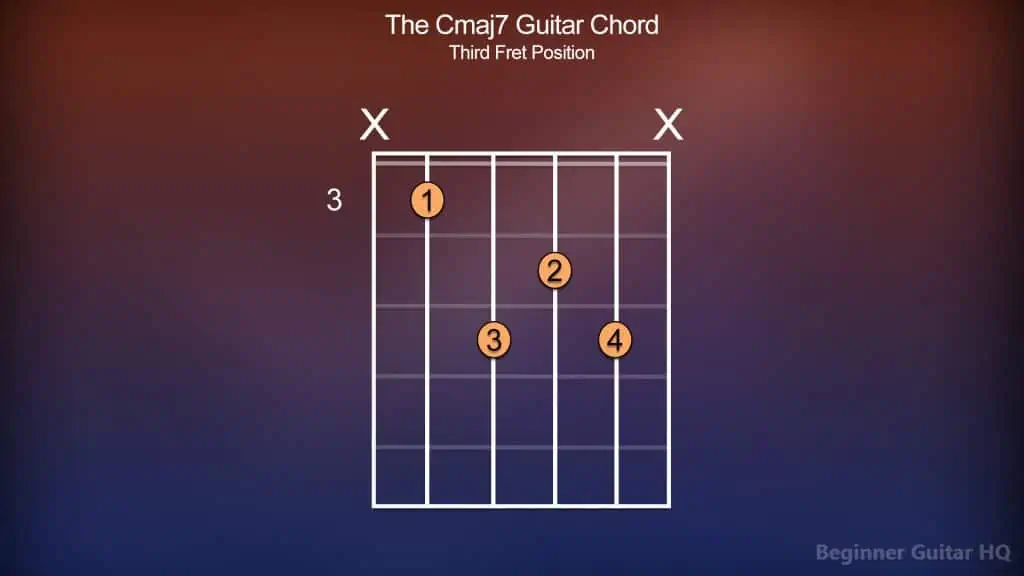
Chord chart of the Cmaj7 guitar chord in the third fret position.
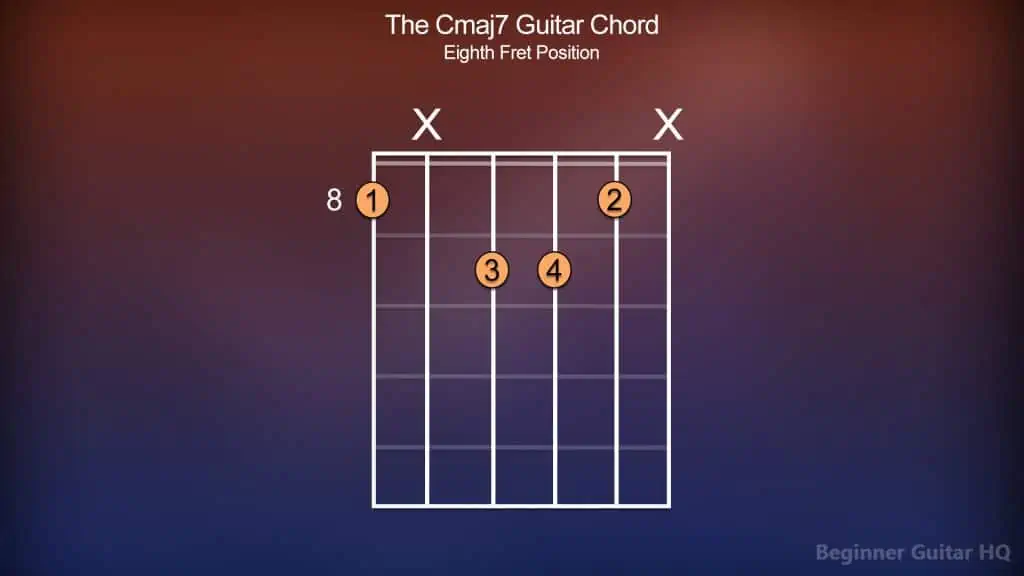
Chord chart of the Cmaj7 guitar chord in the eighth fret position.
Trouble With Chord Charts?
If you’ve never seen a chord chart before, it might feel a little overwhelming. Rest assured, they are actually much easier to understand than you might think! First, let’s bring our attention to the big rectangle with a bunch of vertical and horizontal lines. This represents our fretboard. Each vertical line represents a different string on the guitar. From left to right, we have our low E, A, D, G, B, and high E strings. Each horizontal line is what separates one fret from the next.
Within these fret spacings, and on the strings you will see circles containing numbers anywhere from 1 – 4. These numbers help us understand which finger we’re supposed to use on the corresponding fret/string. The number “1” is for our index finger. The number “2” is for our middle finger. The number “3” is for our ring finger. Lastly, the number “4” is for our pinky finger.
Sometimes, you might notice a long bar extending from one number to the next on a singular fret. This indicates that the player should form a “barre” in order to complete a “barre chord”. A barre is achieved by draping your index finger across multiple strings of a singular fret and applying pressure. For beginners, this will be challenging and slightly uncomfortable, but over time it will get easier!
Next, you may notice depending on the chord, above the fretboard and the strings, an “O” or an “X” might be present. The “O” represents an open note, a string to be played, but not fretted. The “X”, however, represents a note that is to not be played in order to complete the chord. Finally, we may see a number off to the left of the fretboard. This indicates the fret we’re to start on in forming our chord. However, if there is no number, then that generally implies that you are to start from the open note position.
Breakdown of the Cmaj7 Chord
Seventh chords like our “bluesy-sounding” Cmaj7 chord are used primarily in the world of Jazz and Blues music. It’s not uncommon, however, to hear these chords in genres such as Hip-Hop, Rock, and Neo-Soul, amongst others where they want to capture a similar vibe. What actually is a seventh chord though? In a nutshell; a seventh chord can be described as a triad, with an interval of a seventh from the tonic stacked on top. That might sound a little confusing though. Let’s run through everything to give you a better understanding of how this works.
For starters, let’s go over the key of C major since, after all, we’re forming a Cmaj7 chord. A key can be described as a grouping of notes/pitches that form the foundation for our scale. How are these notes determined? This is where our key signature comes into play. Every key has its own key signature. A key signature can be described as a grouping of sharps (#) or flats (b), often found after the clef on a piece of sheet music. These notes apply to a work of music, as a note that is marked sharp is to be raised by a semitone, while a note that is marked flat is to be lowered by a semitone.
In a summary: These markings after the clef indicate what happens to all of the corresponding notes within a song. For instance, if the key signature has an F#, then every F note becomes an F#.
So, how do we determine what the key signature of a given key is? In this case, it’s best to consult the circle of fifths.
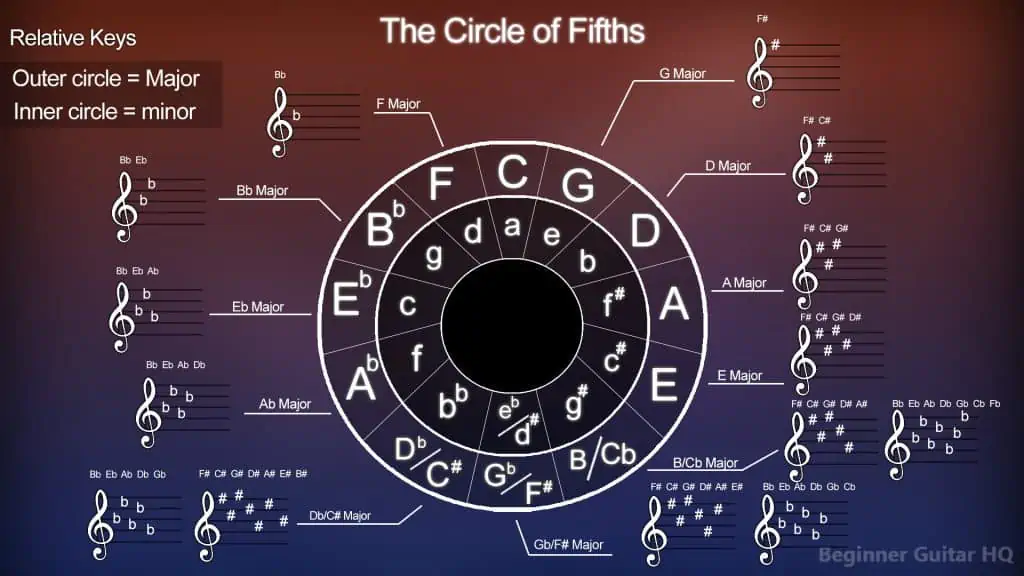
Diagram of the circle of fifths, displaying the most commonly used key signatures.
The circle of fifths can be thought of as a “cheat sheet” of sorts. This wheel-shaped diagram contains all of our most commonly used keys and their corresponding key signatures. As you can see, the outer ring contains all of our major keys, while the inner ring contains all of our relative minor keys (keys that share the same key signature).
Starting from C major, as you go clockwise around the wheel, you’ll notice that every key signature gains an additional sharp. On the other end of the spectrum, going counterclockwise around the wheel, each key signature gains an additional flat.
How do we determine which notes are sharp in each key? We use a simple acronym: FCGDAEB. This stands for:
“Father, Charles, Goes, Down, And, Ends, Battle”
The first letter of each word within the sequence of this acronym represents a sharp to be added. For instance, if we were in the key of D major, and we know D major has two sharps, then using our fingers, counting to two we go, “Father, Charles…” Therefore, the key of D major contains the sharps, F and C sharp. Another example is if we’re in B major, knowing B major has five sharps, doing the same thing, “Father, Charles, Goes, Down, And…” Therefore, the key of B major contains the sharps, F, C, G, D, and A sharp. For reference, here is how the sequence of notes appears on the circle of fifths:
- C = No sharps or flats.
- G = F
- D = F, C
- A = F, C, G
- E = F, C, G, D
- B = F, C, G, D, A
- F# = F, C, G, D, A, E
- C# = F, C, G, D, A, E, B
The idea is to memorize the number of sharps on the right half of the wheel, and you can easily determine what those sharps are, just by using this acronym.
What if our key signature contains flats?
Then, you simply reverse our acronym FCGDAEB, to BEADGCF, which stands for:
“Battle, Ends, And, Down, Goes, Charles’, Father”
If you don’t know how many flats the key has, you only need to remember the number “7”. Using the right half of the wheel with the sharps, if you know E major has four sharps, then you know Eb major will have three sharps, totaling seven. Then going, “Battle, Ends, And…” Therefore, the key of Eb major has the flats B, E, and A in its key signature. Here is the sequence of flats being added to each key:
- C = No sharps or flats.
- F = B
- Bb = B, E
- Eb = B, E, A
- Ab = B, E, A, D
- Db = B, E, A, D, G
- Gb = B, E, A, D, G, C
- Cb = B, E, A, D, G, C, F
Since, however, we’re in the key of C major, we have no sharps and no flats, different from C#, and Cb major, containing all seven sharps and flats.
Now that we have our key signature figured out, let’s put our scale together:
C > D > E > F > G > A > B > C
Our major scales follow their own strict pattern of tones (T) and semitones (S). This is what our sequence looks like:
T > T > S > T > T > T > S
What makes this really easy for us to see is that our C major scale has no sharp or flat notes. The first two intervals are both a tone apart, but as we know the third interval, from B > C, is a semitone apart. The next three intervals are all a tone apart, then our final interval E > F, is a semitone apart. It’s fairly straightforward!
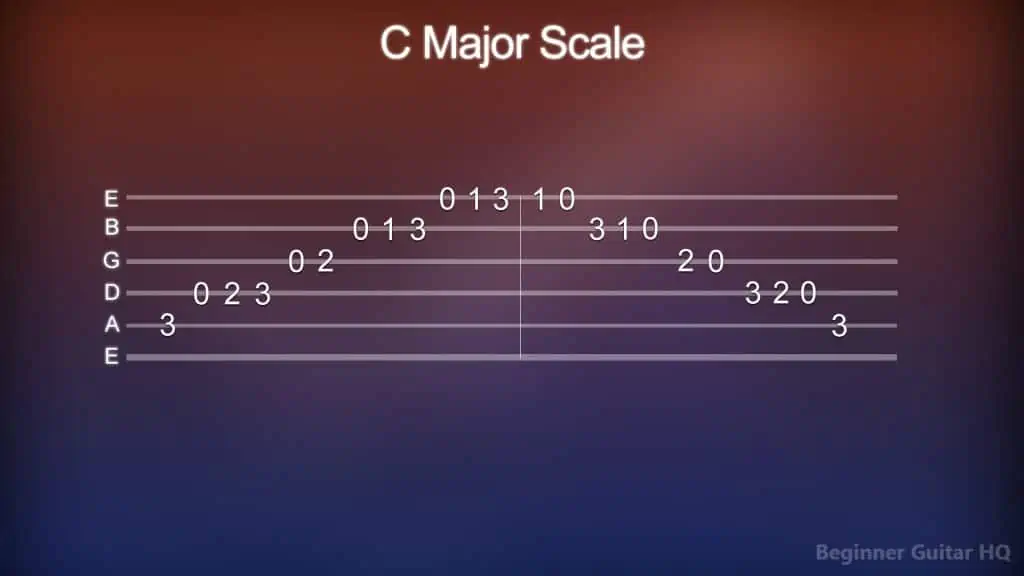
Now, let’s give our C major scale a try:
Guitar tablature of the C major scale from open note position.
Trouble With Tablature?
Guitar tablature, otherwise known as “tab”, is an alternate way for guitarists with no musical background to read, learn, and practice their favorite songs and exercises with ease. As you can see in the image above, we have six horizontal lines strewn before us, representing our six guitar strings. Each of the letters off to the left displays the name of the corresponding string. From the bottom to the top we have our low E, A, D, G, B, and high E strings.
On each of the lines, we can see numbers printed. These numbers tell us what fret we are to play on the corresponding string. Using our C major scale as an example, the A string contains the number “3”, which indicates that we are to play the third fret of the A string. If we had the number “2” on the D string, that indicates we are to play the second fret of the D string. However, if you see the number “0” on a given string, that indicates that we are to play an open note (a string to be played but not fretted).
It’s important to understand, however, that there are some drawbacks to guitar tabs when compared to musical notation/standard sheet music. The upside to using tablature is that it is easy to learn and gets straight to the point with what you’re trying to play. The downside, however, is the lack of detail that might otherwise be important to how the song or piece of music should be played. This means that it’s up to you the guitarist to use your ear and use your best judgment to fill in the gaps of what isn’t provided within the tab. However, in some cases, these details may be provided, as the quality in the tab varies. Here are some examples of symbols generally used in tablature:
H = Hammer-on
P = Pull-off
B = Bend
X = Mute
PM = Palm Mute
\ = Slide Down
/ = Slide Up
~~~ = Vibrato
If you’re a self-taught guitarist, then it’s very important to exercise good playing habits, primarily, good fingerwork. Most tabs and sheet music don’t supply the guitarist with information about where their fingers should go, as it’s generally implied that you already know. However, if you don’t, this can hinder your growth as a guitarist. It’s very important to read ahead and prepare yourself for what you’re going to play. The general idea is you want to play what will fit within the space of your hand. If you read ahead and saw that the lowest fret you’ll play is on the 2nd fret, while the highest note is on the 5th fret, but your first note is on the 3rd fret, what finger will you use first? You’ll probably use your middle finger first to play the 3rd fret, then your index on the 2nd fret, your ring finger on the 4th fret, and your pinky finger on the 5th fret. Good fingerwork and planning can make a world of a difference in cleaning up your technique.
Scale Degrees
Every note within our scale has an important purpose. These are often referred to as the different scale degrees. There are seven degrees within our scale, each with its own unique identifier that helps musicians refer to them. In our C major scale, here are the different degrees:
- C = Tonic (1st Degree)
- D = Supertonic (2nd Degree)
- E = Mediant (3rd Degree)
- F = Subdominant (4th Degree)
- G = Dominant (5th Degree)
- A = Submediant (6th Degree)
- B = Leading Tone (7th Degree)
- C = Tonic (1st Degree/Octave)
The first degree, the tonic is our tonal center, things feel calm here, making it the ideal place for things to resolve. Next, we have the second degree, the supertonic. The triad of the supertonic shares two notes with our fourth degree, which makes it an excellent substitution. We have our third degree, the mediant. The triad of our mediant shares two notes with our tonic, making it an excellent degree to draw out the tonic, instead of adding tension. Speaking of tension, we’re now on to our fourth degree, the subdominant, where things start to feel a little “tense”. The triad of our subdominant shares a note with our tonic, in this case, the C note. Moving to even greater tension we’re at the fifth degree, the dominant. Next to our tonic, this is the most important degree, sharing one note with its triad, but none with the subdominant. From this degree, we typically want to resolve and return home to our tonic. Upward, we have the sixth degree, our submediant. This degree is another excellent pre-dominant chord, working as an excellent substitution for the supertonic, sharing two notes with the tonic. Next, we have the seventh degree, our leading tone. The leading tone is an important degree for our seventh chords and is another degree holding a lot of tension. If you play the C major scale, and end on B, your ears want to hear it resolve to C. Finally, we hit the tonic, and we’re up an octave from where we began.
Triads
Now that we’ve covered each degree of our C major scale, let’s go over how we can make a C major triad. To make a C major triad, you need to take the tonic, mediant, and dominant (1st, 3rd, and 5th degrees) of our C major scale, and stack them on top of each other. This gives us the notes: C, E, and G.
Did you know that major triads contain their own set of intervals making it easy to identify them?
- Major 3rd – Between the first and third degree. C > E.
- Minor 3rd – Between the third and fifth degree. E > G.
- Perfect 5th – Between the first and fifth degree. C > G.
If we wanted to make our C major triad into a Cmaj7 chord, we would take an interval of an M7 (major seventh) from the tonic, and stack it on top. This gives us the notes: C, E, G, and B.
Finding chords compatible with C major
It doesn’t matter whether you’re a new or seasoned guitarist; sometimes writing your own chord progressions can be challenging! Thankfully, however, there is a way of making that process a little easier! This involves our newly learned triads. Taking every degree of our C major scale, we’ll form triads for each one:
- C Major = C, E, G (1st Degree)
- D minor = D, F, A (2nd Degree)
- E minor = E, G, B (3rd Degree)
- F Major = F, A, C (4th Degree)
- G Major = G, B, D (5th Degree)
- A minor = A, C, E (6th Degree)
- B diminished = B, D, F (7th Degree)
These are the various chords that work well in the key of C major! The problem, however, is what chords should you use for your progression. Sometimes, it doesn’t hurt to use chord progressions that have been done before. In fact, here are a couple of examples you can try:
I – IV – V
For this chord progression, we’ll start on our first degree, our tonic, C major. As we know, this is our home and tonal center. From here we will add some tension, moving to our fourth degree, the subdominant, F major. This contains the note C in its triad, sharing one note in common with our C major chord. From this, we’ll shift to the peak of our tension, the fifth degree, the dominant, G major. G major shares one note in its triad with C major, G, but nothing with the subdominant. Naturally, we’ll want to resolve so we’ll head back home to C major, doing this progression again. This chord progression follows this sequence: Cmaj > Fmaj > Gmaj.
I – vi – IV – V
For our next chord progression, we’ll start on the tonic as well, C major. Instead, however, we’ll move to our sixth degree, the submediant, a sad-sounding A minor. This is an excellent chord to draw out our tonic, as they share two of the same notes: C, and E. From here, we’ll slowly add more tension, moving to our subdominant, F major. Our F major chord shares two notes with our A minor chord, A, and C, but only one note with the tonic, C. You can see the tension gradually building as the notes begin to shift away from the tonic triad. Shifting to the peak of our tension, we fall on the dominant, G major. This chord shares a single note with our tonic, G, and nothing with our subdominant. This means it’s time to resolve. Therefore, we’ll head back home to our tonic to repeat this progression again. This chord progression follows this sequence: Cmaj > Amin > Fmaj > Gmaj.
Cmaj7 to Cmin7
When shifting from a major chord to a minor chord, it’s important to note some of the key differences that play a big part in how everything sounds. For instance, let’s talk about the key of C major, and how it compares to its minor counterpart. As we know, C major contains no sharps or flats in its key signature. C minor, contains three flats, however. This is what we call a parallel key relationship. This occurs when the keys share the same tonic but have a different key signature. A relative key relationship, on the other hand, occurs when the keys have a different tonic but share the same key signature.
The flats in C minor are Bb, Eb, and Ab. So now we’ll lay out the C minor scale:
C > D > Eb > F > G > Ab > Bb > C
As with our major scales, our minor scales also have their own strict pattern of tones (T) and semitones (S) that form the scale. This sequence appears as this:
T > S > T > T > S > T > T
We can see that the C minor scale follows this pattern perfectly. Our first interval from C > D is a tone apart, but the second interval, from D > Eb, is a semitone apart. E > F is normally a semitone apart, but because the key signature calls for an Eb, this now separates E > F by a tone. As we can see this happens to our interval Bb > C, and to follow this minor pattern A has to become Ab to keep it a tone apart from Bb.
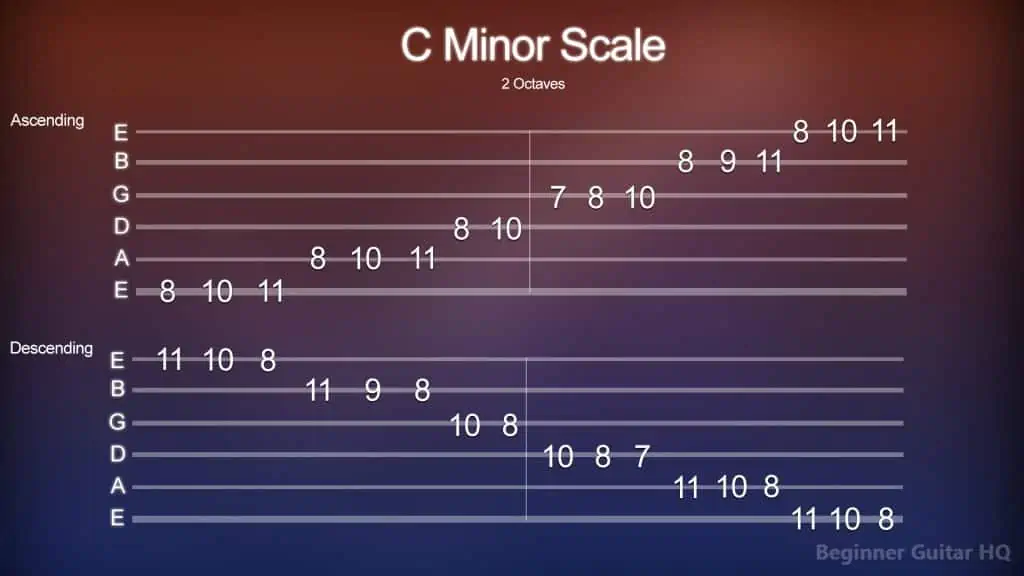
Now, let’s try playing the C minor scale:
Guitar tablature of the C minor scale from the eighth fret.
The triad of C minor follows the same formula as the triad of C major. We only need to take our tonic, mediant, and dominant degrees of our C minor scale (1st, 3rd, and 5th degrees). This gives us the notes: C, Eb, and G.
The difference between our C major triad and our C minor triad lies within the intervals used between the stacked notes. Let’s see if you can notice the difference:
- Minor 3rd – From the 1st degree to the 3rd degree. C > Eb.
- Major 3rd – From the 3rd degree to the 5th degree. Eb > G.
- Perfect 5th – From the 1st degree to the 5th degree. C > G.
Do you see it? In our minor triad, the first interval is a minor 3rd, while the second interval is a major 3rd. When we’re forming a major triad, this gets reversed! The first interval is a major 3rd, while the second interval is a minor 3rd. The perfect 5th says the same in both.
If we want to turn our C minor triad into a C minor seventh chord, we would need to take our existing triad and stack an m7 (minor seventh) on top. This gives us the notes: C, Eb, G, and Bb for our chord.
Conclusion
Now you know all that you need for getting started with your Cmaj7 chord! These chords can be really fun and challenging. It’s important to test out different variations and find what you enjoy, that works with what you’re seeking. However, it’s recommended that if you are interested in learning about these different chord variations and voicings, you look into the CAGED system, as this can change your perspective on guitar as a whole. Perhaps this may even lead to you adding new chords to your repertoire. The world is your oyster.


