Seventh Chords are an excellent way to spice up your chord progression by giving it a different, more “Jazzy” aesthetic. Your D7 chord on the guitar is no different! As you read on, we’ll dissect this smooth-sounding guitar chord, and how you can incorporate it into your practice routine. Let’s dive in!
Contents
How to Play the D7 Chord
The D7 chord is widely used across many popular songs, such as “Johnny Cash’s – Ring of Fire”, “Simon and Garfunkel’s – Cecilia”, and even “Pearl Jam’s – Last Kiss”. It comes with many variations, but we’ll only go over a few of them to get you started:
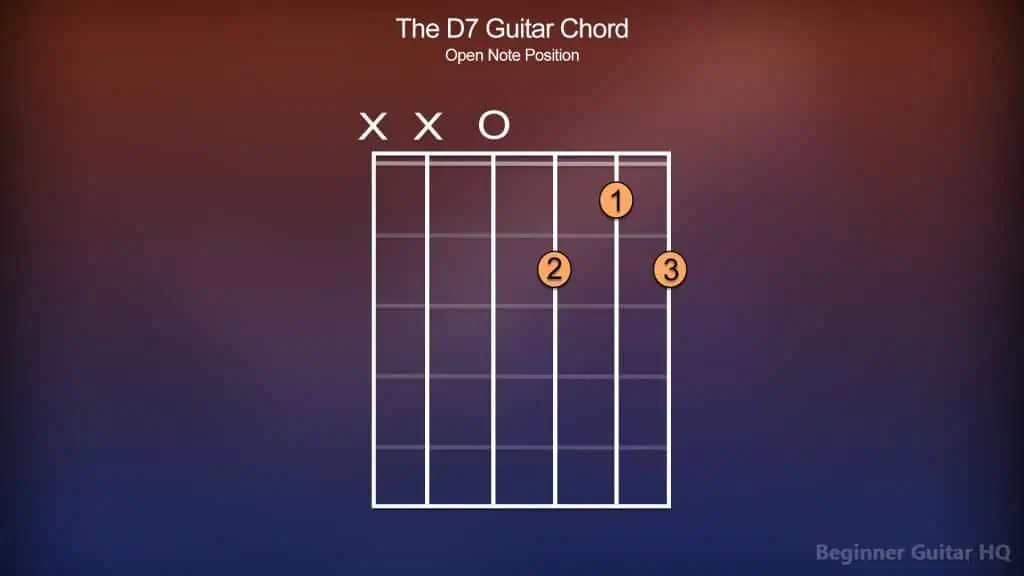
Chord chart of the D7 guitar chord being played from open note position.
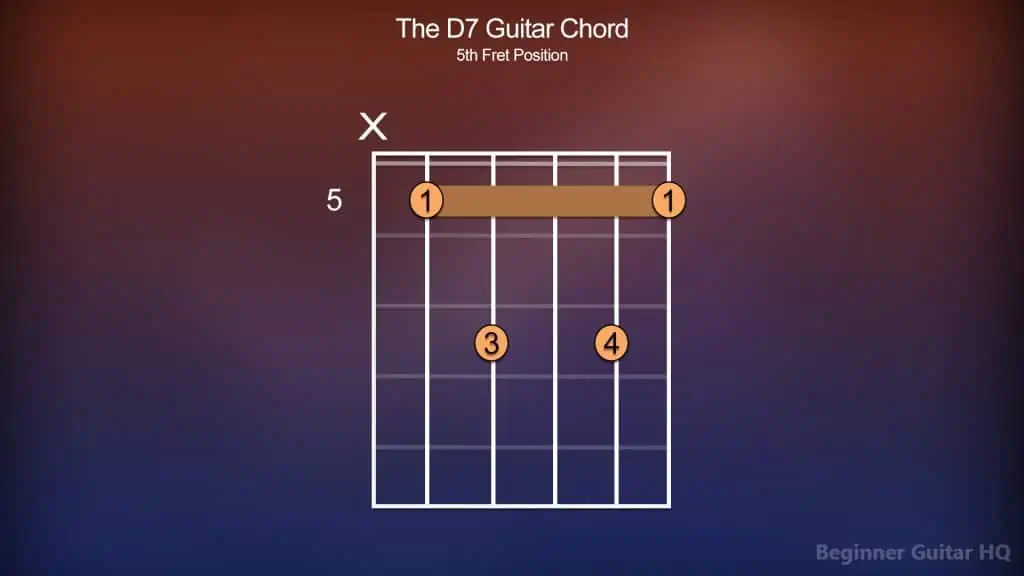
Chord chart of the D7 guitar chord being played from the fifth fret position.
Chord chart of the D7 guitar chord being played from the tenth fret position.
Trouble With Chord Charts?
If you’ve seen one of these, and are a little intimidated by it, don’t worry, we’ve all been there. Learning chord charts is an easy task. First, we’ll bring our attention to the giant rectangular box with numerous vertical and horizontal lines. This box is what represents our fretboard. The vertical lines that you see represent a different string on the guitar. From left to right we have our low E, A, D, G, B, and high E strings. The horizontal lines, however, separate one fret from the next.
On these lines, and within the frets, you will see numbers anywhere from 1 – 4. These numbers help us understand which finger is to go where on the fretboard. The number “1” is for your index finger. The number “2” is for your middle finger. The number “3” is for your ring finger. Finally, the number “4” is for your pinky finger.
If you happen to see a long bar stretching across numerous frets, this is what we call a “barre”, or “barre chord”. To play this, you simply need to drape your index finger across the strings of an individual fret and apply pressure. Some songs with a number of these chords will call for a “capo” to be placed on a certain fret to make this task easier.
Atop the fretboard, right above the strings, you might see an “O” or an “X”. The “O” indicates an “open note”, a string to be played, but not fretted. However, the “X” indicates a string to not be played in order to complete the chord. Finally, we may notice a number off to the left of a fret indicating the starting point in forming our chord. When no number is present, it’s generally implied you are playing it from the open note position.
Breakdown of the D7 Chord
Seventh chords, like our D7, are widely used in the genres of Jazz, Blues, and even Folk music, but aren’t uncommon in deep house, or hip-hop when the artist is trying to capture a similar aesthetic. A seventh chord is essentially a triad containing an interval of a seventh from the tonic placed atop the triad. If that sounded like gibberish, don’t worry! We’ll break it down into bite-sized chunks to make understanding seventh chords easier!
To better understand our D7 chord, let’s first go over the key of D major. A key is a collective group of pitches that form the foundation around a song. This could be anywhere from the melodic content, to the chords used within a song. To understand what the key of D major involves, however, we need two things: the key signature of D major, and the D major scale.
Let’s first cover our key signature. A key signature is a collection of sharps or flats that you’ll most times see after the clef on a piece of sheet music. The notes that are marked as sharp indicate that the note is to be raised by a semitone, while a note that is marked flat means that the note is to be lowered by a semitone. If you’re new to key signatures, it’s highly recommended to consult the circle of fifths as your tour guide to the various keys.
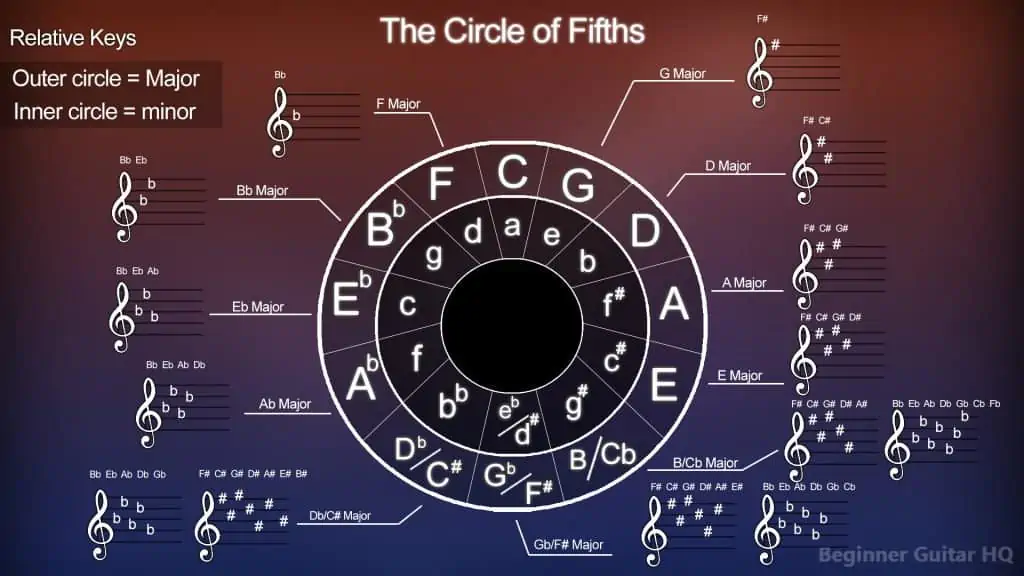
Diagram of the circle of fifths, displaying all of the most commonly used key signatures.
The circle of fifths is a wheel-shaped diagram that shows us all of the most commonly used keys and their corresponding key signatures. The outer ring shows us all of our various major keys, while the inner ring shows us our relative minor keys (keys that share the same key signature). As you can see, starting from C major, and going clockwise around the wheel, each key gets an additional sharp added to its key signature. However, on the other end of the spectrum, going counter-clockwise from C major gives every key signature an additional flat. For now, we’ll be focusing on the right half of the wheel with the keys containing sharps.
So, how do we determine which notes are supposed to be sharp? There’s a simple acronym to help you figure it out: FCGDAEB. This stands for:
“Father, Charles, Goes, Down, And, Ends, Battle”
Each first letter of every word within this acronym represents a different note that is to be sharp within a given key. Let’s take a look at the sequence below:
- C = No sharps or flats.
- G = F
- D = F, C
- A = F, C, G
- E = F, C, G, D
- B = F, C, G, D, A
- F# = F, C, G, D, A, E
- C# = F, C, G, D, A, E, B
Now to put this acronym into action, let’s start with the key of B major. From looking at the circle of fifths, we can deduce that B major contains five sharps. Now, using our fingers, let’s count to five along with our acronym: “Father, Charles, Goes, Down, And…” so, therefore, the sharps within the key of B major are F, C, G, D, and A. Let’s try another easy one, G major. We can see, G major has only one sharp, “Father…” therefore, the sharp in the key of G major is F.
A good goal to have is to memorize how many sharps are in each key, along with this acronym to make remembering key signatures easy.
Using this system, we can find that the key of D major contains two sharps, F and C sharp. Now, we can lay out our D major scale:
D > E > F# > G > A > B > C# > D
Major scales have a very strict pattern of tones (T) and semitones (S) that they follow. The pattern looks like this:
T > T > S > T > T > T > S
As you can see from the scale above, it fits this pattern perfectly. E > F is normally a semitone apart, however, we know that the second interval of notes is a tone (T), so, therefore, the F becomes F#, moving closer to G, making those a semitone (S) apart. The same occurs with B > C becoming B > C#, moving closer to D. Music is a series of different patterns and shapes!
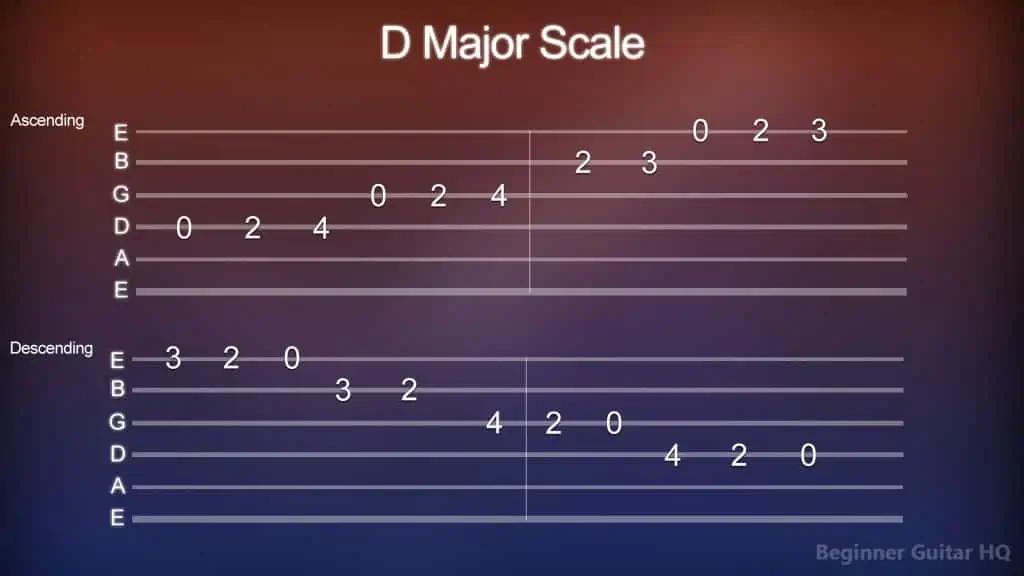
Now, let’s try playing our D major scale in tablature:
Guitar tablature of the D major scale, ascending and descending.
Trouble With Tablature?
Tablature, otherwise known as “tab”, is a very easy way for beginners with no real musical background to learn their favorite songs and exercises on guitar. Notice the six horizontal lines, each of them representing a different string on the guitar. From the bottom to the top, we have our low E, A, D, G, B, and high E strings.
Next, on each of these lines, you’ll notice some numbers. The numbers represent the fret to play on the corresponding string. So if you see the number “2” on the A string, that means you are to play the second fret of the A string. If you see the number “4” on the B string, that means you’re to play the fourth fret of the B string. If, however, you see the number “0” on a string, then that means you are to play an open note (a string to be played but not fretted).
As a beginner, tablature can make a world of a difference in how you go about learning guitar. However, it’s important to understand that in most cases, tablature is simplified when compared to musical notation. Oftentimes, when you look up how to play a song you really enjoy on the guitar, you don’t get all the details, and it’s really up to you as a musician and using your ear to fill in the gaps. However, there are some really great tabs put together that compensate for this, using symbols/markings to give the musician a better idea. Here are a few of the understood terms:
H = Hammer-on
P = Pull-off
B = Bend
X = Mute
PM = Palm Mute
\ = Slide Down
/ = Slide Up
~~~ = Vibrato
Something that isn’t always accounted for, especially for self-taught guitarists who are reading tab is maintaining good habits. The habit we’re talking about in particular is proper fingerwork. It’s not often you find on tablature or sheet music that they’ll tell you where to place your fingers when playing a song. It’s highly recommended when starting out to read ahead of what you plan to play. This will help you better assess what finger you should be starting with, and allow your playing to become more fluid. The idea is you want whatever you’re playing to fit within the space of your hand. Good fingerwork can go a long way!
Degrees
Now that we can play our D major scale, let’s dissect it a little further. Every note within our scale serves its own unique purpose based on its degree. Each of these degrees is given its own unique identifier, allowing the musician to comprehend and refer to them more easily. Here is how it appears within our D major scale:
- D = Tonic (1st Degree)
- E = Supertonic (2nd Degree)
- F# = Mediant (3rd Degree)
- G = Subdominant (4th Degree)
- A = Dominant (5th Degree)
- B = Submediant (6th Degree)
- C# = Leading Tone (7th Degree)
- D = Tonic (1st Degree/Octave)
Our tonic is our root note, our tonal center where things tend to resolve. The supertonic shares two notes with our fourth degree, making it an excellent substitution. The mediant, however, shares two notes with our tonic, which makes it a great degree to expand from the tonic with. The subdominant is one of the more important degrees, as it applies tension holding one of the same notes as our tonic, the D. The subdominant will usually transition to the dominant, the next most important chord to our tonic. This degree holds the most tension, sharing one note with our tonic. Typically, after reaching the dominant, you will resolve back home to the tonic. Next, we have the submediant, which is another great expansive degree from our tonic, as they both share two notes. Finally, we have the leading tone, which is a very important degree for making our seventh chord. This degree also falls right underneath the tonic one octave higher from where we began, therefore holding a lot of tension, wanting resolve.
Triads
Since we understand a bit more about our scale degrees, let’s build a D major triad. To build a major triad, you only need to take the tonic, mediant, and dominant degrees of our D major scale (1st, 3rd, and 5th degrees). This will give us the notes, D, F#, and A. When these notes are stacked on top of each other, you get a D major triad.
Major triads all share the same characteristic intervals between notes:
- Major 3rd – Between the 1st and 3rd degrees. D > F#.
- Minor 3rd – Between the 3rd and 5th degrees. F# > A.
- Perfect 5th – Between the 1st and 5th degrees. D > A.
When making a D7 chord, you simply need to take our existing D major triad and stack an interval of a seventh from the tonic on top. In other words, add the seventh degree of the major scale on top of our triad. This gives us the notes: D, F#, A, and C#.
We now have our D7 chord!
Chords Compatible With D Major
Making a chord progression from scratch can be a challenge for most! Thankfully, we have a method of making this task much easier. This can be achieved by forming triads on every degree of our D major scale:
- D Major = D, F#, A (1st Degree)
- E minor = E, G, B (2nd Degree)
- F# minor = F#, A, C# (3rd Degree)
- G# Major = G, B, D (4th Degree)
- A Major = A, C#, E (5th Degree)
- B minor = B, D, F# (6th Degree)
- C diminished = C#, E, G (7th Degree)
However, if you still have no idea what kind of chord progression to form, you may always use some tried and true chord progressions as the foundation for your next song! Here are a few examples used in the key of D major:
I – IV – V
This is a very standard chord progression most are familiar with. We start on our first degree, the tonic, D major. As we know, this is our home and tonal center. Next, we will shift to our fourth degree, for some much-needed tension, our subdominant, G major. The G major chord shares one note with D major, the note D. To add further tension, we’re going to move away to our next chord, A major on the fifth degree, our dominant. The A major chord does not contain the note D but does share the note A. Naturally, the dominant is the peak of tension within our chord progression, which means it’s going to beg for resolve. This is a three-chord progression, so it will go back around again by resolving to the tonic, D major. Our chord progression looks like this: D > G > A.
I – vi – IV – V
We’re going to change things up a little with this next chord progression by throwing a new degree into the mix. Once again, we’ll start on the tonic, D major. From D major, we’ll move to our sixth degree, the submediant, B minor. The submediant shares two notes with our tonic, in this case, the notes D and F#. Because our submediant shares two notes with our tonic, this makes the B minor chord an excellent chord for drawing out the tonic a little longer. Now, it’s time to add some tension, moving to our fourth degree, the subdominant, G major. We’ll do as we did in the prior chord progression, by now moving to our dominant, A major. Finally, we will loop back around again, resolving to the tonic. Our chord progression looks like this: D > Bm > G > A.
D7 to Dm7
Now that we have a better understanding of the key of D major, and D major seventh chord, what differences does it have from its minor counterpart? Well, let’s first cover the differences in their keys. Going back to the circle of fifths, we can see that D major and D minor have different key signatures. As we know, D major has two sharps within its key signature, F and C sharp. However, in the key of D minor, we have one flat, Bb. So, let’s go over how we find flat key signatures, very briefly. We know how to find sharp key signatures using FCGDAEB; in order to find flat key signatures, we simply reverse the acronym to BEADGCF. We can better understand this acronym as:
“Battle, Ends, And, Down, Goes, Charles’, Father”
The sequence of notes will follow this acronym much like it was for keys containing sharps:
- a = No sharps or flats.
- d = B
- g = B, E
- c = B, E, A
- f = B, E, A, D
- bb = B, E, A, D, G
- eb = B, E, A, D, G, C
- ab = B, E, A, D, G, C, F
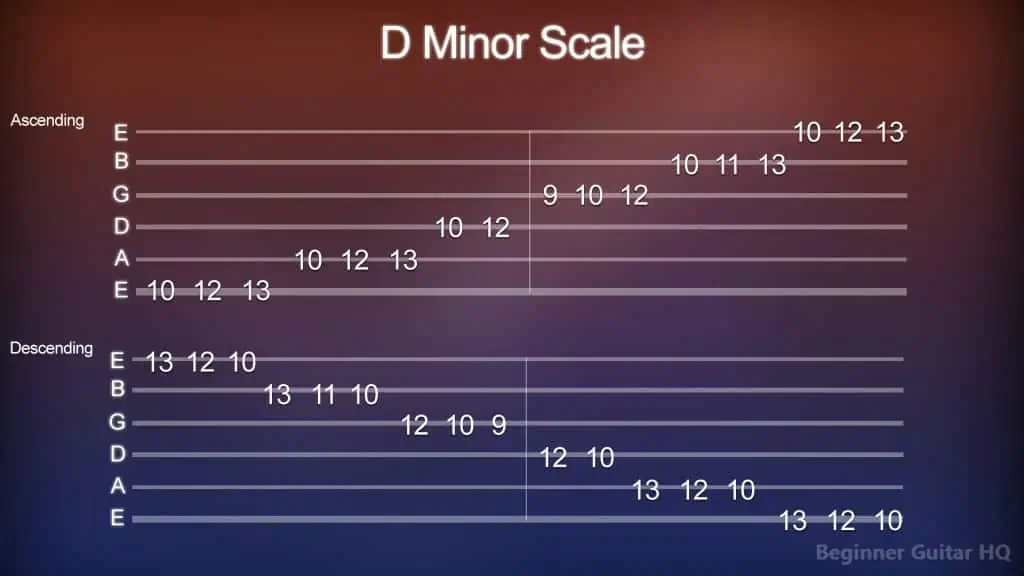
Now, let’s see how the key signature of d minor fits into a d minor scale:
D > E > F > G > A > Bb > C > D
As with our major scales, our minor scales have their own strict pattern of tones (T) and semitones (S) that they follow:
T > S > T > T > S > T > T
Let’s try playing it to hear how it sounds:
Guitar tablature of the D minor scale, ascending and descending.
Now let’s slot in our D minor scale to the various degrees:
- D = Tonic (1st Degree)
- E = Supertonic (2nd Degree)
- F = Mediant (3rd Degree)
- G = Subdominant (4th Degree)
- A = Dominant (5th Degree)
- Bb = Submediant (6th Degree)
- C = Leading Tone (7th Degree)
- D = Tonic (1st Degree/Octave)
Just as we did before with our major triads, let’s form a D minor triad using the tonic, mediant, and dominant degrees of our scale. This will give us the triad of notes: D, F, and A.
Minor triads have their own characteristic intervals different from our major triads. Minor triads consist of the following intervals:
- Minor 3rd = Between the 1st and 3rd degrees. D > F.
- Major 3rd = Between the 3rd and 5th degrees. F > A.
- Perfect 5th = Between the 1st and 5th degrees. D > A.
Can you see the difference? In a minor triad the 1st > 3rd intervals are a minor 3rd, and its 3rd > 5th intervals are a major 3rd. This differs from a major triad as in a major triad, this is reversed. Your 1st > 3rd intervals are a major 3rd, and your 3rd > 5th intervals are a minor 3rd.
If we wanted to turn our Dm chord into a Dm7 chord, all we need to do is take the 7th degree of the D minor scale and throw it on top of the D minor triad. This gives us the grouping of notes: D, F, A, and C.
Conclusion
That’s all there is to it! Seventh chords are a very good way to add some character to an otherwise stale chord progression. But why stop there? You may even choose to learn ninth, eleventh, or thirteenth chords. It’s always nice to find different ways of making your practice or songwriting sessions feel fresh and interesting, allowing you to grow as a musician. The most important thing, however, is that you have fun doing it. Keep on rockin’.

