As a beginner, it’s relatively common for us to explore the various Major and minor chords, due to their simplicity and contrasting harmonies. Therefore, it’s likely that you’ve already learned how to play the G Major chord on the guitar. However, today, we’ll cover its minor counterpart, the G minor chord. There are many widely popular hits that fall in the key of G minor, incorporating this chord, like “Toto’s – Rosanna” and even “System Of A Down’s – Chop Suey”. As you read on, we’ll cover how to play this chord, and a little bit of the finer details, so you can understand how it works! Let’s dive in!
Contents
Playing the Gm Chord
Learning to play the Gm chord can be a fun, yet challenging experience as many of the chord variations vary in difficulty. It can be a great asset to yourself as a guitarist to learn different variations, which may be called upon under different circumstances. These circumstances may depend on your playing ability, how it flows within the chord progression, and tonal qualities within the variation. It might even just come down to how you enjoy playing the chord. Below, we’ll be covering five variations of the Gm chord:
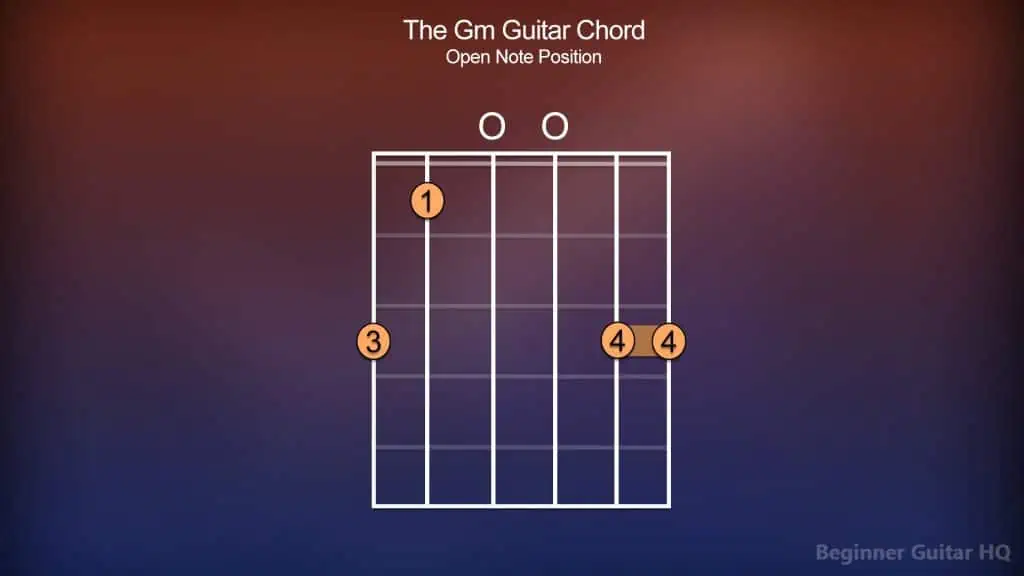
A chord chart of the Gm guitar chord being played from the open note position.
For the first variation, we’ll begin with playing from the open note position. Generally, we can understand this, due to there being no number to the left, indicating that we’re playing from a higher fret. Furthermore, we will notice a couple of “O” markings above the strings indicating open notes (strings to be played but not fretted).
To kick things off, let’s begin by taking our index finger (1), and placing it over the first fret of the A string. Following that, with our ring finger (3), we’ll position it over the third fret of the low E string. Lastly, with our pinky finger (4), we’ll form a partial barre, covering the third fret of the B and high E strings. To achieve this partial barre, simply drape your pinky finger over the high E and B strings and apply pressure. Lastly, the D and G strings will remain open.
From the low E string to the high E string, let’s give our guitar a strum! This concludes our first variation.
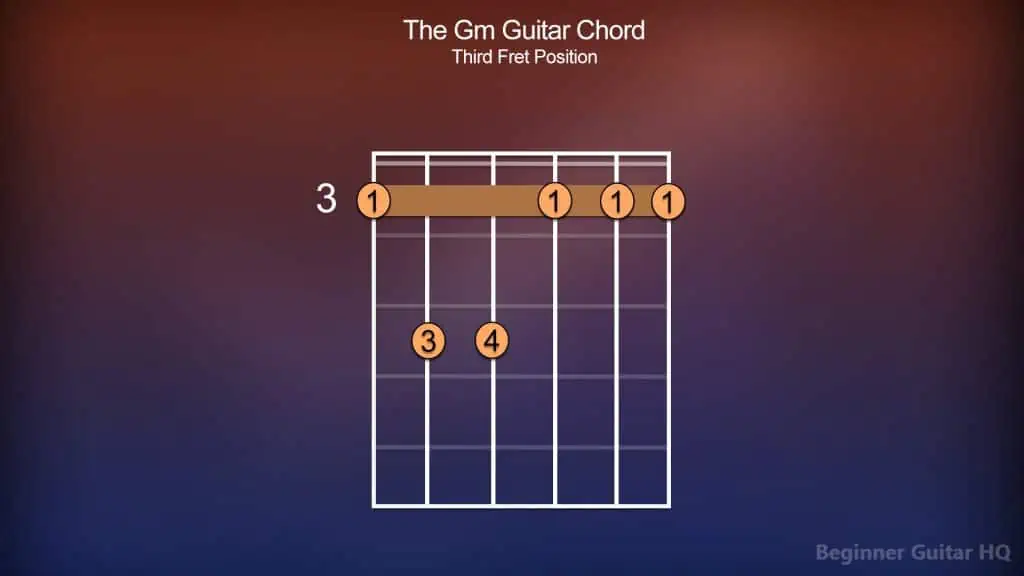
A chord chart of the Gm guitar chord being played from the third fret position.
For the second variation, we’ll begin from the third fret position. As you can see, this time we have a number “3” to the left of the chord chart, indicating that we’re to start from the third fret.
To start this chord off, we’ll be required to form a barre over the third fret. For this, however, unlike the partial barre chord formed in the prior chord chart, we’ll be taking our index finger (1), and draping it over the low E string to the high E string. Following that, we’ll take our ring finger (3), placing it over the fifth fret of the A string. Lastly, with our pinky finger (4), we’ll position it over the fifth fret of the D string.
From the low E string to the high E string, we can give the guitar a strum. Our second variation is complete.
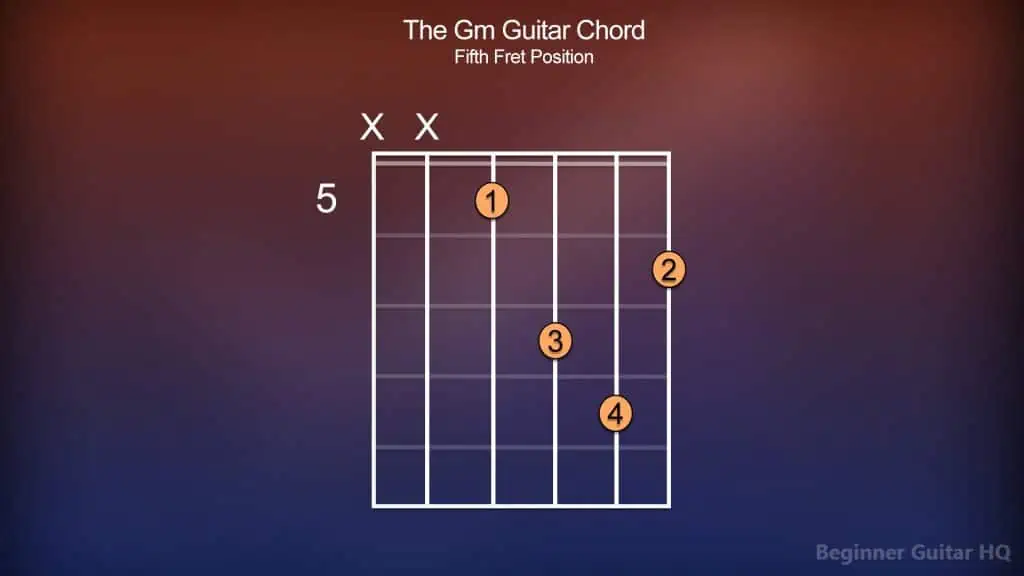
A chord chart of the Gm guitar chord being played from the fifth fret position.
For the third variation, we’ll be playing from the fifth fret position. To start things off, we’ll take our index finger (1) and place it over the fifth fret of the D string. Following that, taking our middle finger (2), we’ll position it over the sixth fret of the high E string. Next, with our ring finger (3), we’ll place it over the seventh fret of the G string. Lastly, with our pinky finger (4), we’ll place it on the eighth fret of the B string. The low E and A strings remain muted, as per the “X” marking above those strings.
From the D string to the high E string, we’ll give the guitar a strum. This concludes our third variation.
A chord chart of the Gm guitar chord being played from the eighth fret position.
For the fourth variation, we’ll be starting from the eighth fret. First, we’ll be taking our index finger (1), and placing it over the eighth fret of the D string. Following that, we’ll take our middle finger (2), and position it over the tenth fret of the A string. Next, on the same fret, our ring finger (3) will go over the high E string. Lastly, our pinky finger (4) will go over the eleventh fret of the B string. The low E string will remain muted, while the G string will be played open.
From the A string to the high E string, we’ll give our guitar a strum. This concludes our fourth variation.
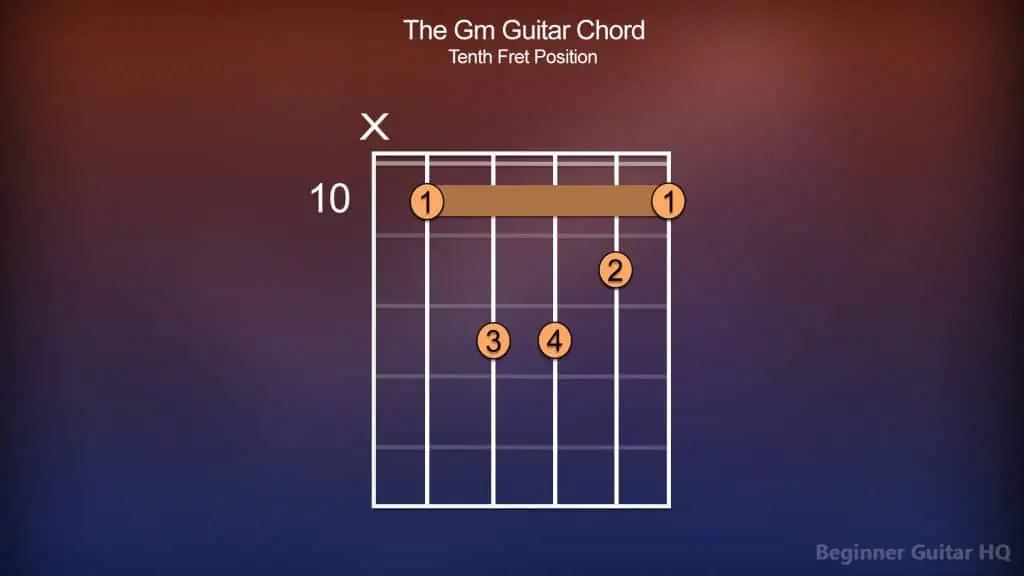
A chord chart of the Gm guitar chord being played from the tenth fret position.
We’ll begin from the tenth fret position for the fifth and final variation. Let’s begin by forming a partial barre on the tenth fret with our index finger (1), covering the A string to the high E string. Next, on the eleventh fret, we’ll take our middle finger (2), and position it over the B string. Following that, we’ll move to the twelfth fret, placing our ring finger (3) over the D string, and our pinky finger (4) over the G string. The low E string will remain muted.
From the A string to the high E string, we’ll give the guitar a strum. This concludes our final variation.
Breaking Down the Gm Chord
The Gm Chord can easily be broken down into a few fundamental components: the key, scale, and triad. Let’s cover each of these in a little more depth:
The key, which in this case, is G minor, is represented by a collection of notes, no different than you’d find in its corresponding scale, the G minor scale. However, the notes within are determined by the key’s key signature. The key signature, represented by a collection of sharps (#) and flats (b), can typically be seen following the clef on a piece of sheet music. When a note is marked as sharp, it’s to be raised by a semitone, while when a note is marked flat, it’s to be lowered by a semitone. Whether or not you might be new to key signatures, it can still help to consult the circle of fifths as a reference.
Diagram of the circle of fifths, displaying the most commonly used keys.
The wheel-shaped diagram you see above is otherwise known as the circle of fifths. In a nutshell, it displays all of our most commonly used keys, as well as their corresponding key signatures. The inner ring contains all of our minor keys, while the outer ring houses all of our relative major keys. Starting from the middle, C Major/a minor, going clockwise, you’ll notice that every key will gain an additional sharp to its key signature. However, going counterclockwise, you’ll see that every key will gain an additional flat to its key signature. Given that we are in the key of G minor, we’ll focus on the left half of the wheel containing the flats.
So, how can we find out which flats are in our key signature of G minor? We can use a simple saying:
“Battle, Ends, And, Down, Goes, Charles’, Father”
Each word following the sequence of this saying represents a different note to be made flat. As you go counterclockwise along the wheel, you’ll see this sequence in play:
a = no sharps or flats.
d = Bb
g = Bb, Eb
c = Bb, Eb, Ab
f = Bb, Eb, Ab, Db
bb = Bb, Eb, Ab, Db, Gb
eb = Bb, Eb, Ab, Db, Gb, Cb
ab = Bb, Eb, Ab, Db, Gb, Cb, Fb
It helps if you know how many flats a given key has, leaving the rest of the work to your fingers, sounding out our little saying. A brief example of this would be if we were trying to find the flats used within the key of bb minor. Knowing that bb minor has five flats, we’d follow the saying while using our fingers “Battle, Ends, And, Down, Goes…” Therefore, the flats in the key of bb minor are Bb, Eb, Ab, Db, and Gb.
Using this same method for the key of G minor, containing two flats, we can determine that the flats within are Bb and Eb. Now we can throw together our G minor scale:
G > A > Bb > C > D > Eb > F > G
Within our scale, each note plays an important role. We otherwise know these as our different scale degrees. Each degree of our scale, 1 – 7, has a unique name, allowing us to refer to them more easily. Within the G minor scale, here are our different degrees:
G = Tonic (1st Degree)
A = Supertonic (2nd Degree)
Bb = Mediant (3rd Degree)
C = Subdominant (4th Degree)
D = Dominant (5th Degree)
Eb = Submediant (6th Degree)
F = Leading Tone (7th Degree)
G = Tonic (1st Degree/Octave)
We’ll cover these in more depth later on, however, it’s important to know that they are a vital part of building our triads. To build a minor triad, we need to take the tonic, mediant, and dominant degrees of our scale (1st, 3rd, and 5th degrees), and stack them on top of each other. Within the G minor scale, this gives us the notes: G, Bb, and D forming our triad! Let’s take a deeper look into the intervals forming our G minor triad, giving it its melancholy harmony:
- Minor 3rd – Between the first and third degrees. G > Bb.
- Major 3rd – Between the third and fifth degrees. Bb > D.
- Perfect 5th – Between the first and fifth degrees. G > D.
Making Chord Progressions
When making chord progressions from scratch, it can be helpful to use what we’ve learned about triads. In fact, by using triads we can find every chord that is compatible with the key of G minor. Let’s begin by forming a triad on every degree of the G minor scale:
G minor – G, Bb, D (Tonic/1st Degree)
A diminished – A, C, Eb (Supertonic/2nd Degree)
Bb Major – Bb, D, F (Mediant/3rd Degree)
C minor – C, Eb, G (Subdominant/4th Degree)
D minor – D, F, A (Dominant/5th Degree)
Eb Major – Eb, G, Bb (Submediant/6th Degree)
F Major – F, A, C (Leading Tone/7th Degree)
Let’s briefly run through each degree on our G minor scale, and what they’re used for:
Tonic – Our G minor chord, the home and tonal center where things will resolve after tension.
Supertonic – Acts as a “predominant degree”, holding some tension. Shares two notes with the subdominant triad: C and Eb. (A diminished to C minor)
Mediant – Great degree for drawing the tonic out further, sharing two notes with it: Bb and D. (Bb Major to G minor)
Subdominant – A light tension-building degree, which will naturally want to raise to greater tension, like our Dominant degree.
Dominant – Typically the peak of our tension, and will naturally want to resolve home to the tonic. (D minor to G minor).
Submediant – Acts as a predominant degree, sharing two notes with the tonic, G and Bb, as well as the subdominant, Eb and G.
Leading Tone – A degree of great tension, naturally calling for resolve. (Try playing the C major scale and ending on B to hear the full effect).
Finally, we’ll return home to our tonic, just an octave higher from where we began!
Gm to Gmaj
We’ve covered quite a bit about the G minor chord, but what about its major counterpart, G Major? First, it’s worth noting that the relationship between these two keys is that of a “parallel key relationship”, meaning that while they share the same tonic note, they both contain different key signatures. This differs from the relationship G minor would have with Bb Major, in which they both contain different tonic notes, but share the same key signature.
Moving forward, the best way to understand the difference between these Major and minor chords is to break down the fundamental components as we did with the Gm chord earlier.
Let’s begin with the key. Consulting the Circle of Fifths again, we’ll notice that the key of G Major contains one sharp in its key signature, which is F#. With this information, let’s throw it together, making ourselves a G Major scale:
G > A > B > C > D > E > F# > G
An important distinction between Major and minor scales is the sequence of tones (T) and semitones (S) within, giving them their characteristically happy or sad sound.
Within a Major scale, the pattern appears as:
T > T > S > T > T > T > S
While within a minor scale, the pattern appears as:
T > S > T > T > S > T > T
A good way of comparing the sounds between the Major and minor scales is to take the C Major scale and compare it to its relative minor scale, A minor. This is a good place to start since neither key contains any sharps or flats.
Moving on, we can now form our major triad. Major triads, just like our minor triads, take the tonic, mediant, and dominant degrees (1st, 3rd, and 5th degrees) of the scale and stack them on top of one another. Within the key of G Major, this gives us the notes: G, B, and D.
Dissecting our G Major triad further, let’s look at the intervals forming our chord:
- Major 3rd – Between the first and third degrees. G > B.
- Minor 3rd – Between the third and fifth degrees. B > D.
- Perfect 5th – Between the first and fifth degrees. G > D.
When comparing a Major triad to a minor triad, there are a couple of key differences. The first difference is the starting interval, matching the type of triad. For instance, a Major triad will begin with a Major 3rd, while a minor triad will begin with a minor 3rd. The second difference involves a contrasting second interval. Therefore, in a Major triad, the second interval will be a minor 3rd, while in a minor triad, it will be a Major 3rd. Finally, the Perfect 5th will remain the same in both.
Let’s try playing our G Major chord, so we can hear the difference:
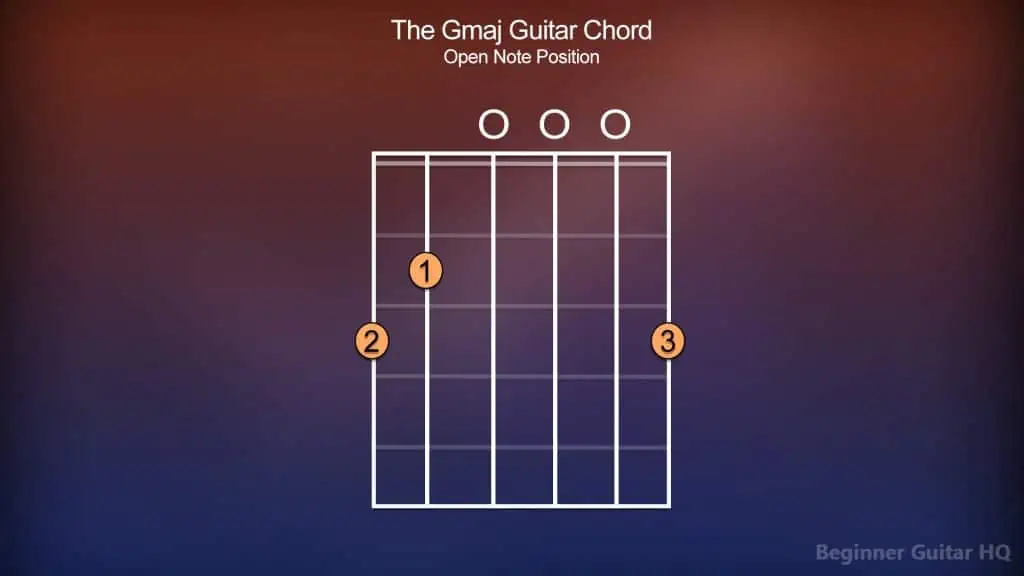
A chord chart of the Gmaj guitar chord being played from the open note position.
To play the G Major chord, we’ll begin from the open note position. Kicking things off, we’ll take our index finger (1), and position it over the second fret of the A string. Next, we’ll take our middle finger (2), placing it over the third fret of the low E string. Finally, with our ring finger, we’ll position it over the third fret of the high E string. We will leave the D, G, and B strings open.
From the low E string to the high E string, give the guitar a nice strum! That’s how the G Major guitar chord sounds. To hear the full effect, try returning to the first variation of our G minor chord, played from the open note position.
Other G Chords
If you’re feeling good about playing the G minor and Major chords, perhaps it’s time to take things up a notch. Here are a few different G chords you may wish to explore:
Gm7 – The G minor 7th chord, involves the use of a minor triad, with an interval of a minor 7th stacked on top. Therefore, this gives us the collection of notes: G, Bb, D, and F forming the foundation for the Gm7 chord.
We’ll begin from the open note position, placing our index finger (1) over the first fret of the A string. On the same fret, we’ll take our middle finger (2), positioning it over the high E string. Next, with our ring finger (3), we’ll place it over the third fret of the low E string. Finally, on the same fret, with our pinky finger (4), we’ll position it over the B string. The D and G strings will remain open. From the low E string to the high E string, let’s give the guitar a strum.
Gm9 – The G minor 9th chord involves all of the same notes as our Gm7 chord, but with the inclusion of a Major 9th stacked on top. This gives us the notes: G, Bb, D, F, and A forming our Gm9 chord.
We’ll begin from the open note position, first placing our index finger (1) over the first fret of the high E string. Following that, we can take our ring finger (3), and place it over the third fret of the low E string. Finally, taking our pinky finger (4), we’ll form a partial barre, covering the third fret of the G and B strings. We’ll leave the A and D strings open. From the low E string to the high E string, we can give the guitar a strum.
Gsus4 – The G suspended 4th chord is a little different than our aforementioned chords, in that it doesn’t involve the same formula for its triad. Instead, the mediant gets subbed out for the subdominant. This gives us the triad of notes: G, C, and D, forming our chord.
For the Gsus4 chord, we’ll start from the open note position. Taking our index finger (1), we’ll place it over the first fret of the B string. Next, taking our ring finger (3), we’ll form a partial barre over the third fret of the low E and A strings. Finally, with our pinky finger (4), we’ll position it over the third fret of the high E string. The D and G strings can remain open. Now, let’s give the guitar a good strum from the low E string to the high E string.
Conclusion
Now you have all of the tools at your disposal in making the most out of this chord! It can be really handy to bolster your repertoire, learning how to play chords and a number of their variations, especially when it comes to songwriting or improvisation. When the time feels right, you could even try your hand at some unique chords, like seventh, ninth, sus, diminished, etc. It’s good to keep things fresh, and allow yourself room to grow and develop your skills! So what are you waiting for? Keep on rockin’.

