Minor chords are an excellent way to capture that moody, and melancholy vibe in your songs. However, adding that seventh note, making it a minor seventh chord, can bring about a completely different feeling! Much is the case with other seventh chords, like our major, diminished, half-diminished, or even augmented seventh chords. However, today we’ll be going over the Gm7 chord, how it works, and how you can start playing it right away. Let’s dive in!
Contents
The Gm7 Chord Variations
Before anything else, let’s go over the Gm7 chord, as well as a few of its variations.
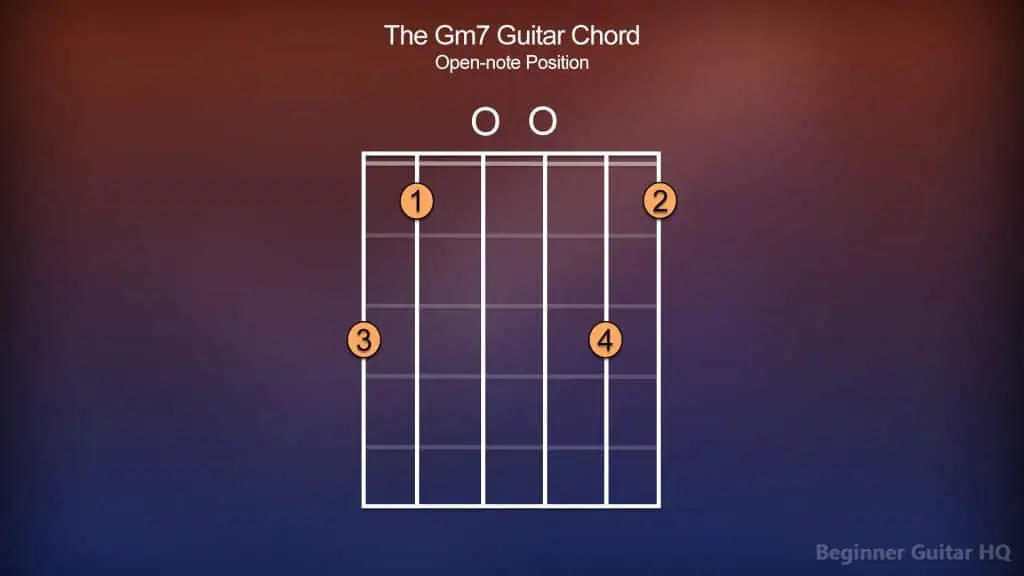
Chord chart of the Gm7 chord played from the open note position.
For our first chord variation, we’ll be starting from the open note position. From looking at our chord chart, we can understand this, as there are no numbers to the left of the chord chart indicating a starting fret. Furthermore, we have a couple of open notes within our chord, making it easier to assume it’s from the open note position.
To start, we’ll take our middle finger (2) and place it on the first fret of the high E string. Following this, we’ll take our pinky finger (4) and place it on the third fret of the B string. Now, we’ll skip over the D, and G strings, as these, are open notes (strings to be played, but not fretted). Next, we’ll take our index finger (1) and place it on the first fret of the A string. Finally, we’ll take our ring finger (3) and place it on the third fret of the low E string.
From the low E string to the high E string, give the guitar a good strum! You’ve successfully played the Gm7 chord from the open note position!
Chord chart of the Gm7 chord played from the third fret position.
For our second variation, we’ll be starting from the third fret. Notice how this time we see the number “3” to the left of the chord chart, indicating that we’ll be starting from this fret. Now, this chord variation will be slightly more challenging than the first, as it requires you to form a “barre” to complete a barre chord. Don’t fret if you don’t get it at first, this might just mean you need to develop more finger strength, something that will come the more you practice!
First, we’ll begin with the barre. Taking our index finger (1), we’ll drape it over all six strings on the third fret, and apply pressure. Next, we’ll be taking our pinky finger (4), and positioning it over the sixth fret of the B string. We’ll now skip over the D and G strings. Next, we’ll place our ring finger (3) over the fifth fret of the A string. Lastly, we’ll skip over the low E string, leaving it to be held down by the barre.
Give it a nice strum! Our second variation is complete!
Chord chart of the Gm7 chord played from the fifth fret position.
For our third variation, we’ll be starting on the fifth fret. To start this chord off, we’ll be forming a “partial barre”. To form a partial barre, just as before, drape your middle finger (2) over the sixth fret of the high E and B strings, and apply pressure. Next, we’ll take our ring finger (3) and place it on the seventh fret of the G string. Finally, we’ll take our index finger (1) and place it on the fifth fret of the D string. Notice how above the low E and A strings there are two “X” symbols. This implies that we’re not to play those strings to complete our chord, therefore, we’ll skip over these and call our chord complete. Give it a strum!
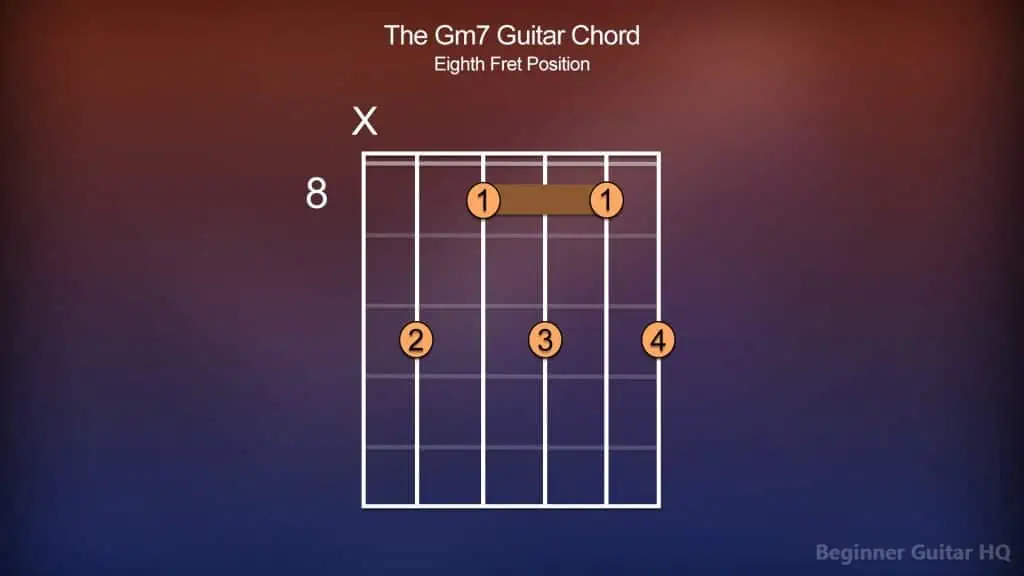
Chord chart of the Gm7 chord played from the eighth fret position.
For our fourth variation, we’ll be starting on the eighth fret. First, using our index finger (1), we’ll form our partial barre on the eighth fret, covering the D, G, and B strings. Next, we’ll take our pinky finger (4) and place it on the tenth fret of the high E string. Now, we’ll skip over the B string, moving to the G string where you’ll take your ring ringer (3) and place it on the tenth fret. Once again, we’ll be skipping over the D string, moving to our A string, where we’ll take our middle finger (2) and place it on the tenth fret. We’ll now leave our low E string muted. From the A string to the high E string, give the chord a strum!
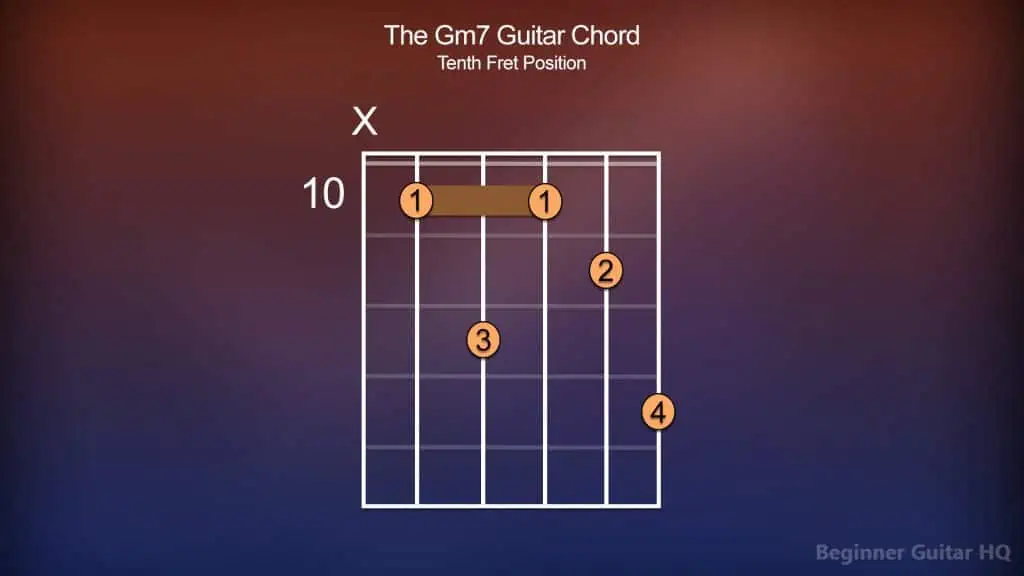
Chord chart of the Gm7 chord played from the tenth fret position.
For the fifth and final variation that we’ll cover, we’ll be starting on the tenth fret. First, using our index finger (1), we’ll be forming a partial barre on the tenth fret of the A, D, and G strings. Next, we’ll be taking our pinky finger (4) and placing it on the thirteenth fret of the high E string. Following that, we’ll take our middle finger (2) and place it on the eleventh fret of the B string. Finally, skipping over the G string, we’ll place our ring finger (3) on the twelfth fret of the D string. We’ll leave the low E string muted.
From our A string to our high E string, give the chord a strum. We’ve successfully completed our final variation.
Chord variations give you a variety of different options to play the same chord, which may be preferable under certain circumstances.
So why play one variation over another?
Firstly, they’re fun. Playing different variations can be an excellent way to encourage growth as a guitarist. What better way to grow than through finding unique ways of challenging yourself, whether that’s through practicing scales, improvisation, or trying a chord that is a little out of your comfort zone?
On the other end of the spectrum, you may choose one variation over another because of your skill level as a guitarist. It can be healthy to have a lot of ambitious goals, however, sometimes it might make more sense to play something you feel more comfortable with. This can help you build up some confidence and some enjoyment in being able to nail some of your favorite chords!
Sometimes a chord variation may fit into a chord progression better than others, making it more playable. This can vary from musician to musician. Sometimes it’s more desirable to play chords around the same fret, for a smoother transitioning chord progression.
You might even decide on a variation due to the tonal qualities and characteristics it gives off over another variation. This is due to the fact that some notes in a variation contain more emphasis, being played enharmonically. Unlike inversions, variations don’t just flip a chord on their head but instead are formed around the basis of the notes within the chord/triad, which may show up more than once.
It can even come down to personal preference. We all have our favorite chords, which may/may not depend on any of the aforementioned factors! The world is your oyster.
What Are Seventh Chords?
Seventh chords are used across a variety of genres but are mostly known for their presence in Jazz and Blues music. So what are they? Firstly, it’s important to note that there are a number of flavors our seventh chords might come in. For instance, the main topic at hand is our minor seventh chord, Gm7. Minor seventh chords are built upon the foundation of a minor triad, with an interval of a minor 7th (m7) from the tonic on top. When these notes are played simultaneously, you’ll have a minor seventh chord.
You may even run into other seventh chords:
- Major 7th – Major triad, Major 7th from the tonic.
- Dominant 7th – Major triad, minor 7th from the tonic.
- Half-Diminished 7th – Diminished triad, minor 7th from the tonic.
- Diminished 7th – Diminished triad, diminished 7th from the tonic.
- Augmented 7th – Augmented triad, minor 7th from the tonic.
Oftentimes, seventh chords are used to add a layer of tension to a chord progression, given their smooth, yet dissonant, composure. Given their overall tone, it makes sense that they’re commonly used at points of great tension, typically our dominant, and leading tone, before resolving on the tonic. However, it’s not exclusively used at these points in a chord progression. In fact, there are times when it might be used on the supertonic or subdominant degrees, where tension starts to build. Less often, you’ll see seventh chords on the tonic, mediant, or submediant degrees.
Building a Gm7 Chord
Now that we know about seventh chords, let’s dive a little deeper into how we build our Gm7 chord. To begin, we’ll first need to go over three fundamental pieces that form the foundation behind our chord: key, scale, and the triad.
Let’s start with our key, the key of G minor. Our key is defined by its grouping of musical pitches, which in this case would be no different than those within the G major scale. However, before we get to that, we should understand how these pitches come to be; through our key signature.
Every key has its own key signature, visually represented by the grouping of sharps (#) and flats (b) that come after the clef on a piece of sheet music. When a note is marked as sharp, it’s to be raised by a semitone, however, when a note is marked flat, it’s to be lowered by a semitone. When trying to figure out the sharps and flats in a key’s given key signature, it can help to turn to the circle of fifths for the answer.
However, to cut out the middleman, we’ll reveal that the key signature of G minor contains two flats, Bb, and Eb. With this information, we can now piece together our G minor scale. Here is the sequence of notes:
G > A > Bb > C > D > Eb > F > G
Every note within our scale has an important role to play; we refer to these as the different scale degrees. Each degree has its own name, helping musicians refer to them with ease. Within the G minor scale, here are the different degrees:
G = Tonic (1st Degree)
A = Supertonic (2nd Degree)
Bb = Mediant (3rd Degree)
C = Subdominant (4th Degree)
D = Dominant (5th Degree)
Eb = Submediant (6th Degree)
F = Leading Tone (7th Degree)
G = Tonic (1st Degree/Octave)
A triad is a type of chord containing three notes, played simultaneously. To form a minor triad, the foundation for our minor seventh chord, we need to take the tonic, median, and dominant degrees (1st, 3rd, and 5th degrees) of our minor scale and stack them on top of each other. This gives us the notes: G, Bb, and D. This is our G minor triad, otherwise known as the G minor chord.
In order for us to turn our G minor triad, into a G minor seventh chord, we simply take the leading tone (7th degree) from our G minor scale and stack it on top. This gives us the notes: G, Bb, D, and F.
Making Chord Progressions
Since we have a general understanding of triads, and how they’re formed, did you know they can also be used to find chords compatible with one another? In order to do so, we’ll need to take our G minor scale, and stack triads on each degree of our scale, giving us the following chords:
G minor = G, Bb, D (Tonic/1st Degree)
A diminished = A, C, Eb (Supertonic/2nd Degree)
Bb Major = Bb, D, F (Mediant/3rd Degree)
C minor = C, Eb, G (Subdominant/4th Degree)
D minor = D, F, A (Dominant/5th Degree)
Eb Major = Eb, G, Bb (Submediant/6th Degree)
F Major = F, A, C (Leading Tone/7th Degree)
To get a generalized understanding of each degree, let’s run through each of them briefly:
-
- Tonic – Our root note, otherwise considered our home and tonal center where things tend to resolve after tension.
- Supertonic – Acts as a predominant degree, adding tension. The supertonic triad shares two notes with our subdominant triad, C and Eb.
- Mediant – A great degree for drawing the tonic out further. The mediant triad shares two notes with the tonic triad, Bb and D.
- Subdominant – A predominant degree for building some mild tension. Will typically escalate to a degree of greater tension, like the dominant.
- Dominant – Our most important degree, next to our tonic. Typically referred to as our peak in tension/climax. After which, it’ll normally resolve home to our tonic.
- Submediant – Acts as a predominant degree, sharing two notes with our tonic, G and Bb, and our subdominant, Eb and G.
- Leading Tone – An important degree for our various seventh chords. This degree holds a great deal of tension, much like our dominant.
Building chord progressions that you enjoy might take some time and practice! However, there are plenty of chord structures out there you might look to try, especially when discovering what works well:
i – iv – v
The “one-four-five” is one of the most common chord progressions, used in many popular hits like “Lynyrd Skynyrd’s – Sweet Home Alabama”, “The Who’s – Pinball Wizard”, and even “Green Day’s – Basket Case”. Within the key of G minor, these chords would appear as G minor, C minor, and D minor.
i – III – VII
This chord progression consists of the chords: G minor, Bb Major, and F Major. To explain this progression in slight detail, we start on the tonic, G, before shifting to Bb Major, the mediant, which draws our tonic out a little (remember they share two of the same notes). From here, we then shift to our leading tone, F Major, which Bb Major shares one note with, F. This is where we’re at the peak of our tension, then we return home to our tonic for resolve.
i – VI – III – VII
This chord progression has been used in songs like “Green Day’s – 21 Guns”, “Red Hot Chilli Peppers’ – Otherside”, and even “Shania Twain’s – That Don’t Impress Me Much”. In the key of G minor, this four-chord progression consists of the chords, G minor, Eb Major, Bb Major, and F Major.
Gm7 to Gmaj7 – What’s the Difference?
Since we’ve covered quite a lot about our Gm7 chord, that might beg the question “what about its major counterpart, Gmaj7?”. There’s a bit to unpack here, starting with their relationship being a parallel key relationship. What this means is that while they might share the same tonic, G, they both contain different key signatures. This differs from the relationship that G minor has with Bb Major, in which they share the same key signatures, but contain a different tonic.
We know that G minor has two flats in its key signature, Bb and Eb. However, G Major contains one sharp in its key signature, F#. Therefore, while the starting point of the G Major scale is the same as G minor, we’ll have different notes affected by the difference in key signatures. Here is how our G Major scale appears:
G > A > B > C > D > E > F# > G
When making a G Major triad, the steps in doing so aren’t any different than when we made our G minor triad. We only need to take the tonic, mediant, and dominant degrees (1st, 3rd, and 5th degrees) of our G Major scale, and stack them on top of each other. This gives us the notes: G, B, and D.
While the steps are the same, it’s important to note the differences within the triads, themselves; primarily the intervals. For instance, here are the intervals of our G Major triad:
- Major 3rd – Between the 1st and 3rd degrees. G > B.
- Minor 3rd – Between the 3rd and 5th degrees. B > D.
- Perfect 5th – Between the 1st and 5th degrees. G > D.
However, when we built our minor triad earlier, the first interval was a minor 3rd, and the second interval was a major 3rd. As you can see here, these intervals are reversed. The perfect fifth remains the same within both.
If you want to convert the Major triad into a Major seventh triad, then as before, we stack the seventh degree of our scale on top of the triad. This would give us the collection of notes G, B, D, and F#, making up our Gmaj7 triad.
Now, let’s try playing our Gmaj7, so we can hear the difference:
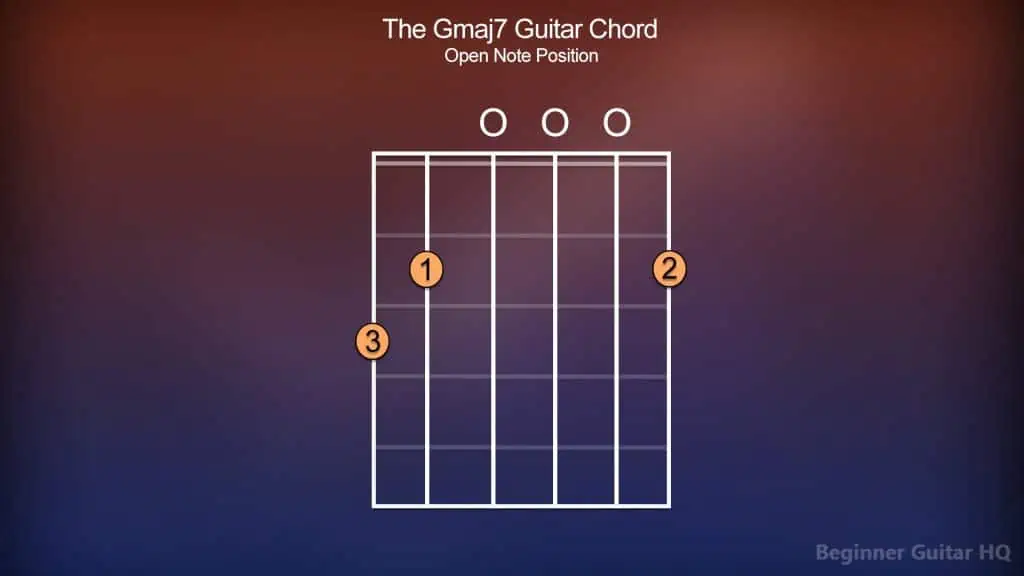
Chord chart of the Gmaj7 chord played from the open note position.
For our Gmaj7 chord, we’ll be playing from the open note position. Let’s begin by taking our middle finger (2) and placing it on the second fret of the high E string. Next, we’ll be skipping over the D, G, and B strings, as these are all to be played as open notes. Following that, we’ll place our index finger (1) on the second fret of the A string. Finally, taking our ring finger (3), we’ll place it on the third fret of the low E string.
Give it a nice strum, and we have our completed Gmaj7 chord.
Conclusion
Seventh chords can be a lot of fun to learn and mess around with. It’s a great way of getting those creative juices flowing, utilizing new chords beyond your standard major and minor chords. In fact, there are many other chords beyond seventh chords and their variations you might choose to learn next! For instance, there are augmented, diminished, and even sus chords to add more character to your chord repertoire. The more chords you know, the more options you’ll have when it comes to writing your own music! With that said, make sure you take it slow and enjoy the process! More importantly, keep on rockin’.


