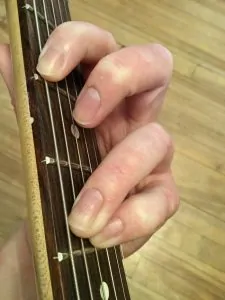
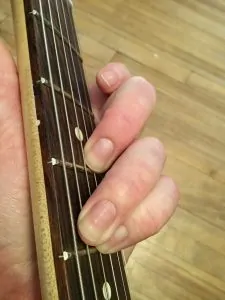
For beginner guitarists (and even experienced players), barre chords can feel like a major pain in the…hand. After all, they’re one of the trickiest voicings to master.
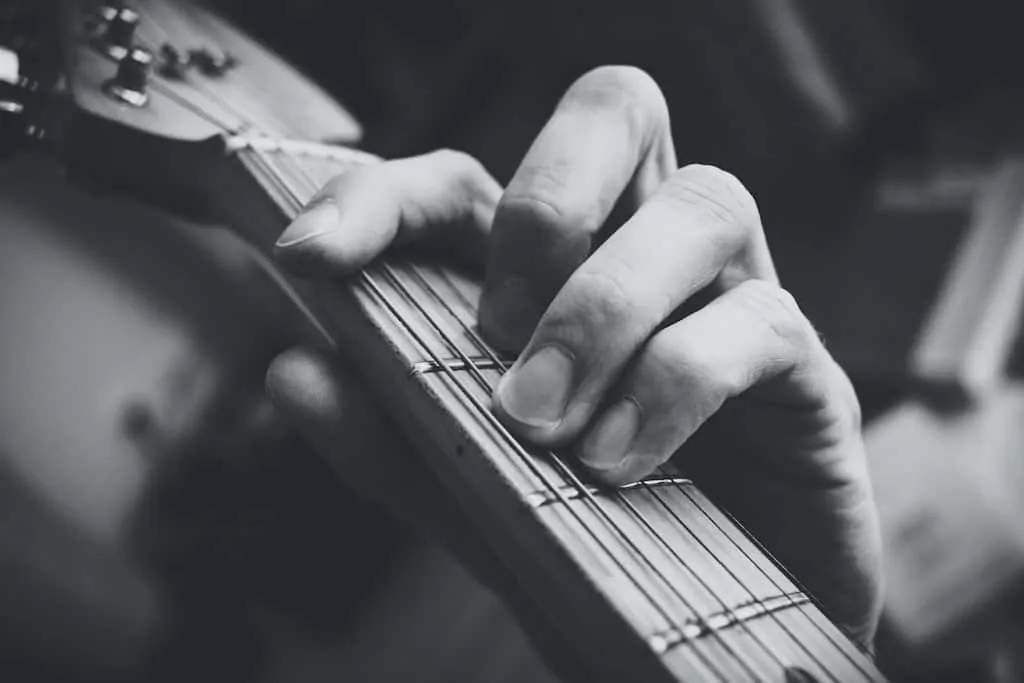
It may not seem like it when you’re fretting as hard as you can and getting nothing but dead strings. But barre chords really aren’t that bad. Once you get the hang of them…
How do you do this?
- Master the fretting technique
- Make alterations when you need to
- Train your fingers with short exercises
Once you’ve conquered the barre, you’ll unlock a whole new set of chords to play your favorite songs. Better yet, you can learn how to use them to write your own songs!
Contents
First Things First
Before we dive into those wild finger stretches, let’s look at how barre chords are formed and how we use them in songs.
What are they?
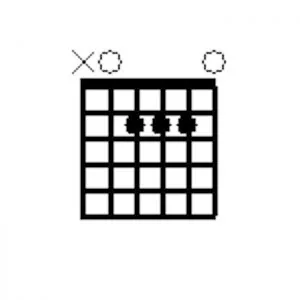
When you first learned guitar, you probably started with open chords. These voicings are played on the first three frets. They consist of one or more open strings, plus recognizable finger shapes like A, Em or G.
A (or A major) is a common open chord. The root note is played on the open 5th string (A).
Most natural major chords (with no sharps or flats) are easy to fret in this area. And in some popular keys like G major, you can play entire songs with just these open voicings.
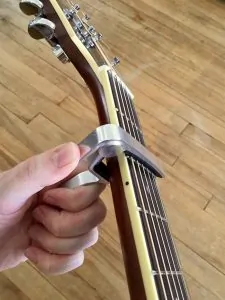
But let’s say you have a song in B♭major. B♭ is three semitones higher than G. You could put your capo on the third fret and play the same shapes as G major. For example, you would substitute your B♭ with a G shape, E♭with a C and F with a D.
Capos works fine for basic rhythm progressions. However, it gets trickier when you’re dealing solos. Especially if you run out of space for notes beyond the 21st-24th fret.
And if the song modulates (changes keys)? You’ll have to stop playing and shift your capo to a new fret. Not ideal in the middle of a performance…
Even with a trigger capo, you won’t be able to make split-second modulations.
Bottom line –– capos can only get you so far. This is where barre chords come in.
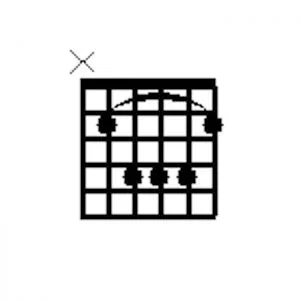
Like the name suggests, barre chords use your index finger as a bar across your guitar neck, like a capo. Below this, you form the shapes of your classic open chords with your middle, ring and pinky fingers.
The two main types are the:
This B major is an A shape chord, with an A major voicing.
Some barre chords are based on D, with the root on the 4th (D) string, or G, with a muted 5th string and the root on the 6th. However, I wouldn’t worry about these for now. They aren’t very common.
Before you start learning barre chords, you’ll need to memorize the notes on your 6th and 5th strings. This way, you’ll know how to adjust your barre so you can fret the root note at the right position.
Let’s go back to our B♭example. B♭ is one semitone higher than A and six higher than E. You could place your index on the 1st fret and add an A shape on the 3rd fret. Or, you could place it on the 6th fret and add an E shape on your 8th-9th frets. It’s up to you!
This principle works with any other A or E shape variation –– including minors (m), dominant 7ths (7), major 7ths (maj7) and minor 7ths (m7).
Why use them?
Not all guitarists are masochists. Most of us didn’t want to rip up our fingers by learning how to barre chords. But as the saying goes, “no pain, no gain.” If you really want to take your playing to the next level, you need to know how to use them.
Capos are fine up to the 5th fret. If you place it any higher, you put too much pressure on your neck. So, it’s much safer to use barre chords instead.
Barre chords have other advantages too. You can change positions in a second or less. You can experiment with different voicings to shake up a tired open shape progression. The possibilities are endless!
All you need is the proper technique to make it happen.
Technique
How can you conquer these fearsome chords?
The first step is to learn how to fret them properly. With your fingers, wrist and arm in the proper positions, you’ll cut out annoying fret buzz and protect yourself from injuries.
Index finger
Let’s start with the most important finger –– the index.
Lie it straight across all six strings. The first knuckle joint should fall in between the 3rd and 4th string. The second should graze the edge of your fretboard.
For E shapes, the tip of your finger can extend just beyond the 6th string. For A shapes, you can pull it back so it’s lightly touching (and muting) the 6th string.
If your index is directly over the fret, move it so it’s just slightly above or below. This way, you won’t deaden your sound.
One mistake I used to make was to barre straight down with the fleshy part of my index finger. It seems like the logical thing to do. However, this actually makes it harder to apply enough pressure to your higher strings.
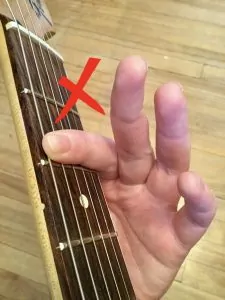
When you fret straight down (left), your finger will want to press harder with the first joint, at your 4th-6th strings. However, when you fret on a slight angle (right), you can apply pressure evenly.
For even pressure, try fretting with the bony part of your finger by tilting it slightly away from your other fingers. This will feel weird and unnatural at first. But you eventually get used to it.
Now that you have your barre in place, press your index into the fretboard. Concentrate on pushing with the middle of your finger, which is the weakest point. The stronger fingertip will naturally follow.
How much pressure should you use? That depends on the type of guitar and strings you have. Ultimately, you want to press just hard enough to hear a clear sound on each individual string. Anything more and you might hurt yourself.
One final tip –– release the pressure off your index each time you move to a new position or change the shape of your other fingers. You don’t want to overstrain your hand.
Thumb
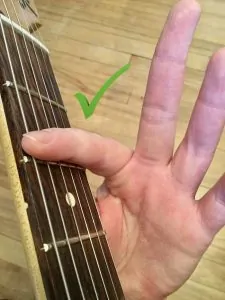
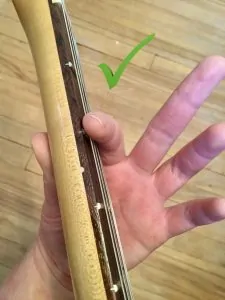
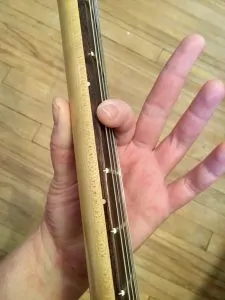
Some guitars (myself included) like to play with their thumb peeking over the neck. However, when you play barre chords, you should bring your thumb beneath the neck.
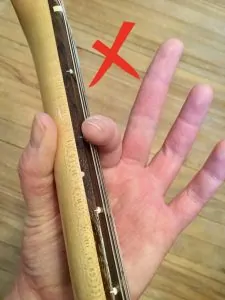
Technically, you can barre with your thumb curling over the neck (left). However, when you keep it halfway between each edge of the neck (right), it’s much easier.
There are three reasons for this:
- Stretch: when you bring it back, you can stretch your other fingers further up the fretboard.
- Strength: think of your thumb and index finger as two halves of a vice. If you apply pressure underneath the neck with your thumb, you won’t need to push as hard with your index.
- Stability: if you keep your thumb under the neck, you can keep it steady when you play. This position also helps you straighten your wrist and prevent injuries.
Wrist
However you fret your guitar, it’s important to keep your wrist as low and straight as you can. If you overstrain it over time, you might develop carpal tunnel syndrome.
Your wrist should bend no more than a few degrees when you play.
For a good visual exercise, turn your palm up and keep your wrist straight. Now, pretend you’re holding a slider (mini burger) between your thumb and index finger. Move your hand left and right. Try to be as steady as possible when you do this. Otherwise, all the toppings will fall out.
This is how you should move when fretting barre chords.
It’s a lot easier to straighten your wrist if you play classical guitar with your instrument clamped between your knees and the neck raised high. This position isn’t comfortable for most steel-string acoustic or electric players. However, you can still learn how to avoid wrist strain with a few adjustments.
If you play standing up, tighten your strap so your guitar doesn’t hang too low. Angle your guitar’s neck up. And pay attention to how you hold your arm! If you extend it too far forward, you might lose control of your wrist.
Arm
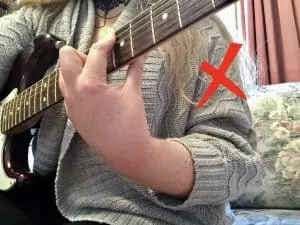
The best way to support your wrist is to relax your shoulder and gently tuck your elbow against your waist.
You can even use your upper arm to bring your fingers closer to your fretboard. How? By using it to gently pull the neck toward you.
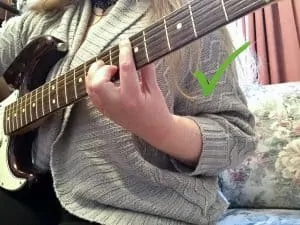
See how much easier it is to fret when you keep your elbow back (left) instead of forward (right).
Other fingers
Now that we’ve mastered the basic barre, let’s move on to the other finger shapes.
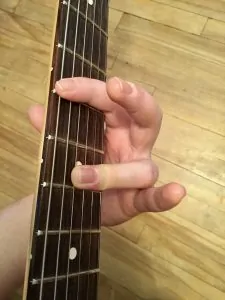
The fretting technique for your middle, ring and pinky isn’t all that different from your open voicings. They should be arched, pressing just above or below the fret with your fingertips.
Without your index, it’s a bigger stretch to fret your E and A shapes. That’s why I’d recommend practicing your open chords without your index too. Over time, you’ll build strength in these other fingers (especially the pinky).
The A major shapes are the hardest of all. They involve a second barre that you fret with your ring finger. Because you only need to fret three strings, you can push straight down with the fleshy part, from the tip to the first knuckle. This makes it slightly easier than the full index barre. Still, it might help to practice barring your open A voicing too.
This D chord requires a double barre at the 5th and 7th frets.
Like your index, you can avoid overstraining your other fingers by releasing pressure each time you change chords. But keep them in place! This way, you’re ready to play the same shape again or use your anchor finger to switch into a new one.
Right hand
As you practice, it’s important to slow down and make sure that every string rings clear. That’s why I’d recommend picking instead of strumming. Once you know which strings are buzzing or muted, you’ll know where and how to make adjustments.
Don’t expect to get everything perfect the first, second or even the thirtieth time. After all, there’s lots of technique points to keep in mind! Just be patient with yourself. Run through the fingers/thumb/wrist/arm checklist whenever something doesn’t sound right.
And if you’re still struggling? It’s perfectly fine to make adjustments.
Alterations
Muscle memory is a wonderful thing. The more you practice, the more effortlessly barre chords will come to you.
But until then, you may need some extra help to make them manageable.
Start higher up the fretboard
My introduction to barre chords was teaching myself “Hotel California” by the Eagles. It includes a Bm and F# at the 2nd fret.
This was a bad idea. I struggled for weeks trying to play these chords (which are close to the nut). Instead, I should have started learning to barre higher up the fretboard.
As you move toward the bridge, your guitar neck gets thinner, the frets get smaller and the string tension gets looser. It’s basically barre chord heaven!
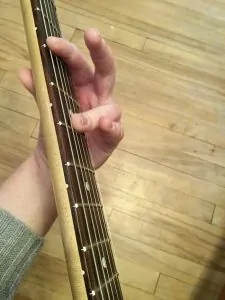
You’ll stretch your fingers a lot more at the 3rd fret (left) vs. the 7th fret (right).
If your guitar has a double cutaway, you may even be able to barre beyond the 12th fret. But then you run into the opposite problem. The tension is so loose and the frets are so small that it’s hard to maintain your shape –– especially with large hands.
I’d recommend starting at the 7th fret. It’s the happy medium between the two extremes. Then, once you’ve mastered your B (E shape) and E (A shape) barre chords, you can slowly work your way down the neck.
Swap your string gauge
If you’re still having trouble barring up the neck, you might want to swap your strings for a lighter gauge. With thinner strings, you don’t need as much force to fret your notes.
For electric guitars, I’d recommend lights. Anything lower will sound too twangy.
Acoustic guitar strings are thicker than electric ones. Even lights may be too hard to fret. So, you might want to choose custom lights or extra lights instead.
Lower your action
Action refers to the distance between your strings and the fretboard. Many guitars are built with high action to cut fret buzz. However, the higher it is, the harder you have to fret.
To check your action, take a coin that’s about 2 mm or a bit more than ¾ inch thick. This could be an American nickel, Canadian loonie, British 10p coin, Euro or Australian 10 cent coin, etc.
Slide it under the 6th string at the 12th fret. If the coin is snug or has a bit of head room, your action is fine. If it’s loose, then you can take it to a luthier or guitar tech to have it lowered.
Switch to open tuning
Maybe the E and A shapes are too overwhelming. Or maybe you just need to pay more attention to your index finger. In this case, you might want to switch from standard tuning (E A D G B E) to open tuning.
In open tuning, you’ll hear a chord when you strum all six open strings at once. For example, Open G contains all the notes of G major (D G D G B D). Other common choices are Open D and Open E.
No matter which one you choose, you form all your major voicings the same way –– by barring your index finger across all six strings.
<iframe width=”560″ height=”315″ src=”https://www.youtube.com/embed/QbSCizntask” frameborder=”0″ allow=”accelerometer; autoplay; clipboard-write; encrypted-media; gyroscope; picture-in-picture” allowfullscreen></iframe>
This video shows you how to practice barring in Open E.
Playing in open tuning is a great way to get comfortable with your index barre. After you’ve mastered it, you can switch back to standard tuning and add your E and A shapes.
Use alternative voicings
The best way to conquer barre chords is to power through them. But if you’re really struggling, it’s okay to substitute other voicings while you keep practicing your barres.
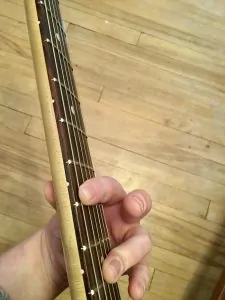
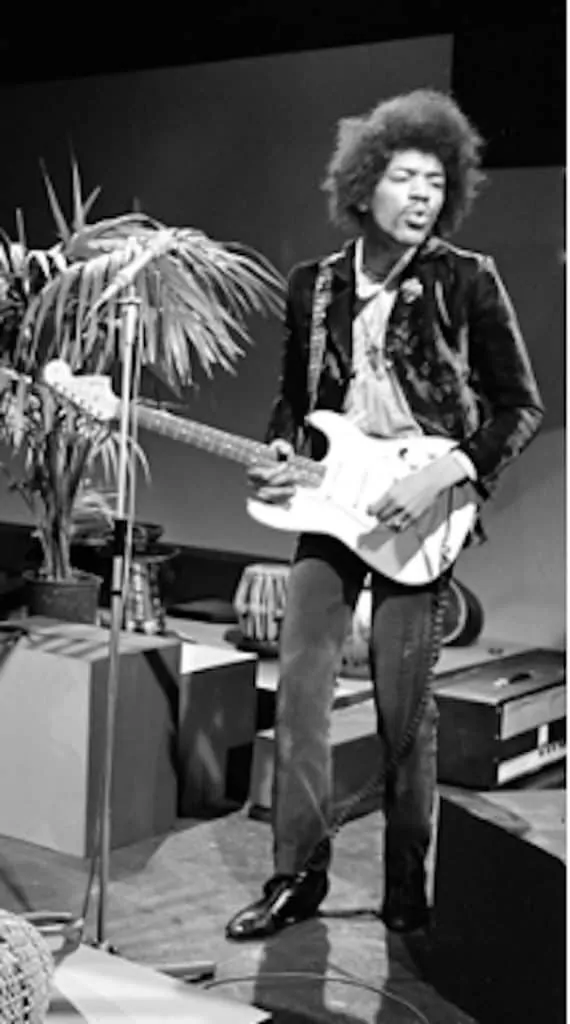
Instead of playing E shape barre chords with his index finger, Jimi Hendrix used his thumb to fret the 6th string, while muting the 5th and 1st strings. This thumb-over technique frees up your ring and pinky fingers for embellishments. It’s also useful if you play standing up with your guitar hanging low.
Jimi Hendrix demos the thumb-over technique on his left-handed guitar (cropped from “Jimi Hendrix 1967” by A. Vente / CC BY-SA 3.0),
Another E shape variation is to fret only the 2nd string with your index and mute your 6th and 1st strings. This allows you to play the important notes of your barre chord –– without actually barring anything.
A common variation of the F# voicing at the 2nd fret.
The same thing goes for your A shapes. You could fret your index on the 5th string and mute your 1st and 6th strings. If you’re also struggling with the ring finger barre, you could play a classic A-shape with your other fingers.
Personally, I find this Bm variation harder than doing a full barre. But you might find it’s an easier alternative.
Some other variations include…
- Power chords: also known as 5 chords, they have the same shape as barre chords on the bottom three strings (4th-6th on E shapes, 3rd-5th on A shapes). They’re the building blocks of many rock, metal and punk songs.
- Triads: also based on barre chord shapes, these bright-sounding voicings are played with only three strings at a time. Triads are common in R&B, indie, blues and jazz.
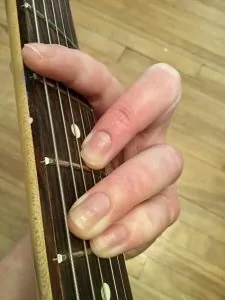
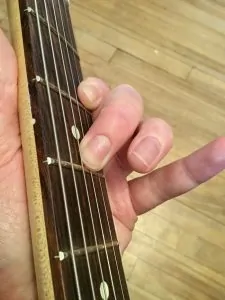
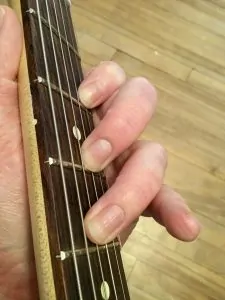
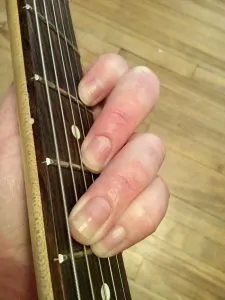
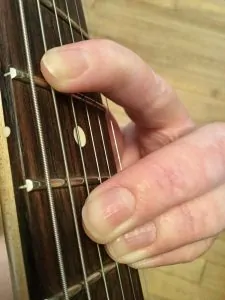
Instead of playing a full F# (top left), you could play an F#5 power chord (top right) or an F# triad (bottom row). Don’t forget to mute your open strings!
None of these alternative voicings will capture the full tonality of barre chords. But they can help you learn how to master different parts of the chord in bite-sized chunks.
Change your guitar
This is a last resort option. If you’ve just shelled out money on a brand new axe, I wouldn’t even bother. However, if you’re already looking to upgrade, there are some barre chord boosters to look out for…
- C (or modern C) neck shape: this common shape is also the least bulky. This way, you can comfortably bring your thumb back and curl your fingers over the fretboard.
- Short scale length: the shorter the distance from the nut to the bridge, the less space there is between frets This makes it easier to stretch your fingers –– especially if you have small hands. In this case, I’d recommend choosing a guitar with a scale length of 24.75” or less.
- Jumbo or medium jumbo fret size: because they’re tall, you won’t have to press as hard to fret clear notes.
It’s also easier to fret barre chords on an electric than an acoustic. Still, with the right technique, voicings, string alterations and warm up exercises, you can learn how to play them on any type of guitar.
Finger Training Exercises
As the saying goes, practice makes perfect. If you dedicate a few minutes every practice session to training your fingers, you’ll learn how to master barre chords in no time.
Here are some ideas to get you started…
Finger flicks
To boost the dexterity of your fingers, Guitar Tricks suggests this “ultimate barre workout.”
Stand up with your hands relaxed at your sides. Flick your fingers out, then curl them into a fist. Repeat 200 times as fast as you can.
This is a great exercise that you can do anywhere, even without your guitar on hand.
Full barre reps
This handy exercise helps you build up finger strength –– especially in your index.
Start by making an E-major shape barre chord. Press it into the fretboard as hard as you can without hurting yourself. Count to 20. Let go.
Take a quick break and repeat two more times. Then, do the same with your Em, A and Am. You could even add your 7ths as a bonus.
Barre walk downs
For next-level strength training, start in a B chord (E shape) at the 7th fret.
Slap your 4th-6th strings with your index while keeping your other fingers in place. Do the same with your 1st-3rd strings. Then, barre the entire fret and pick each string individually.
Repeat this movement with your Bb (6th fret), A (5th fret) and so on, until your fingers get sore. Take a quick break, then repeat the entire exercise with your A shapes.
Don’t worry if you don’t make it to the 1st fret right away. If you practice your walk downs every day, you should reach the top in no time.
Song substitutions
This last exercise may be the most challenging. But it’s also the most fun!
Take a song you like with a basic open chord progression. For example, you could play Bad Moon Rising by Creedence Clearwater Revival (D – G – A), Good Riddance (Time of Your Life) by Green Day (G – C – D – Em) or Fallin’ by Alicia Keys (Bm7 – Em).
Only, instead of playing your open voicings, substitute them with barre chords.
You may hear some string buzz from time to time. But keep going! The point is to help you learn how to switch quickly between different barre shapes and positions.
No matter which exercises you do, it’s important to take breaks whenever your fingers start to cramp. But don’t be afraid to come back and try again in a minute or two.
Final Thoughts
Barre chords aren’t every beginner’s cup of tea. Even some experienced players shy away from them. But as long as you know how to fret them properly, make adjustments and incorporate training exercises into your routine, they’ll become a lot more manageable.
The biggest advice I can give you is to stick with it. The pain and awkwardness will fade away eventually. And the variety and flexibility barre chords give you will be worth the struggle.
Good luck!

