Welcome to our complete FL Studio 20 tutorial for beginners Beginner Guitar HQ is guiding you through your first song on FL Studio 20.
If you’re a beginner and want to learn how to create or record a song in FL Studio 20, this is a tutorial article showing you how to use this music production software.
FL Studio by Image-Line is one of the top DAW software of all time. A DAW software is a program you can use on your PC or laptop to record and create music. It should be part of every home studio setup.
Previously known as Fruity Loops, we’re talking about a digital audio workstation with the features of an audio editor, audio recorder, multitrack support, and MIDI. You can use it to produce music and record music alike.
The company Image-Line premiere FL Studio 20 in May 2019. They escalated from 12 straight to the number 20 because of the 20th anniversary of the developers.
In truth, Image-Line took the program to a whole new level, so I do recommend you get the new version if you have the old one, or get the newer version if you download it for the first time. You can get the FL Studio 20 free trial here.
This guide is for beginner musicians. It doesn’t matter if you’ve never had any prior experience with music-making software. If you have, though, this will be easier for you.
In the meantime, here’s a video showing everything new in FL Studio 20:
Contents
How complex are talking about?
This Beginner Guitar HQ tutorial on FL Studio 20 guide will help you create your first song. Let’s keep it simple and say it has a guitar track and your voice.
Additionally, you can add other string instruments like a second guitar or a base; and we’ll learn how to create keyboards, deep basses and percussions.
You should be able to create, for example, a simple trap song by the end of this guide. You should also be able to record your own songs using your guitar and your voice.
And, lastly, you’ll learn how to turn what you create on FL Studio into an audio file, which is known as “consolidation.”
It can be a bit complex as first because FL Studio 20, as soon as you open it, looks like the control of an airplane. It has a wide array of options, much of which you’ll never use; it has a huge display of effects, and it has extra plugins.
I’ll try to make it very easy for you and give you a step-by-step guide on how to create your first song on FL Studio 20.
Additionally, I’ll share some basic concepts about music so it’s easier for you to move around within the software.
A foreword for you: the hardest thing regarding FL Studio is using it for the first time. After you get the basics, it’s all going to be uphill.
Our FL Studio 20 tutorial for beginners also works as an introduction to any music production software.
Why FL Studio 20?
FL Studio is the music production software I always recommend because it’s very good to record music, and it’s amazing to create music. If you’re an aspiring DJ or music producer, this is the best choice for you. This is because FL Studio is a software to make music mostly based on loops and samples.
More so, the latest version of the formerly known Fruity Loops is, right now, one of the most advanced and definitely easier to use in the music production software market.
More so, this is the best studio to produce electronic music, but there’s also a wide range of genres you can create with this software:
Electronic music
- BPM
- House
- Techno
- Latin music
- Trap
- Hip Hop
- R&B
- Rap
- Dance
- Downtempo
- Country rock
- Hard rock
- Industrial rock
- Experimental rock
- Hard Rock
- Heavy metal
- Etc.
Following the guide will help you use Image-Line’s latest music production software, but also help you use any of its versions, including prior FL Studio 12, which is far more common.
Lastly, this is the first FL version available for Mac as well. FL Studio is a great DAW, and now Mac users can enjoy the program as well.
FL Studio 20 is probably the best software to create electronic music.
How budget are we talking about?
FL Studio, just like every DAW software, sells various editions that represent different bundles. The entry-level edition is just below the double-zero mark, while their most expensive product is just below the triple-zero mark.
You can check FL Studio 20 prices here. I recommend going for the Producer Edition as it allows you to record with your mic, whereas the entry-level alternative only alls you to produce music using loops and samples within the program.
Going up the chart for the most professional editions, you’ll find extra audio plugins with pro-audio quality. These include synthesizers, pianos, organs, basses, drums, and more.
Individually, FL Studio 20 plugins are pricey, but they sell a version with all the plugins installed. The Producer version already has over 80 plugins installed. I’d say that’s more than enough. Plus, you can always look for more on your own, and some of them are free.
I have to add every version will get all of the updates for free.
I’ll share some more info on VST (virtual studio technology) plugins in a bit.
By using the right set of VST plugins, you wouldn’t even need a guitar amp to record an amazing rock electric guitar.
Who is using FL Studio?
If you want to have an idea of your possibilities with FL Studio 20, you can take a look at some of the artists using Image-Line’s software.
One of them is the young DJ Martin Garrix, which is one of the top DJs in the world right now. Garrix says FL Studio 20 os the easiest music production software, with fast results and quality audio.
Another example is Avicii (may he rest in peace), who famously mixed acoustic guitars, country music, and electronic music for their singles. Tim Berg also preferred FL Studio for the easiness ad how quickly he could produce a song with the software.
A third example I want to name is Afrojack. The Dutch DJ explains FL Studio is “quick and obvious,” which is why he chose the program to create his music.
Introduction to FL Studio 20: understanding the interface
Our FL Studio tutorial begins with the basics. Let’s jump right into the program and introduce a basic understanding of its menus, options, and general interface. So open FL Studio 20, go to File, and choose ”New (basic with limiter).”
This software is not very friendly to newcomers, so I decided to put this introduction together to guide you through your first steps.
FL Studio 20 has five main areas, and you can switch all of them on and off using their icons in the center top part of the program. Hover your mouse over and press these sections on and off.
The highlighted icon represents the “Browser.”
Let’s review these sections:
- The browser (the one highlighted on the photo above) has the ingredients for your songs: sounds, instruments, effects, samples, and so on. Particularly, instruments are inside the “Packs” folder.
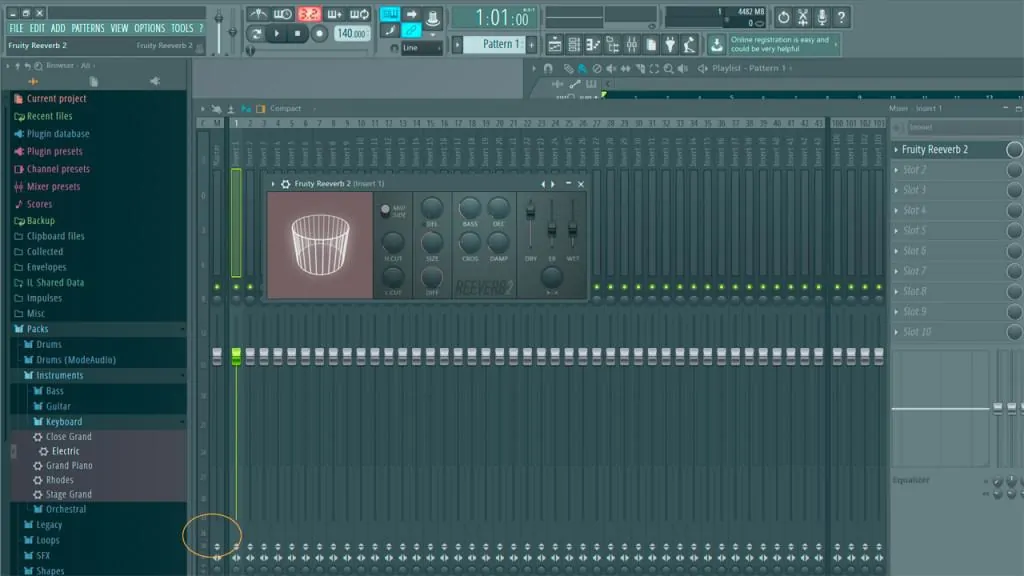
- The mixer shows the channels’ volume knobs plus the master volume. You can use this to level the audio and select the input source of each channel (track or insert).
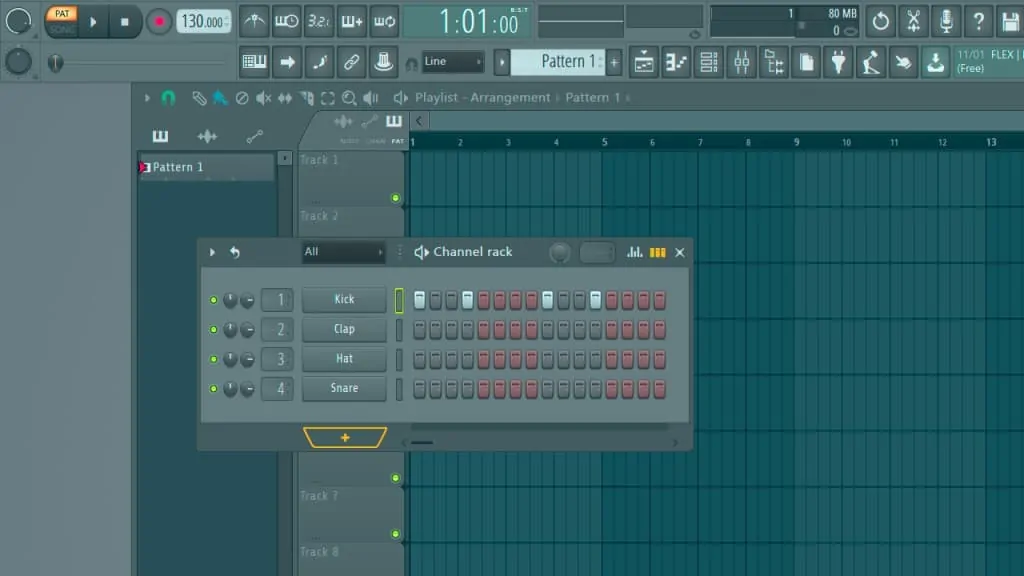
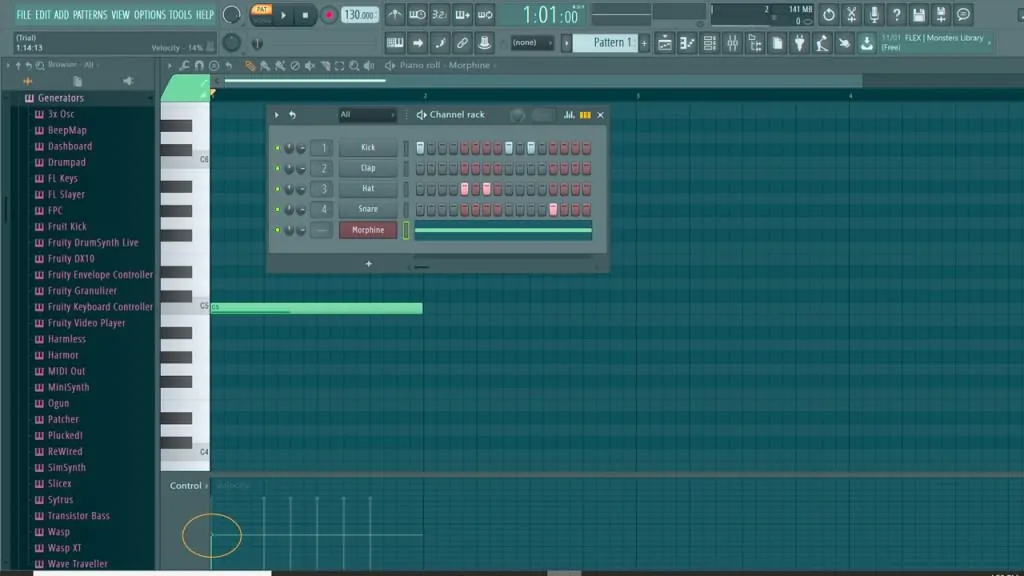
- The channel rack is a series of instruments, which are percussion by default, you can use to create beats. You can add any instrument you like by pressing the “+” sign. You can then arrange these beats on the playlist.
The Channel Rack allows you to arrange beats into a pattern.
- The central area is the playlist. Is where the song’s arrangement comes together. You create the song with individual Patterns (which are short musical arrangements you can loop) you create in the channel rack; and audio recordings.
- The Piano Roll plays notes across a virtual keyboard, and you can use it to have more precision on your beats.
We’re looking into this elements with more detail in the following steps. In the meantime, here’s a great tutorial video introducing you to FL Studio 20:
Step 1: set your home studio with FL Studio 20
Let’s start our journey into our first FL Studio 20 song by setting your home studio. These are the necessary things if you want to record an instrument.
However, if you’re just looking to create music using loops, effects, samples, and digital instruments, you’ll only need a laptop plus FL Studio 20.
Let’s break it down to everything you need:
Music production computer
You should be looking for a computer with plenty of storage space. If possible, search for computers with two separate hard drives and over 1TB of space.
Storage hard drive can be HDD or SDD. SDD is pricier but better, so you can search for laptops giving you some storage on an SDD, which would be a boot drive (where the operating system and apps are installed); plus a separate HDD drive for your work.
Aside from that, go for at least an Intel Core i5 processor or AMD equivalent, at least 16 GB RAM, and a moderate 2 GB graphics card, if any.
It’s very important to have a soundcard with up-to-date drivers on your computer.
These settings are higher than FL Studio 20’s system requirements, which are as follow:
- 2 GHz Intel Pentium 4 / AMD Athlon 64 (or later) compatible CPU with full SSE2 support.
- WINDOWS 7 or later / macOS 10.11 or later.
- 4 GB or more RAM recommended.
- 4 GB free disk space.
- Soundcard with DirectSound drivers.
Personally, I recommend the Dell Inspiron 15 for music production, although a more professional choice would be the HP Pavilion Power 15.
To install FL Studio 20, you would only have to go to their webpage, download the product, run the .exe file, and say Yes to everything.
Apple laptops are also a very good choice for FL Studio 20. Remember this version is the first one to become available for macOS.
Your home studio interface
The audio interface helps you record professional audio from your instruments with your computer.
You can connect mics and instruments to the interface and record with your DAW software. These devices ship with different kinds of inputs to record different things:
- Unbalanced inputs for guitars’ TSA cables, plus RCA cables.
- Balanced stereo inputs for XLR mic cables.
- High-impedance inputs (like DI or high-Z) to plug and record instruments directly to the interface.
- Line-level inputs for external gear like multi-effect units, samplers, and loopers; as well as studio monitors and headphones.
Most budget audio interfaces come with a pair of inputs, enough to record string instruments and your voice.
When you’re recording, it’s important to have studio headphones so you can hear yourself as you record.
Using headphones is very important in the studio if you’re recording because they allow you to hear yourself with quality audio.
Interfaces also come with different audio quality capacities. I’m talking about bit-range and sample rate, and it’s very easy: the more, the better -and the pricier.
Bit-range is either 16-bit or 24-bit, ad 24-bit is the professional standard. A 16-bit recorder pushes a lot of noise into your song, especially in the quieter parts.
The sample rate is the quantity of audio information the gear captures per second. It can be 48kHZ, 96khZ, or 192kHz.
Overall, it would go like this:
- Demo-level: 16-bit / 44kHz
- EP-level: 24-bit / 96kHz
- Professional level: 4-bit / 192kHz
My top recommendation for FL Studio 20 is the famous Focusrite Scarlett Solo 3rd Generation. It’s capable of 24-bit/192kHz audio recording.
How to connect an interface to FL Studio 20
Here’s a step-by-step guide on how to connect an interface like the Focusrite to FL Studio 20:
- Install your interface
Audio interfaces ship with either a digital or CD driver installation. Before you can connect the interface to your computer, you must install the driver with the CD or via the digital download.
After you do this, connect the interface to the computer with the USB connection.
- Check your computer’s audio settings
Right-click on your computer’s speaker icon. Now, on the computer’s audio settings, make sure your audio interface shows up under the audio settings. It means it’s working.
- Connect the interface to FL Studio 20
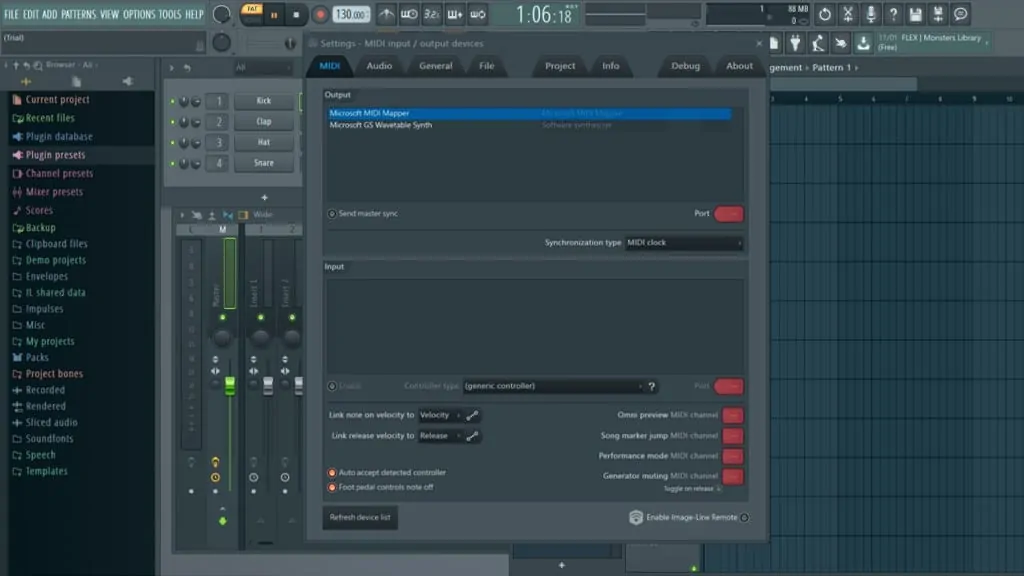
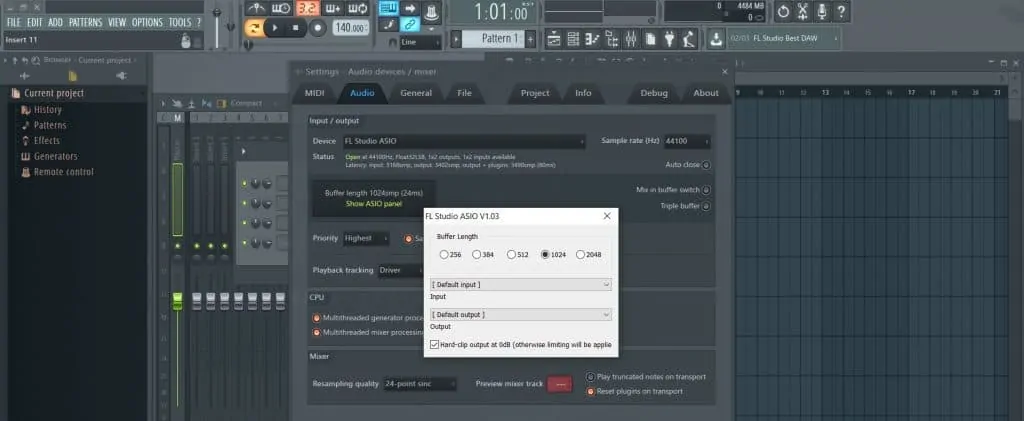
Now you have to open the program and then press F10 to open System Setting. You could also choose Audio Settings on the Options Menu.
Press F10 to enter the audio settings.
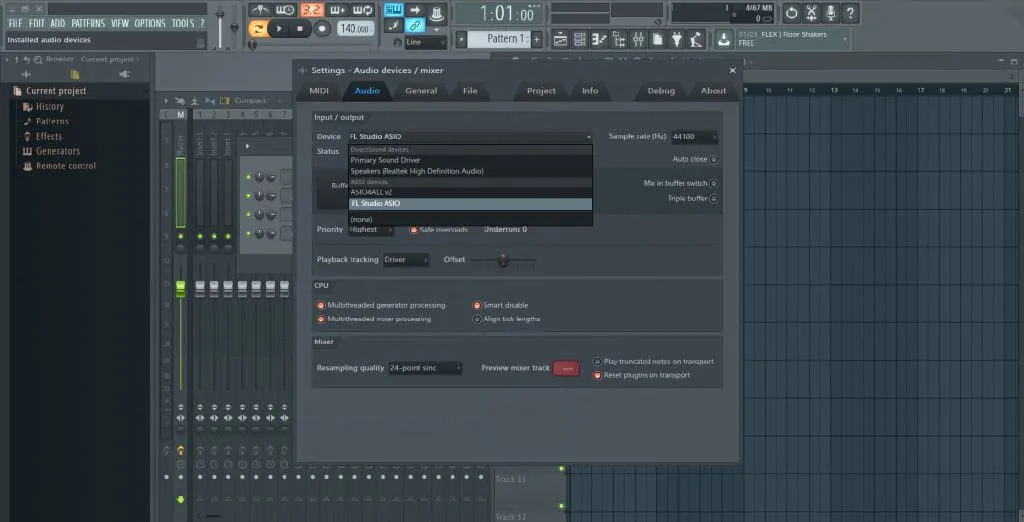
There’s a drop-down menu on the Device section with a list of the audio drivers available in your system. Select FL Studio ASIO as your sound driver (more detailed info about other sound drivers -ASIO drivers- further down below).
Select FL Studio ASIO as your default audio driver.
Now, select 44100kHz as the sample rate. You can select a higher rate if you have a powerful enough computer (at least an Intel Core i7 processor or AMD equivalent). However, most people won’t hear a difference.
The “Priority” dropdown menu helps you combat performance issues on your computer. Put it on “highest” if your performance is poor.
Next, make sure the Resampling quality is 24-point sinc. Next, the Playback tracking option tells the computer how to plaback the audio. Leave it on driver.
Lastly, resample quality means the quality of the audio coming out of the mix, the one you will hear as you mix. If your computer is not powerful enough, though, lower the quality to 6 or 2 points.
- Configure FL Studio ASIO
As soon as you select FL Studio ASIO, click on SHOW ASIO PANEL and leave your buffer length at 1024.
Then, choose the right input (the microphone you’re going to use to record) and the right output (the speakers where you want to hear the mix).
Choose the right microphone or recording device before you begin recording on the “Input” section.
- Configure your track to start recording
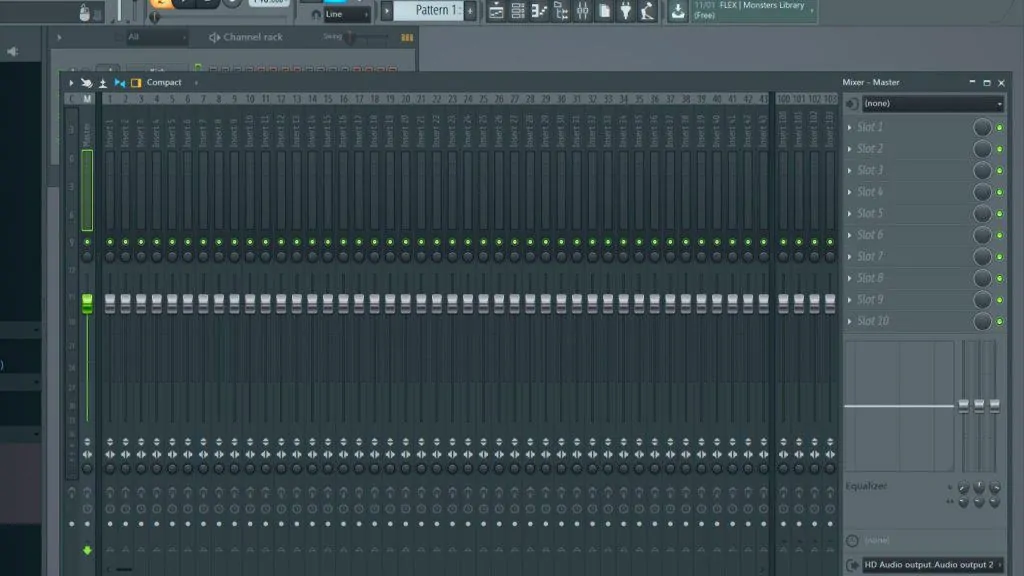
Select the “View” menu on FL Studio 20 and then click on mixers. Then, select an empty track and go to the drop-down menu on the right to see the inputs. Here’s where you can select the audio interface to start recording and then push record.
Select an empty mixer track on the left and then select your audio interface on the drop-down menu on the right.
You can select the channel you want your interface on if your mic is connected on your interface’s channel 1, choose channel 1 as the input. Or if your guitar is plugged to channel 2, then choose channel 2 as your input on a different mixer track.
You can also select the mixer’s master track and go to “Out” in the bottom right corner. The options below -the slots– are “effect racks” where you can set the effects of each track.
If you want to record, you also need a studio microphone.
Alternative to FL STUDIO ASIO
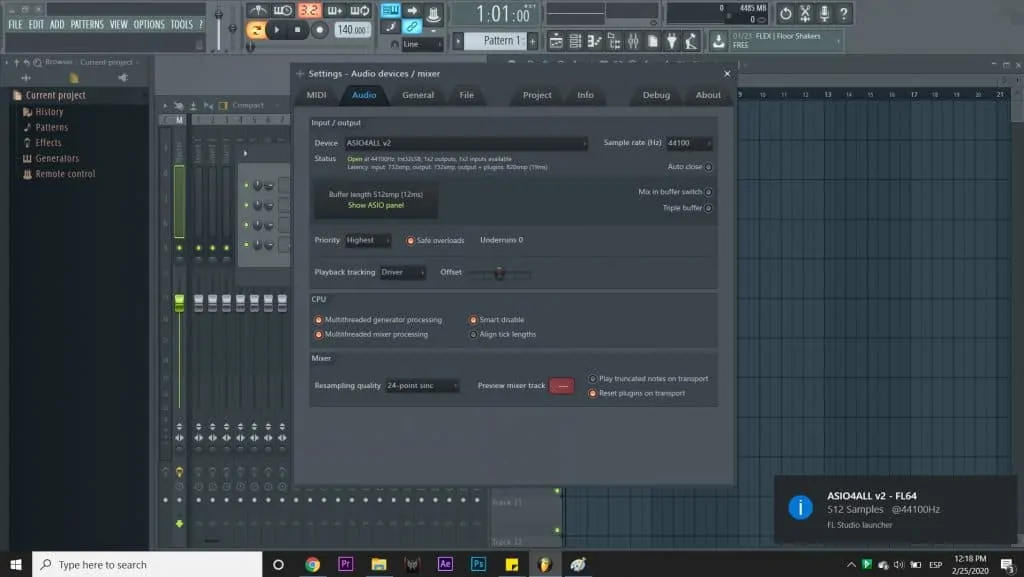
I chose to make this tutorial with FL Studio ASIO because it’s easily available for everyone. However, you might prefer the older ASIO4ALL driver for the job. Go to Options – Audio and select the Devices drop-down menu and choose instead ASIO4ALL.
On MacOS, you would only need to select the “Built-in Audio” option on the devices menu (more on that on the video below).
Lastly, some interfaces have their native ASIO drivers that will install on your computer as soon as you connect the interface. For example, Focusrite Interfaces all come with device-specific drives and don’t work well with ASIO4ALL.
The difference between these options is:
- ASIO4ALL disables all your computer audio except what you need or use in your DAW. It’s best if you’re working on large compositions that require lots of computing resources. It’s specially designed for units that don’t have native ASIO drivers, like your computer’s onboard audio.
- FL Studio ASIO focuses on your DAW but allows you to hear and send audio through other applications (like YouTube, Spotify, etc.). It’s a comfortable, standard middle ground.
- Other inputs will bring too much latency into FL Studio.
- ASIO4ALL and FL Studio ASIO might not handle specific audio interfaces. For example, a Focusrite Scarlett Interface installs a Scarlett ASIO driver on your computer, which you would have to select on the same Options – Audio – Devices menu.
All of your available ASIO drivers are on the same menu. Even specific interface drivers install automatically and then appear at the menu as “¨NAME OF THE INTERFACE – ASIO”
If you want to make sure you chose the best workflow for your computer, you can switch between the two most common drivers and see which one introduces fewer noises, less latency, and more quality into FL Studio.
Here’s an excellent video reviewing how to record a simple voice track on FL Studio 20, which you should be ready by now:
For additional information on when to use and when to avoid ASIO4ALL, check this FAQ.
Choosing your studio recording mic
Chances are, if you’re looking to record your first song, you’re also looking to record some form of singing or rapping.
It means you need a studio microphone, which means a microphone designed to record at a studio. These devices have a lot of precision, a lot of noise cancellation, a deliver great quality sound.
Let’s keep this short as I’ll go straight to my top recommendation: the Shure SM57.
You would connect the Shure SM57 to the right input of your interface, follow the instructions above, and you’re ready to record.
You can use the Shure mic to record your voice or to record acoustic guitars, mostly. You would need an extra mic stand to set the mic correctly.
Connect your guitar to record
You can also plug your electric guitar, electric bass, electric violin, electric viola, and similar instruments directly into the high-impedance input of your interface.
By following the steps below, doing this is enough to start recording. You would hear the natural sound of your instrument on your computer’s playback.
Do you want to record your guitar directly to the interface and use plugins of its sound or record the guitar amp using a studio microphone?
Prepare your playback audio
You want to hear yourself, so it’s good if you use some studio monitors, speakers, or headphones. You can tell FL Studio 20 to send the mix to the headphones or speakers with the “Out” menu I explained above, or simply connect a speaker or a headphone to your laptop or computer as choose it as your main playback sound with the normal Windows or macOS options.
If you need some help with studio monitors, you can check this guide. Otherwise, you can find budget studio headphones right here.
VST plugins
Lastly, we can also discuss VST, virtual studio technologies that work as plugins for FL Studio 20 or any other DAW software.
These plugins bring you effects, instruments, and synthesizers mostly. Some of these are free and they can take your sound to the next level.
Each one of these plugins has different installations work and install differently on FL Studio 20, however, you’ll find most of them on the “slots” or listed on the available instruments within the software (more on that later).
I already did a list of the best plugins in another article. I’ll just re-share it again:
- Amplitube4 (guitar amps and effects);
- EZDrummer (digital batteries);
- VK-1 (synthesizers);
- Guitar Rig (guitar amps and effects);
- TAL Reverb 4 (reverb and mastering);
- Piano 1 (digital piano).
VST plugins alone can create a realistic, powerful sound for almost any instrument you can imagine.
Step 2: understand tempo on FL Studio 20
Make sure you followed Step 1 of the guide before you continue. Then, if you haven’t, open a new blank page on FL Studio (File – New).
By now, you should have your audio interface ready to go with FL Studio 20. You should also have your mic or an instrument connected directly to the interface. Maybe both, although I strongly recommend you record one thing at a time.
Now, it’s time to set the time of your song. That means you should have already composed the song. If you need some help with your songwriting, here’s a Beginner Guitar HQ guide on the matter.
You need a metronome to play on time, either for recording, rehearsing or practicing.
So let’s break this down into easy steps.
Set time signature
The time signature is the notation we use to see how many beats per bar, plus the duration of each beat (whole note, half note, quarter note,…).
Don’t worry, though, if you don’t know anything about musical figures, you can understand it like how many times you can count rhythmically before you feel a musical pattern repeating itself (a bar).
The bar or measure is the segment of time corresponding to the specific number of beats, each beat representing a note value. The length of the bar is given by the beats, and you can see its boundaries represented by vertical lines.
If you’re a beginner musician, you’d probably want to start with a 4/4 time signature, which means 4 crotchet beats per bar.
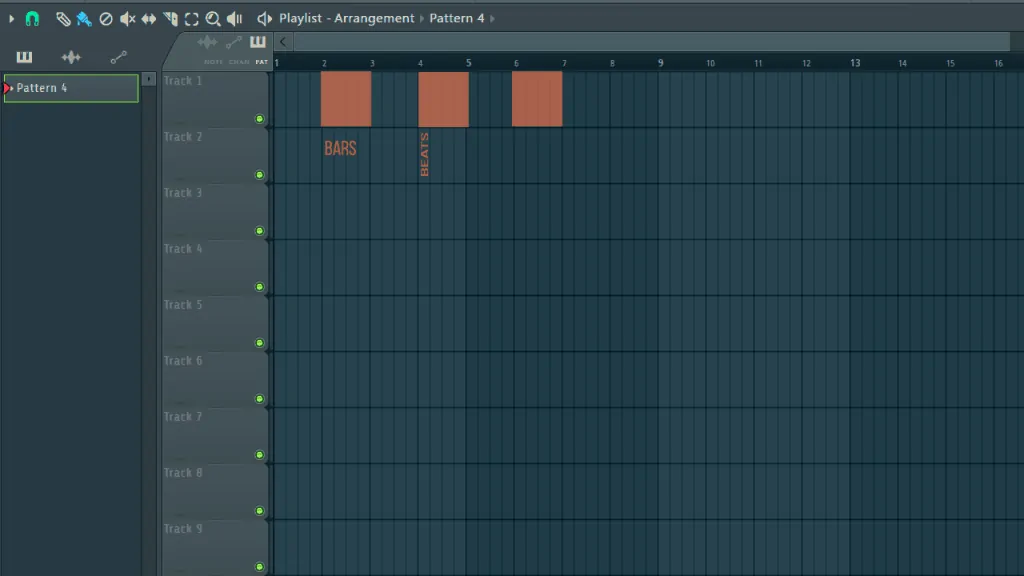
If you click View – Playlist, you’ll see several tracks on your FL Studio 20. This is the Step Sequencer, the place where you can create your song by combining different tracks.
The tracks you see there are divided by bars, and each bar is divided by lines, which represent the beats. So, in a 4/4 time signature, you’d see 4 thin lines per bar, and each bar divided by a more pronounced line.
The number of “thin” lines depends on the number of beats per bar you select.
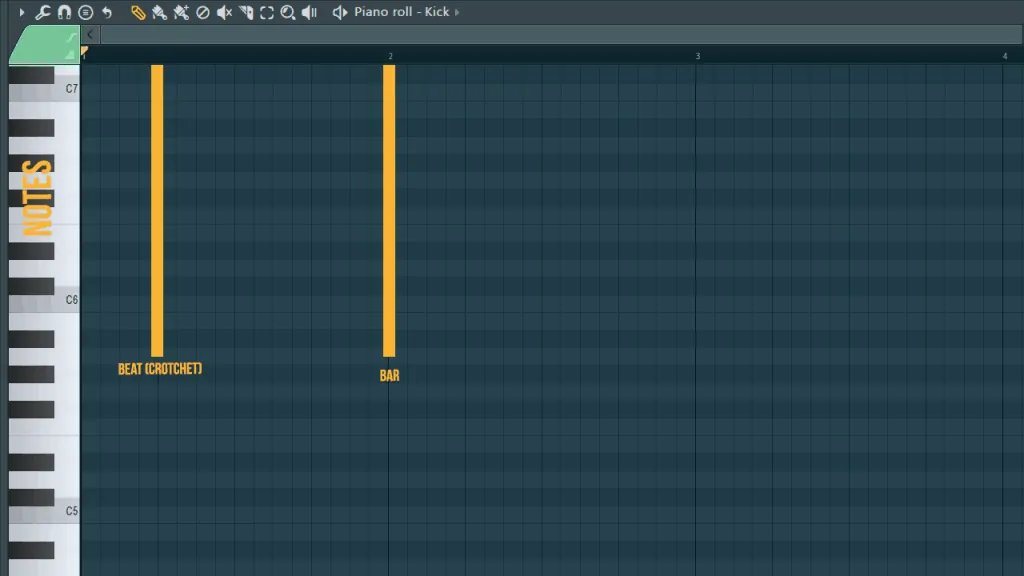
And if you click on View – Piano Roll, you’ll notice there’s quite a lot of subdivisions within each bar. There are 4 subdivisions per beat, so that means these represent 16th notes.
The Piano Roll is where you can write music: you select an instrument, and put the notes on the tempo and note you want.
So, let’s review:
- Beat: it’s the basic musical uni of time. Is the rythm listeners can tap with their toes or follow with their feet.
- Bar: the time segment that has a specific number of beats.
In FL Studio 20, the time signature is 4/4 by default. It’s the most common time in Western Music.
Now that we know the basics, the question is…
How to change the time signature on FL Studio 20?
- Go to Options – Project general settings
- Under Time Settings, select Set as Time Signature
- Choose numerator (which is how many beats are per bar) and denominator (the note duration of each beat).
The step sequencer will change to reflect your new time signature.
Keep in mind this option is not available on previous FL Studio versions, so I dearly recommend you update the software to its latest version and take advantage of Image-Line free updates forever offer.
How to have different time signatures on the same song on FL Studio 20?
If you want to change the time signature as the track progresses, let’s say, for example, play the chorus at a 3/4 tempo, and the rest of the song at a 4/4 tempo.
What we need to do is create two patterns then: one pattern has the 4/4 tempo, and the other has a 3/4 tempo.
A Pattern is a specific duration in bars of any given instrument (digital or not) you create on FL, and you can use it to create loops.
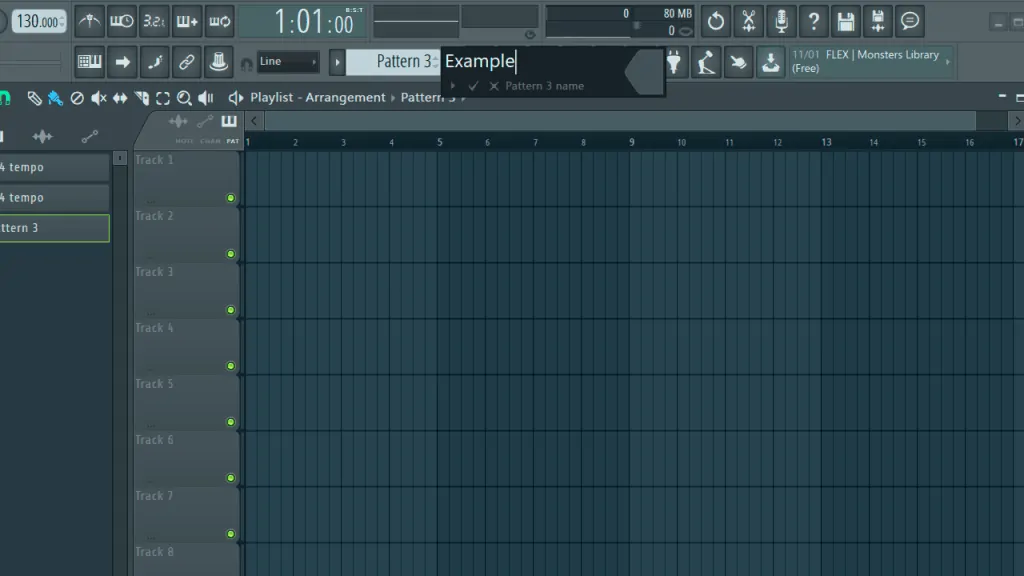
To create a new pattern, go to the “Pattern” option, press “+”, write the name of your new pattern, and then press the checkmark.
You can also clone, delete, rename, put colors and other options to the patterns by right-clicking the pattern name on the left side.
Now, to set a time signature, you would only have to right-click the name on the left bar and select “Set Time Signature.” That option opens the Piano Roll for that pattern, instrument or sample.
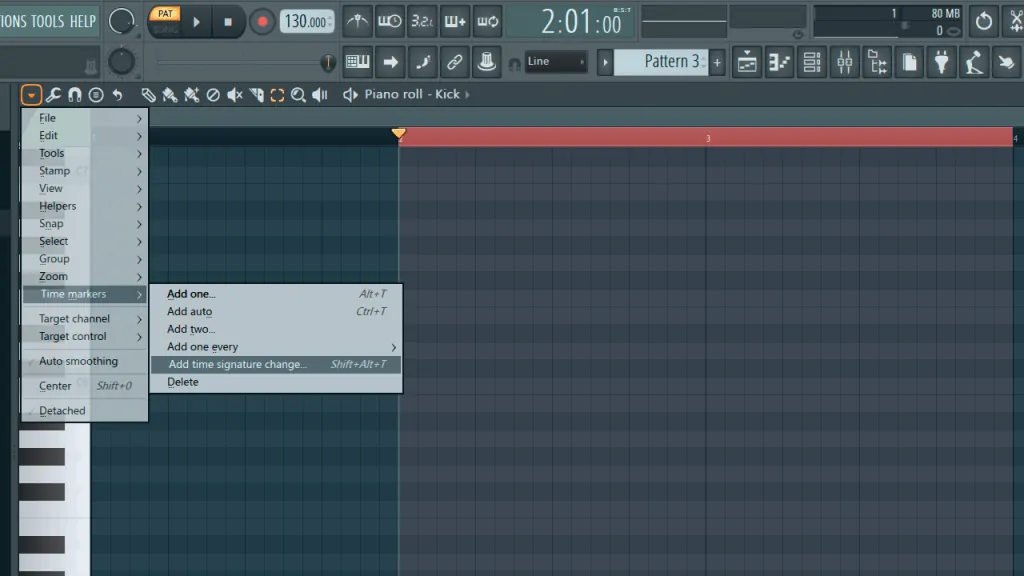
You can change the time of any pattern at any time by open the Piano Roll (View – Piano Roll), go to the Piano Roll Options – Time Markers – Add Time Signature Change. You can select with the mouse the section of the pattern you want with a different time signature.
Each pattern you create contains either a digital instrument or a recorded instrument, plus a time signature and a BPM.
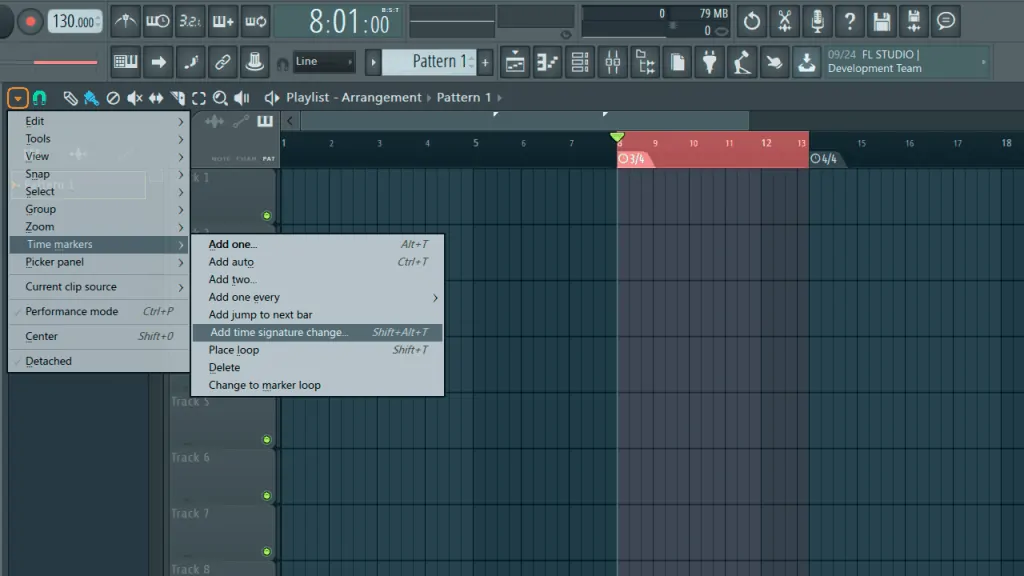
Next, you can define where these time signatures play on your Playlist so it all lines up easily. Here’s how you can do it:
- Open the Playlist
- Select the bars you want with a different time signature by dragging the right click
- Go to Playlist Options (the dropdown menu on the left) – Time Markers – Add time signature change
- Choose a new time signature
Now you have a time signature on a specific section of your playlist.
If you’re a beginner, I recommend you keep a 4/4 time signature. Remember you can you the entire’s project time signature via the Project General Settings menu.
Let’s go on and set the beats per minute.
How to set BPM (beats per minute) on FL Studio 20?
You need to play perfectly on time, so let’s set the BPM. Beats per minute refer to the “tempo”, which is the musical term to speak of the song’s speed.
The BPM says simply how many beats there are per minute, whereas the length of the beat is determined by the time signature.
So, a 4/4 time signature with a 120 bpm means you could count 120 crotchets every minute, as the quarter note (crotchet) is equivalent to one full beat.
The BPM option is right next to the record button. You can set the tempo by moving the arrows up and down with your mouse and set an exact tempo down to the millimeter. I recommend you choose.
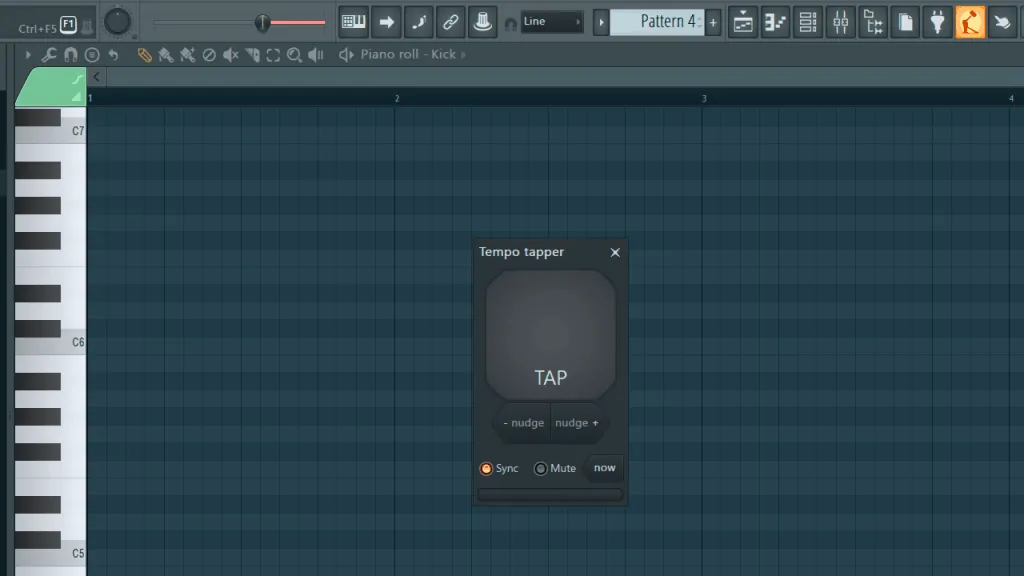
There’s also a “Tap Tempo” option on the icons next to the pattern. It allows you to tap the tempo you have on your mind with your mouse as FL Studio 20 will recognize the BPM. Then, by pressing “Now”, the software will make your tap the tempo of the song.
Setting the BPM of your own songs is easier with the tap tempo feature.
We’ve now prepared the audio interface and set the BPM and time signature of the song. Let’s move on to record our first track. But first, let’s make a review:
Here’s the list of panels you should have in handy on FL Studio 20, all of them available on the “View” menu:
- Mixer: shows you the volume of each track plus the master volume. It allows you to select the input on each track, which means the audio interface or audio device you’ll use to record on that track.
- Playlist: it’s the sequence where you will create a song with the different tracks and patterns.
- Piano roll: here’s where you “compose” digital music by placing a piece of music on the beats and notes you want.
Step 3: record your first track on FL Studio 20
The first thing to record is a guiding track. A guiding track is a basic, guitar line that will serve as the guide of everything else you record on it. It works with a clean electric guitar connected directly to the interface, and it will work for almost any musical genre, except for maybe some subgenres of electronic music.
The order in which you create and record the song should be something like this:
- Guiding track (optional)
- Percussion (which may include digital drums, drums, a
- Bass (which can include bass, contrabass, pianos, synth, bass synths, etc)
- Melody (guitar, piano, keyboards, etc)
- Voices (leading voices and then backing vocals)
- Musical arrangements
- Effects
- Mastering.
There’re three ways in which you can record your audio:
- Simply push the record button. It will show you a menu asking you if you want to record straight to the playlist or into the Edison Audio Editor / Recorder (more on that later);
- Go to the mixer panel, select a track, select the audio interface, and then push record; or;
- Go to the Tools menu (on the top-left bar), and select “One-click audio recorder”. It also gives you the choice to select between Edison or directly to the playback.
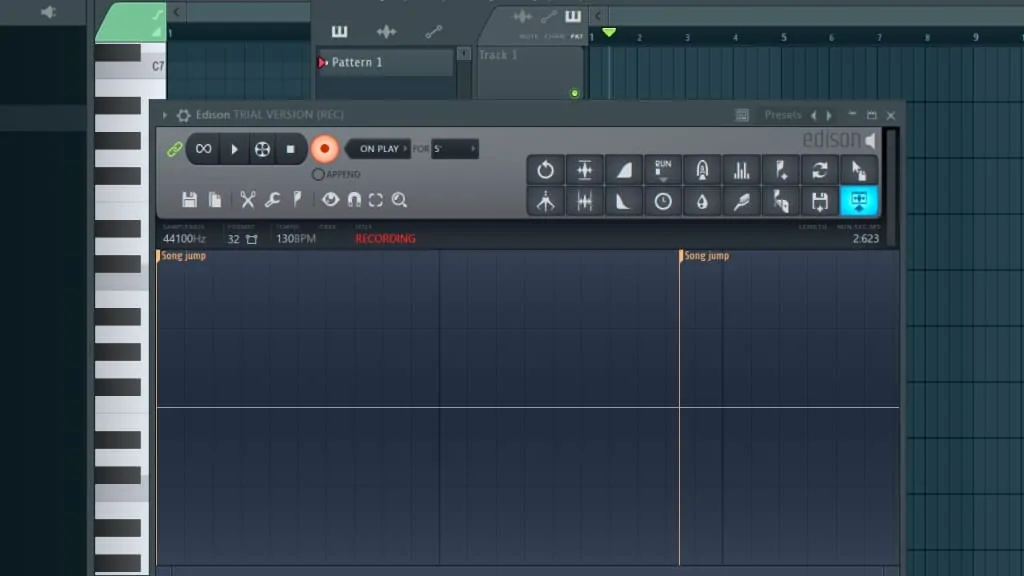
- Select the Edison Audio Editor / Recorder. Edison allows you to record audio and includes basic FXs like reverb and compression. Then you can copy the audio into the playlist with the option on the photo below:
You can save the audios you record on Edison separately. I recommend you use the metronome option (bottom left icon) to record time.
Now, as you’re about to record, it’s important to turn on the metronome, which is right next to the BPM button.
Aside from audio, you can also record external MIDI keyboards to play plugins in FL Studio. You can read more about it here.
You should be ready now to record your guiding track with your guitar. However, you should have a clue as to how to record your voice or a bass guitar, because it works the same.
I advise you to go the old way and avoid using loops when you record instruments. We’ll see more about loops on Step 4.
To make things clearer, I’m leaving you a tutorial video on how to record vocals on FL Studio 20.
Step 4: creating a beat track with loops on FL Studio 20
We’re now learning how to create the beat with the channel rack and the piano roll. By understanding these two elements you’ll be able to create beats, bass lines, guitar lines, keyboards, pianos, and almost anything you imagine.
Let’s start by the element FL Studio stands for: patterns.
A looping beat or pattern is a rhythmical and melodic (optional) pattern repeating itself after a set number of compasses. It can be as low as one compass and as high as you want it to be.
A looping-based approach to music is almost the industry standard, especially for dance and club music.
How to create patterns in FL Studio 20?
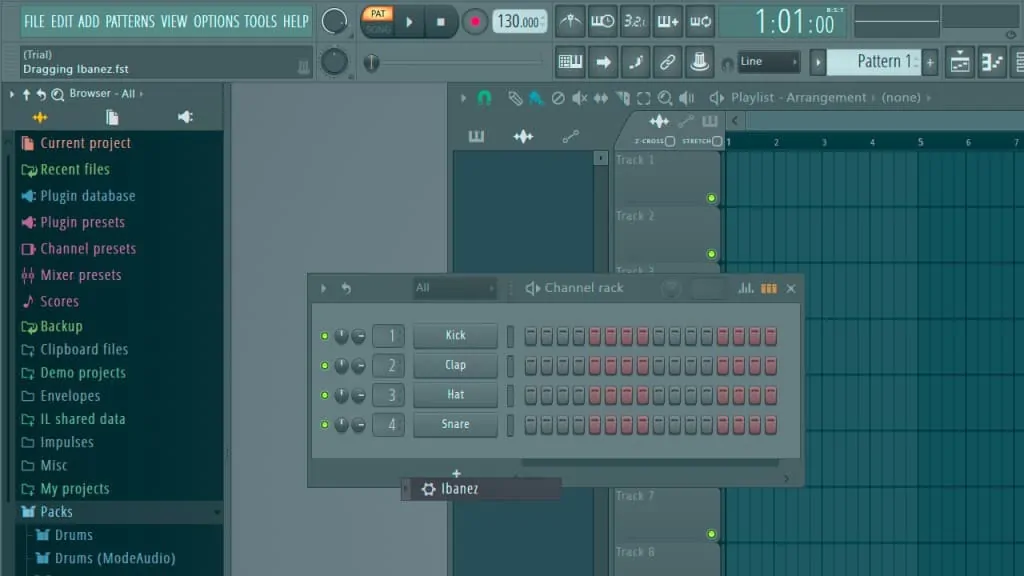
Let’s create a beat pattern example with our DAW software. So open up the channel rack and you’ll find an empty Pattern with four drum sounds:
- Kick
- Clap
- Hat
- Snare
You can add more elements with the “+” button, which opens a list of plugins (more on that on Step 5). Or you simply have to drag an element from the browser and drop it bellow “snare” to add a new element.
Most synth basses you can find as plugins for FL Studio 20. Find the one that suits your purpose.
Now that we have a bass and percussion, we can start arranging and then dragging it as a pattern on the playlist.
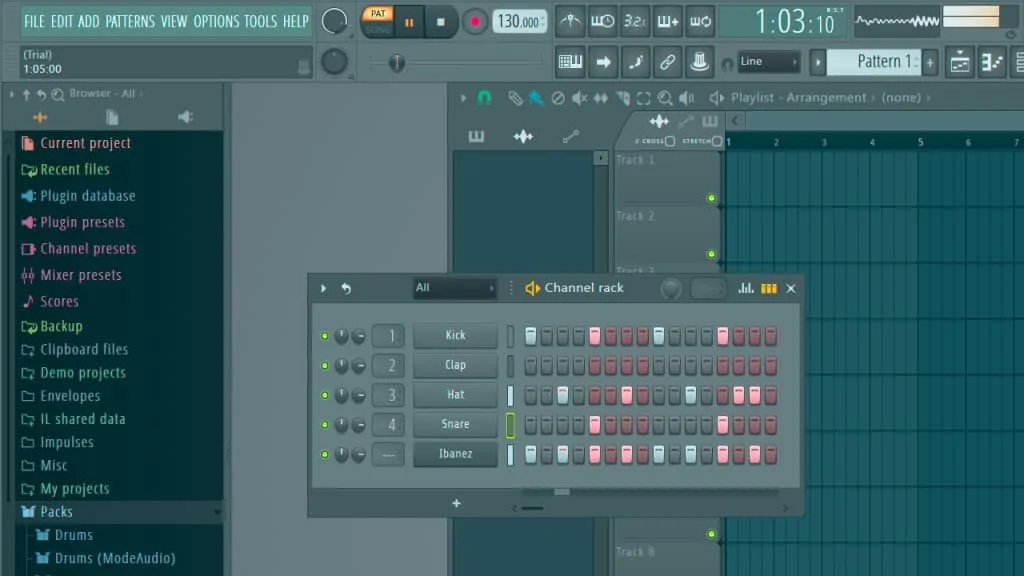
As you see, you have 16 empty spaces, each one representing a 16th note, whereas every four spaces represent a crotchet.
So, now, just click a space to create the beat. Play with it, and play it back by hitting the space button. You can erase it with your right-click.
Here’s my example beat:
I created this beat by imagining the bass is all on 8th notes, the kick on crotches /every four spaces) and the snare on half notes (every 8 spaces).
You notice that the channel rack creates all notes the same by default, so all of the bass notes are C. Let’s keep this as our first pattern, though, and this pattern’s length is a compass.
To paste this a pattern on the playlist, you only need to left-click on any track. You can delete it with the right-click.
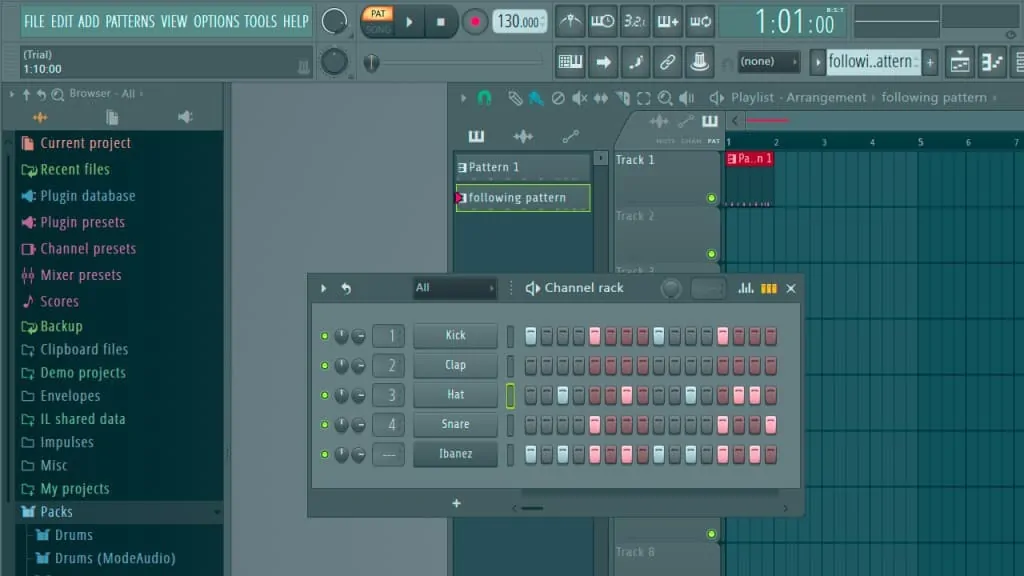
Now let’s create the following pattern with different notes on the bass. Remember to create a new pattern and rename it so the job is easier for you. Then, go to the channel rack.
If you want to listen only to the channel rack, and not the playlist itself, press the sound button within the channel rack. Here’s what I created now:
I gave the beat a minor variation on the hat and the snare.
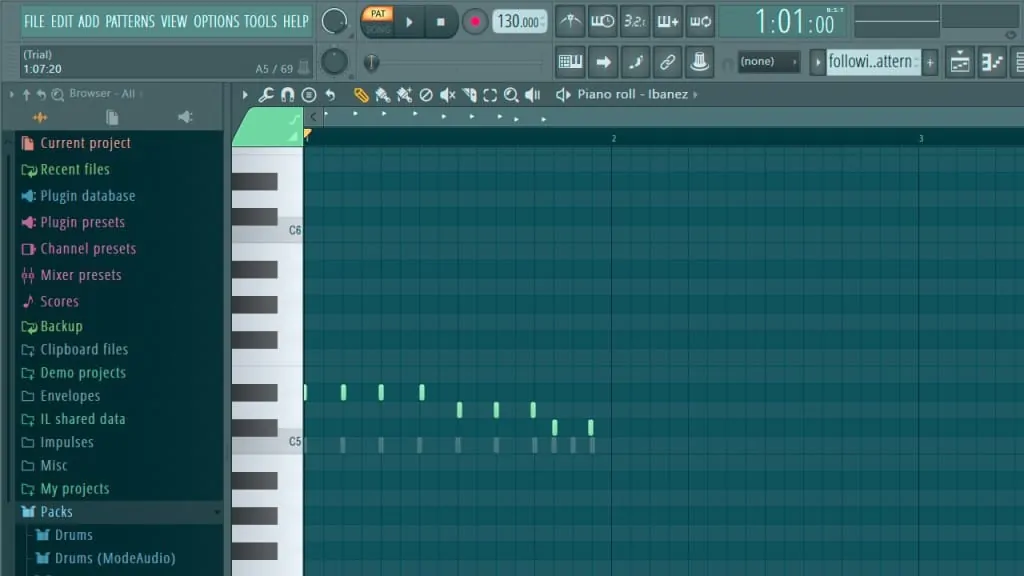
We can edit the notes of the bass with the piano roll, though, so let’s go there by simply selecting the channel on the channel rack (greenlighting the little square next to the name of the channel) and then opening the piano roll.
I did this by simply dragging the notes up, also you can also left-click on any space to create a note and right-click on any note to delete it.
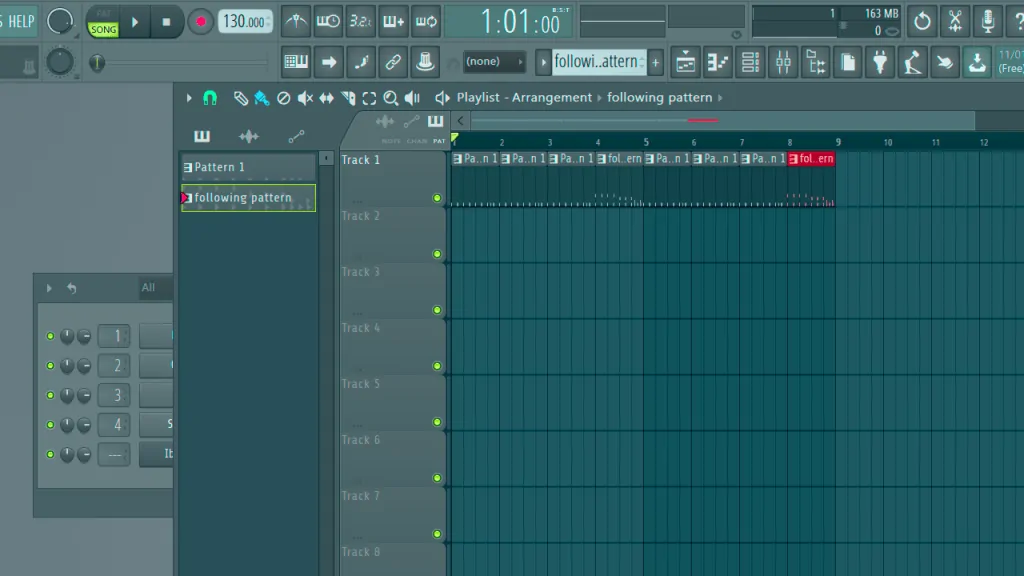
Now, it’s time to arrange these two patterns. You can drag and drop a pattern on the sequence, on any track you want. In my case, I dragged Pattern 1 for compasses and then dragged Following Pattern on the fourth compass. That would create a phrase.
If you don’t know about phrases and cadences, I have this resource for you within my bassline guide, which would also help you create the basic beat of the song. See, the bass is often times the main rhythm and the core melody of the song, so learning how to create a bassline can definitely help you.
Here’s the example:
There’re 8 compasses on the sequence, and every 3 compasses I played the “Following Pattern”. You can listen to the audio here:
You can make the looping beats last more than a compass by sliding the bar bellow to the right, and then filling more spaces.
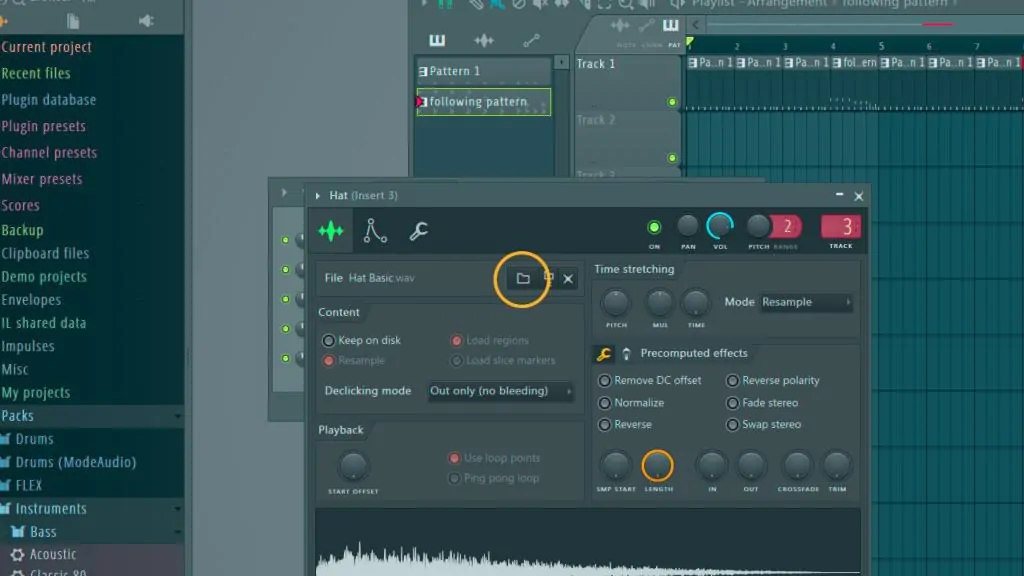
More so, you can change any of the sounds. Just left-click the sounds and then right-click on the folder. It will take you to the program’s sound-bank, where you can select a different sound from a wide array of samples.
This menu also allows you to change the preloaded sounds by moving the pitch, filter, and various effects like reverb.
Remember you can right-click on ay pattern and clone it, delete it, rename it, and give it a color. It will help you through your workflow.
You only need to rinse and repeat these options to create your song. The same channel rack – pattern – playlist workflow works for any digital instrument or plugin you want, which includes keyboards and synths.
In different DAWs, you need to have the beat on one track and the bass on the other. However, that’s not necessary on FL Studio 20. Here, a pattern is a pocket of music with its own sonic data, and you can add as many instruments and effects you want to it.
Step 5: put it all together with plugins
It’s time we put all of what we’ve learned in this FL Studio 20 tutorial and create our first song.
- Plug the interface to the computer and plug an instrument or a mic to it;
- Select the ASIO4ALL audio drivers on FL Studio
- Open up a new sheet and set the time signature and BPM
- Select a track, select input and start recording your guiding track
- Complete your song with looping beats
- Record your voice if you want to sing, or record guitars, basses, and other musical arrangements and lines you want to do with your instruments.
Whenever you fill your song is ready, you can create a WMA or an MP3 file you can listen anywhere. Simply go to File – Export – and select the type of file you want. WMA is the current standard.
But before we export the song, we can take it to the next level by using some plugins.
How to use plugins on FL Studio 20?
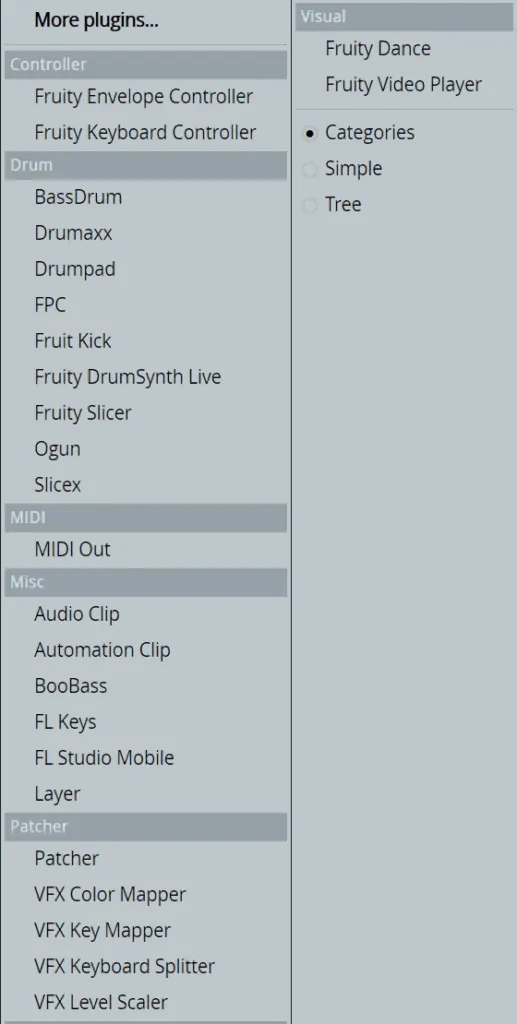
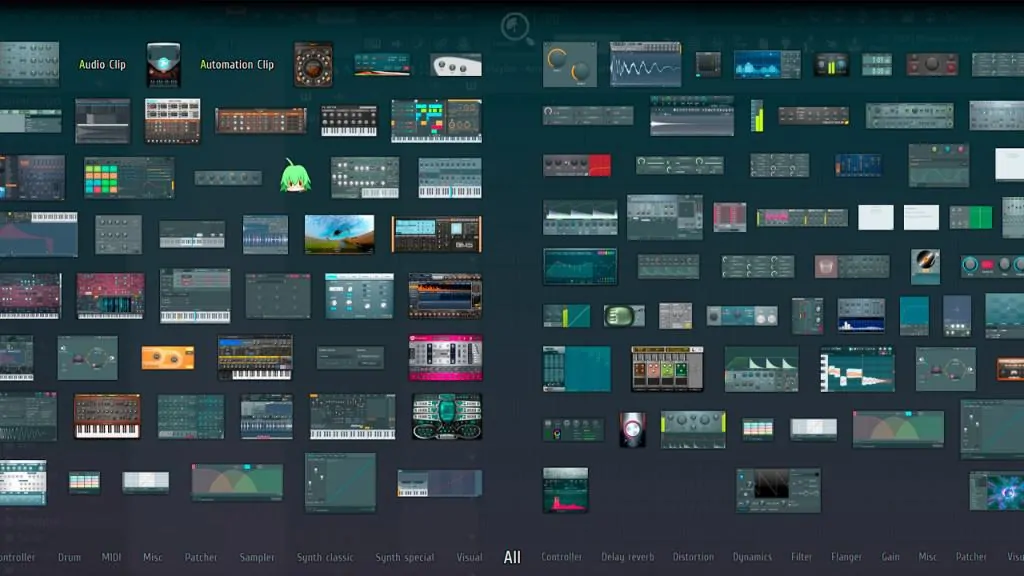
As I said before when you press the “+” button on the channel rack, you will see a list of plugins this:
This menu shows the list of plugins available for the channel rack. As you download and install more plugins, you will find them here.
The plugin list shows all of the plugins you have installed in the program’s library.
Plugins are simply extra software you can use with FL Studio (or any other DAW) to modify, enhance, and create new sounds on your song or project.
These plugins serve as generators of music, instruments, and effects.
If you press the PLUG icon on the program’s interface, you’ll see the list of plugins available.
Just like the menu before, you’ll see more plugins as they become available.
There’re two kinds of plugins:
- Instruments (or generators), which can synthesize, produce and sample sounds. You create the sample sounds with the piano roll or a MIDI device.
For example, I selected the Morphine and it added itself into the channel rack. Then, I created the pattern just like I did in step 4, and dragged the pattern to the sequence.
Additionally, you can modify the sound of the synth bi clicking on it on the channel rack.
I stretched the sound of the Morphine synth for the whole compass and then lowered the Control – Volume bar to give it an exponential fade kind of effect. You can listen to the audio here:
- Effects plugins process, manipulate, and change the incoming sound. When you use these effects, FL Studio adds them to the mixer inserts on the right panel.
It means effects work on the whole track. For example, I opened the mixer, selected a channel and then selected a delay FX from the “PLUG” icon. Then, FL Studio added the effect directly into the channel slots.
FXs plugins work on the entire track. You have up to 20 slots for FX per track, and you can modify each FX simply by right-clicking on it. More so, you can add FX on the master channel for the “mastering” process.
It’s important to note the order in which you load the FX matters. If you, for example, add the delay after the reverb, there’s going to be a delay in the reverb.
Final Considerations
I hope I was able to guide you through your first song on FL Studio 20. As you see, once you’re familiar with the program, it’s not as complicated as it seems.
Take advantage of the program’s use of loops and don’t worry yourself so much about tweaking the sound and using FXs. That knowledge comes later.
For now, give all of your attention to the songwriting.
