Don’t let the title of this article scare you away. Natural harmonics are not that complicated. In fact, the guitar is a beautiful instrument capable of making some of the most interesting sounds. It was musicians like Jimmy Hendrix that really pushed the limits and explored the different possibilities of what the guitar can do! Harmonics are just but a fraction of what you can perform on guitar to make your music have a little more… “flair!” and make you stand out as a musician.
Once you know how to play them, it just takes a little practice before you’re implementing this technique into your everyday guitar playing. In this post, we’ll first define what harmonics are. Then we’ll cover how to play them, how you can use harmonics to tune your guitar, and even some more advanced harmonic methods.
How Sound Works On the Guitar
Have you ever wondered why the guitar sounds like a guitar and not a fellow member of its strings family? For instance, pianos, violins and banjos all happen to play in the same frequencies as our beloved guitar, but what makes it so different?
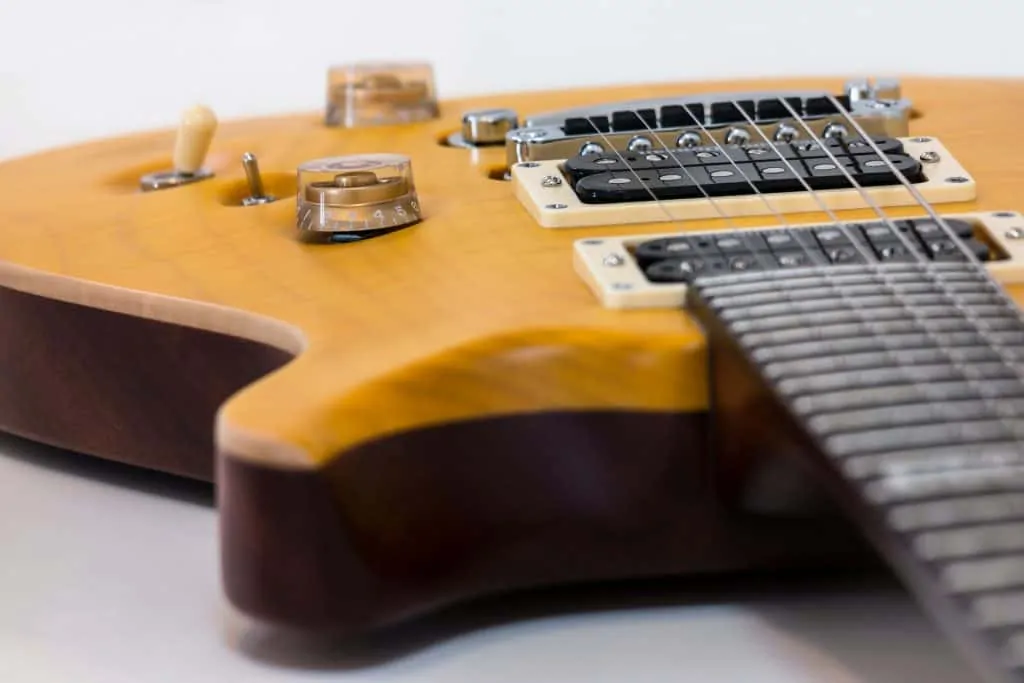
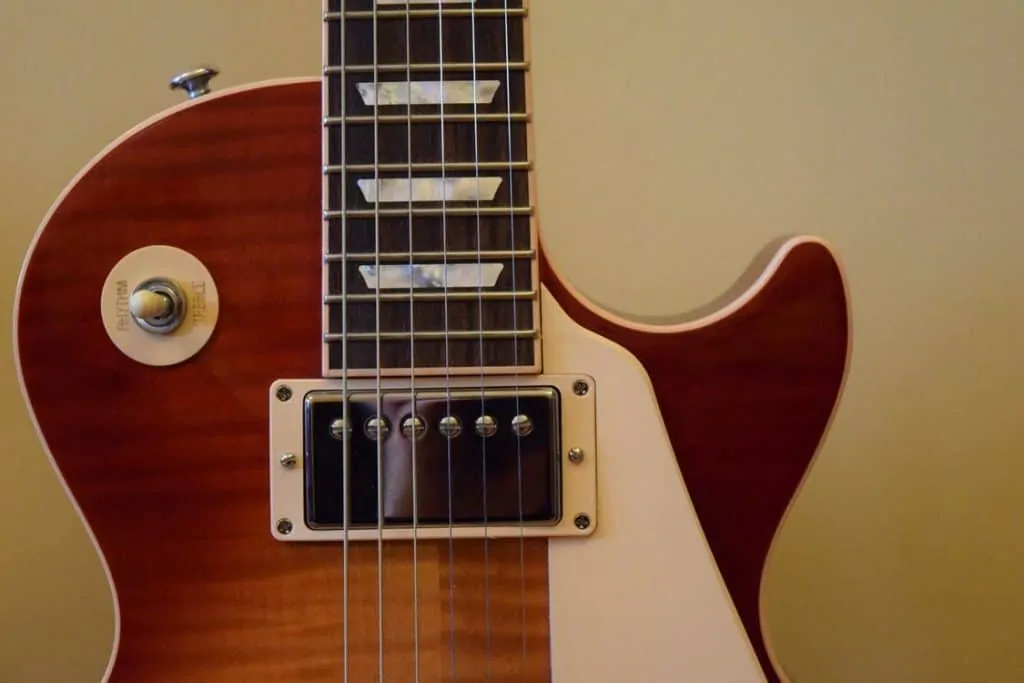
Body of an electric guitar, showing the pickups — essentially what alters the sound of the instrument.
Let’s take an acoustic guitar for instance…
Sound on an acoustic guitar is generated by sending vibrations through the strings when plucked, to the saddle of the guitar. The saddle then transmits these vibrations to the soundboard to which the body, and soundboard of the guitar can amplify the sound. The sound then comes out from within the soundhole.
It’s the acoustic guitar’s distinctive shape and design that give it its distinctive sound. Typically because it’s a stringed instrument, it will sound different from the other stringed instruments because the way it’s produced is different from its fellow family members. This is essentially why a guitar sounds like a guitar.
Now, we’ll entertain the idea of why an electric guitar is different…
Much different than an acoustic guitar, the electric guitar has a thinner body, and doesn’t need a soundhole to resonate and amplify the sound. Instead it all starts with a bar magnet, which is found within the pickups on the guitar; generating a magnetic field all around it. Next, the magnetic field which can’t be seen to the human eye, extends upward through the guitar strings as well as the pickup.
The guitar strings which are near the magnet begin to magnetize due to the magnetic field surrounding it. As it begins to vibrate it creates an altered magnetic field of its own! There is a coil of thin wire that is wrapped around the pickup, which is supposed to detect the magnetic field. The field generates a tiny electric current within the coil. Ultimately, this gets picked up by the amplifier which boosts the electric current; large enough to power a loudspeaker. The loudspeaker then turns that electric current into sound! That’s that!
What are Natural Harmonics
On the topic of sound, before we define what a harmonic is, we have to first talk about overtones and fundamental notes. When you pluck the open string A, the fundamental note is A. However, you’re hearing overtones mixed in with the fundamental note.
Playing a harmonic note (also called “chiming”) isolates each individual overtone of the note, depending on where you play the harmonic note on the guitar.
It’s the purest form of a note. It’s a clear ringing sound, and all it takes is a light touch.
Before we get into how to play harmonics, it helps to know what they sound like. The best example I can think of is Buffalo Springfield’s “For What It’s Worth.” There are two high-pitched notes they play back and forth during the intro and verse. Those are harmonics.
Yes, you can trigger natural harmonics by lightly pressing your finger against an open string at certain points. For example, as you know, we use frets as indicators to mark different tones and semitones of each open string — this can ultimately help us determine where the harmonics lie on the neck of the guitar!
Musician working the fretboard, pressuring different portions of the open string!
How to Play Natural Harmonics
To properly play natural harmonics, you need a light touch. It’s all about finesse, whether you’re playing an acoustic guitar or an electric guitar.
Gently place your finger on one of the strings (the middle three are the easiest to start with) over the 12th fret’s fretwire (the easiest fret to start with). Don’t press down, just lightly rest your finger on the open string.
With your finger softly resting on the open string, pluck it. If it makes a dead sound, that either means you’re pressing down too hard or your finger is not over the fretwire. It should sound sort of like a quiet doorbell.
For added resonance, lift your finger off the string a split second after you pluck it. You’ll notice it rings out louder and longer. This is actually the proper way to play harmonics on the guitar.
When we take the length of a guitar string, it’s found that the 12th fret is the half-way point of the open string. Therefore, this makes it the easiest harmonic note to play! Following that: the 7th fret and the 5th fret are fairly easy harmonic notes to learn once mastering the 12th fret. These frets lie at a third of the portion of the string (7th fret) and a quarter of the string (5th fret).
So to recap for you all:
12th fret – ½ point
7th fret – ⅓ point
5th fret – ¼ point
Easy peasy!
Just about every harmonic note, except for the 12th fret, can be mirrored somewhere else on the fretboard!
For instance, the 7th fret’s harmonic note can be mirrored on the 19th fret simply because they divide the string by ⅓. The same can be said about the 5th fret and the 24th fret as they both divide the string into ¼. The reason this cannot be done with the 12th fret, is because the 12th fret is in the middle and therefore is what divides the string into two halves.
So to recap on mirrored natural harmonics:
12th fret = 12th fret
7th fret = 19th fret
5th fret = 24th fret
Keep in mind, if you capo your guitar, the natural harmonics will move in relation to that. So if you capo the second fret, the easiest natural harmonic notes would now be on the 14th, ninth, and seventh frets.
Fun fact:
When you play a harmonic note, you’re playing the same note as the fretted or open note. So a harmonic on the 12th fret of the A string is the same note as fretting the 12th fret on the A string.
To recap:
- The easiest places to play open-string (natural) harmonics are on the 12th, seventh, and fifth frets on any string. Technically, you can play harmonics all over the fretboard. But beginners should start on the easy frets.
- Mirrored harmonics exist on the exact other portion of the open string.
- Putting a capo on your guitar actually shifts the positions of the harmonics accordingly.
- It will take some practice to get this down. But if you can get it, it will totally be worth it.
Natural Harmonics Vs. Artificial Harmonics
It’s important to know that there is a difference between the types of harmonics that you can play on your guitar. Below we will cover the two different types of harmonics, and how you can go about playing them!
First, there are natural harmonics, which I’ve previously called “open-string harmonics” because you play these on an open string.
Second, there are artificial harmonics. These are when you play a harmonic on a fretted string.
Open-String Harmonics
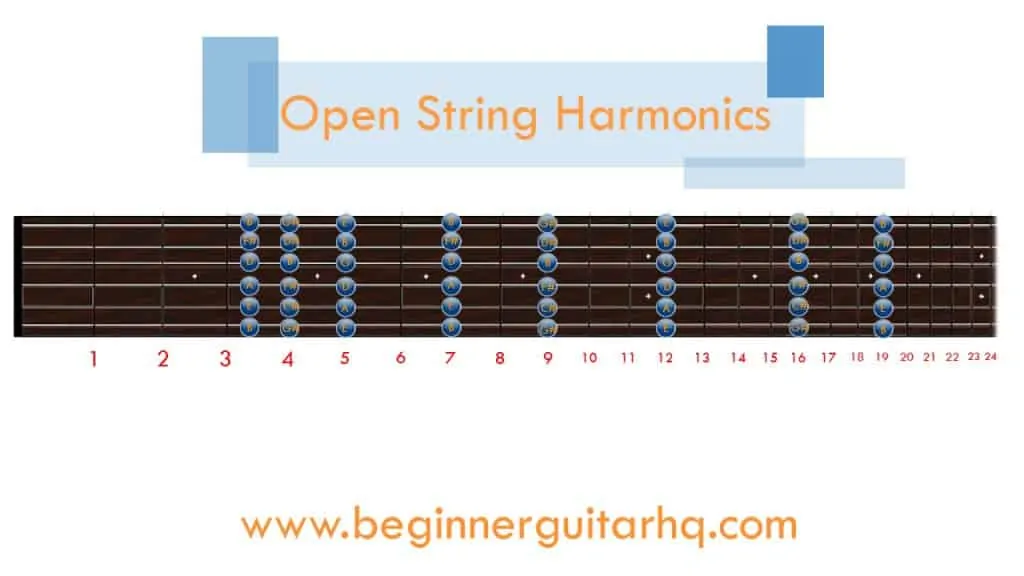
These are what is commonly referred to as, “natural harmonics”. To play these, simply refer to the diagram below, and lightly place your finger on any of those spots and pluck the string. Make sure that you are not pressing the string down, otherwise the string will either produce a muted note, or the natural fretted tone.
Fretted Harmonics
These are definitely some of the more difficult harmonics to learn. To play these you not only need fret a note, but to also include a “soft touch” to the same string roughly 12 frets above the fretted note. Thirdly, you need to also pluck the note. Applying these three steps to fretted harmonics may seem tough and tiresome to learn, however there are two methods to achieve the desired sound.
Artificial Harmonics
The first technique you “may” use in accomplishing harmonic tones. Although it might be known that all harmonics are artificial, this is what this method is called, regardless of that fact.
To achieve harmonic tones using this method you’ll want to do the following:
- Lightly place your index finger on the desired string.
- Next, you will want to pluck the string with either:
- Your pinky finger or other finger of choice.
OR
- Pluck the string with a pick held within your other fingers.
Sounds easy, right? Give it a try before making that assumption. It takes practice!
- This is the same idea as using harmonics with a capo. Fretting a string changes where you hit the harmonic note respectively. So if you push down the low E string on the second fret, you can chime the low E string on the 14th, ninth, and seventh frets.
There are a few more ways to play artificial harmonics, which we’ll briefly cover below.
When fretting a note, the sweet spots will actually stay proportionately to the string’s length, ie. from the fret to the bridge. Therefore, multiple sweet spots exist! This gives you plenty of options. Remember that hitting different sweet spots will not always result in playing a higher octave, but in an entirely different note.
Getting the sweet spot isn’t easy by any means, however, mastering it can enhance your playing a great deal.
Touch Harmonics
The second technique is to play touch harmonics. Simply, fret a note on one of the strings between the first and 10th frets. Gently place your right-hand index finger (for right-handed guitarists) on the note twelve frets above the fretted note, as if you’re going to chime that note. So your finger should be over the fretwire.
With both the note fretted and the right index finger in place, use your right-hand thumb to pluck the string as you lift your right index finger off the string. Your right index finger is chiming the note.
You can now use this structure to play harmonics anywhere on the fretboard.
Tap Harmonics
The third technique. Tap harmonics are the same as touch harmonics up until the “pluck the string” part. You fret a note, but then tap the fret twelve frets higher than the note you’re fretting. Tapping the string against the fret causes it to chime.
It’s hard to do. But really cool once you get good at it.
Pinch Harmonics
The Fourth technique. Pinch harmonics are definitely the most difficult type of harmonics to play. This one will take some practice.
You see, what you’ll first want to practice is the holding of the guitar pick, where it should just barely clear the bottom of your thumb. Next, you’ll want to practice getting that “sweet spot” which is when you pluck the guitar string with the pick and immediately follow up with the thumb to produce the harmonic note.
Tip: The most ideal place to pluck the string depends solely on where your thumb produces the harmonic note. Typically, your thumb should hit the string between the bridge and the fret you are playing on. So when you play different harmonic notes, that means your thumb has to change places in where it plucks the string versus the fret, this can create some difficulty and confusion for most players.
To recap:
Like you did with touch and tap harmonics, fret a note with a finger on your left hand. With your right hand, hold the guitar pick between your thumb and index finger. Let the pick just barely peek out from in between your fingers.
Now, pluck the string with the pick while also turning your hand so your thumb touches the already vibrating string. Make sure your thumb gently touches the string. You don’t want to stop the vibrating completely, just enough to cause it to chime.
When you do this correctly, it will seem like the pick and your thumb are striking the string at the same time.
It’s important to note that there are several “sweet spots” on the guitar. These exist for both open string, and fretted harmonics. When playing open string harmonics, (as shown on the fret diagram) there are several places to which the harmonics can be produced, as well as harmonics produced from between the fret and the bridge of the guitar.
Harmonic Exercises For Beginners
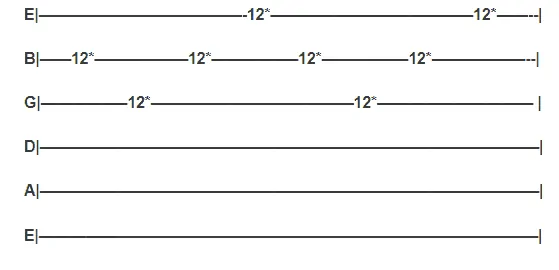
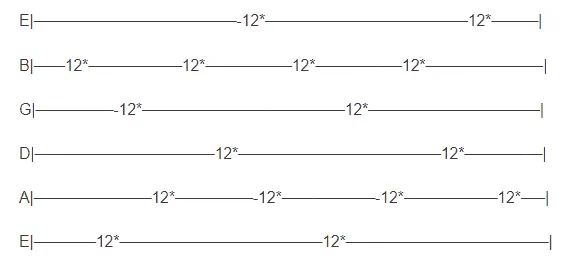
Now that we’ve covered how harmonics work, how about giving them a try! Below are a few different harmonic exercises and plucking patterns to get used to. As a beginner we’ll do these with using only the 12th fret. The * symbol in tablature means to play it harmonically.
Next, we’ll try something a little more complicated. Repeat this 10 times without messing up! If you slip up, start over!
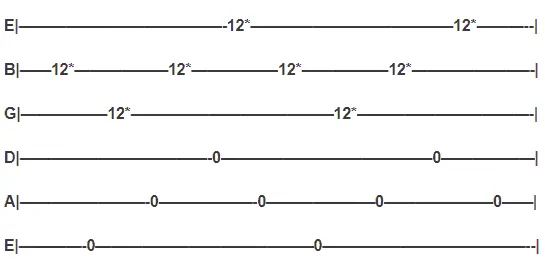
Finally, try and play this without a single slip up. Play this 10 times.
At this point you should have a pretty basic feel for how to play harmonics. You may repeat these exercises if you wish, using other notes and trying different methods such as pinch harmonics or artificial harmonics. If you wish to take it a step further, you’re welcome to google search: harmonic exercises on guitar, for more complex patterns that will get you moving further along.
Tuning Your Guitar Using Harmonics
Tuning your guitar is essential for having the appropriate sound. You wouldn’t play a gig, or hear a record with all the notes out of tune. It would sound off putting, and cause displeasure for the listeners. But did you know you can use harmonics have another use? As a matter of fact, harmonics are a very precise way to tune your guitar. Here’s how…
Man tuning his guitar, turning the tuning knobs.
Firstly, you may be aware of the old 5 fret technique to tune your guitar, and this is kind of like that.
- On the Low E string, (6th string of the guitar) you’ll want to play the harmonic note on the 5th fret.
- While the Low E string is ringing, play the harmonic note of the A string’s 7th fret (5th string of the guitar).
- You want those two pitches to line up and sound in unison of each other.
- Once those two pitches line up, you’ll want to move on.
Next…
- On the A string, you’ll want to play the 5th fret’s harmonic note.
- As the A string is ringing, play the harmonic note of the D string’s 7th fret (4th string of the guitar).
- Line up these pitches before moving on. This influences how the rest of the strings will sound.
Next…
- Just as before, on the D string, you’ll want to play the 5th fret’s harmonic note.
- As the D string is ringing, play the harmonic note of the G string’s 7th fret (3rd string of the guitar).
- Line up both of these pitches before we move on!
Next…
This is going to be a little different.
- On the G string, play the harmonic note of the 7th fret.
- As the G string is ringing, play the open B string. That’s right, no frets.
- Line up both of these pitches, and we’re moving on.
Next…
- As we had done before, on the B string — play the harmonic note of the 5th fret.
- As the B string is ringing, play the high E string’s harmonic note on the 7th fret.
- Line up both of these pitches and you’re all done!
To recap for you all – (Simplified)
- Play the harmonic note on the fifth fret of the low E string and then play the harmonic note on the seventh fret of the A string. The two notes should be the same. If they’re not, tune away.
- Continue following this pattern:
- Fifth fret harmonic on the A string + seventh fret harmonic on the D string
- Fifth fret harmonic on the D string + seventh fret harmonic on the G string
- Fifth fret harmonic on the G string + seventh fret harmonic on the B string
- Seventh fret harmonic on the low E string + 12th fret harmonic on the B string
- 12th fret harmonic on the low E string + seventh fret harmonic on the high E string
Just a quick tip for tuning your guitar, whether or not you’re using harmonics: always tune going up. This means when you’re turning the tuning head, take the string down to the note below what it should be (if it’s not already) and slowly tune up until you hit the right note.
Bonus: Best Sounding Guitar Brands – Acoustic Guitars
The guitar’s quality is of so much importance that if you are a beginner looking to develop, or an experienced player who is unsure about the model of guitar that they’re using — this can really help you achieve your desired sound and feel good going forward! So, to ensure that you are happy with your guitar and its tonal characteristics, we’ll briefly cover some of the recommended guitar models out there.
Brand of electric guitar sitting on display.
1. Acoustic: Martin
Martin Guitars are very widely known for having a top of the line resonator. Essentially, it takes the vibrations through the bridge in to one or more spun metal cones, thus producing a louder sound. This really helps give the guitar it’s bluegrass and bluesy feel, given its tonal characteristics.
On top of that, the wood used is of very high quality. It helps give the guitar its tonal characteristics and impacts its overall sound heavily. What we call these, are tonewoods.
It’s also excellent for finger picking musicians out there. The quality of the instrument gives it a sharp, thick sound. Given the wood’s quality, it makes it very good for adding percussion as well.
The built-in electronics are expensive, however, and on top of that the rosewood material is an absolute must. The reason it’s so important is because of its smooth and warm tonal characteristics. Lastly, the high pressure laminate material isn’t all that great…
2. Acoustic: Seagull
Excellent brand of guitar for those who are looking for a reasonable price and beginner musicians out there who appreciate the sound quality.
You’ll be happy to know that they have a very minimal impact on the environment as they’re very eco-friendly. This was one of Robert Godin’s goals when developing this brand of guitar.
On top of that, it isn’t a brand exclusive to beginners, but intermediate/professionals as well! They are very affordable, and produce a quality sound for guitar connoisseurs.
On the other hand, the head stock isn’t necessarily for everyone, and furthermore, the guitar might feel a little stiff. This can ultimately impact the sound and make it a little restricted, thus lacking harmonic overtones and note sustain. Lastly, the cedar top can be very prone to pick scars and ruin the nice condition of your instrument.
3. Acoustic: Gibson
Still considered to be some of the finest instruments in the world, due to the fine craftsmanship and the high grade materials used in their production. They also have very iconic looks that create much stage appeal.
The price range, however, can turn off even the most experienced musicians. The humbucker pickups can also reduce the guitar’s noise and brightness thus eliminating some desired tonal characteristics. Furthermore, they tend to be a little on the heavy side.
4. Acoustic: Epiphone
Taken over by Gibson in the 1950’s, it has come a very long way in its shape, design and tonal quality! As it has been taken over by Gibson, it is normal to understand that they’d share a lot of the same characteristics, but at a more reasonable price! What makes it cheaper, are the electrical components inside the guitar are of lower grade.
While it may certainly look and sound close to a Gibson, it never quite will be a Gibson. They have lower grade materials, but a similar shape and design. While it has many of the same specs to emulate a Gibson it will never match up to the real thing.
5. Acoustic: Taylor
They are primarily known for their “bright and crisp sound”. They also are known for trying to improve the sound a visual aesthetics by changing the design consistently.
Furthermore, it is a very “child-friendly” guitar brand with a healthy selection to choose from.
Unfortunately, they tend to run on the expensive side, and are a lot stronger as an acoustic brand than an electric guitar brand. Lastly, the new technology necks, are a turn off to some players out there, as it may be an acquired taste.
Bonus: Best Sounding Guitar Brands – Electric Guitars
1. Electric: Fender
One of the most recognized guitar brands out there. Known for its classic yet cutting-edge appeal. Undeniably, both the Stratocaster and Telecaster are etched in history as some of the greatest guitars that were ever made.
2. Electric: Gibson
Widely known for the Les Paul and their amazing guitar tones and craftsmanship, it’s no surprise that the Gibson brand has done well to attract many musicians alike. Very pricey instruments, but they don’t hold out on the quality and what goes into their production.
3. Electric: PRS
Known for being some of the finest guitars in the world, on par and even surpassing the high-end Gibson guitars. Even their lower-end more “cost effective” instruments are made of high quality materials and craftsmanship. Although some models may be cheaper than the standard PRS, they are indeed no beginner instrument. On top of that, they’re very flexible when it comes to playing diverse genres of music.
4. Electric: Ibanez
Originated in Japan, as a company that emulated famous American guitars. Nowadays, it is known as a guitar company in its own right, and produces guitars for mainly metal and hard rock players. As it definitely shines in the heavy metal genre, they make guitars for every genre.
5. Electric: Epiphone
Now owned by Gibson, the Epiphone forged by the very same mold in which the Gibson was created. Ephiphones are very close to being Gibsons, sharing similar craftsmanship, materials, even tone, without actually being a Gibson. However, many professional musicians still love their Epiphone equal to, if not more than their Gibson. Their take on the Les Paul is excellent for beginner musicians as well as intermediate players, as it will carry them through both practice sessions and gigs!
These are only recommended brands that you should consider when shopping for an electric or acoustic guitar. If you have different tastes, that’s okay too! What matters is that you enjoy the quality, sound and aesthetics of your instrument. If you aren’t quite getting the sound you’re looking for, definitely consider one of the former recommendations, as they won’t steer you in the wrong direction.
In Conclusion…
You should have a pretty deep understanding of harmonics, how they work, and how best to use them! It may be a difficult journey, learning how to perfect harmonics, but it will enrich your playing and experience as a musician.
Going forward, it’s recommended that you keep practicing the harmonic exercises, and that you explore more complicated patterns. There are plenty of different websites and places to look at if you’re searching for a challenge!
Persistence Is Paramount!
When you first try playing harmonics on your guitar, you probably won’t get it right away. It may take a lot of practice.
But that’s the case when you learn any new guitar technique. Even great guitarists have to spend time practicing methods they’ve never played before.
So the key is to stay persistent. The practice will be worth the beautiful and clear sounds of a natural harmonic note.
Thank you for reading, and we at Beginner Guitar HQ wish you luck in your endeavours to become the best possible musician you can be! Rock on!

Caleb J. Murphy is a songwriter, composer, and multi-instrumentalist based in Austin, Tx. He’s been playing guitar since 2002, writing songs since 2005, and producing music shortly after that. After getting a few (unofficial) basic guitar lessons from his brother, he taught himself guitar the rest of the way. Since then, he tries out any instrument he can get his hands on, like piano, banjo, ukulele, and cheap keyboards from the 90s.
