If you’re a beginner looking to plunge into the guitar-shredding world; or an intermediate guitar player wanting to go to the next level, I’m here for you.
Soloing is a fundamental part of playing the guitar. It doesn’t matter what music genre you play and prefer: learning how to solo, whether through studied practice and automated moves or improvisation, is only a matter of mixing and matching guitar techniques anyone can learn.
The meat of my guide is understanding a guitar solo is like a story. I will give tips, tricks, tools, and techniques to tell both the story you want and the story the song needs with your guitar medley. And you can do it with as much or as little virtuosity as you want or have.
Let’s dive right into our guitar solo tutorial.
Contents
Following this guide, you will learn:
- How complex are we talking about?
- Guitar solos 101: 10 quick steps to get you started;
- Your guitar tone;
- Advanced guitar solo techniques;
- Final considerations.
How advanced is this guide?
I’m trying to make this as easy as I can for you. One thing I did to help you is putting all of my examples with the same note, C. Why C? Because the C major scale is very simple: it’s one of the most common scales in western music and has no flat and no sharp notes.
More so, I slowly develop new concepts building up from previous examples with the C note. If you learn this well, you’ll be able to transpose these exercises and theories to any note you want.
You always want to start easy and become a God with the easiest things. And then, move on to more complex things.
So, as I said in the intro, you don’t need virtuosity at all to play a guitar solo, and you don’t need virtuosity to improve your guitar solos. You just need the right tools and combine them with your natural creativity.
What’s best, I’m giving you a written guitar solo example, plus the audio, so you can follow and practice along as you read.
You don’t need to be a virtuous guitarist to play a great guitar solo.
Guitar solos 101: 10 quick steps to get you started
Let’s say you’re a beginner guitar player and help you get through your first solo with 9 easy steps.
Before we get started, you can check this BeginnerGuitarHQ guide with 15 easy guitar solos to learn. My steps will greatly improve your ability to learn and even improve those solos.
I advise you to start practicing solos (either the real solo or an improvised solo) over songs you like. You can search for the track on YouTube a play over it. For example:
If you have any questions, please leave them below!
- Understanding scales
A scale is a group of notes arranged in ascending order. They are harmonic with each other and serve as the building blocks of music.
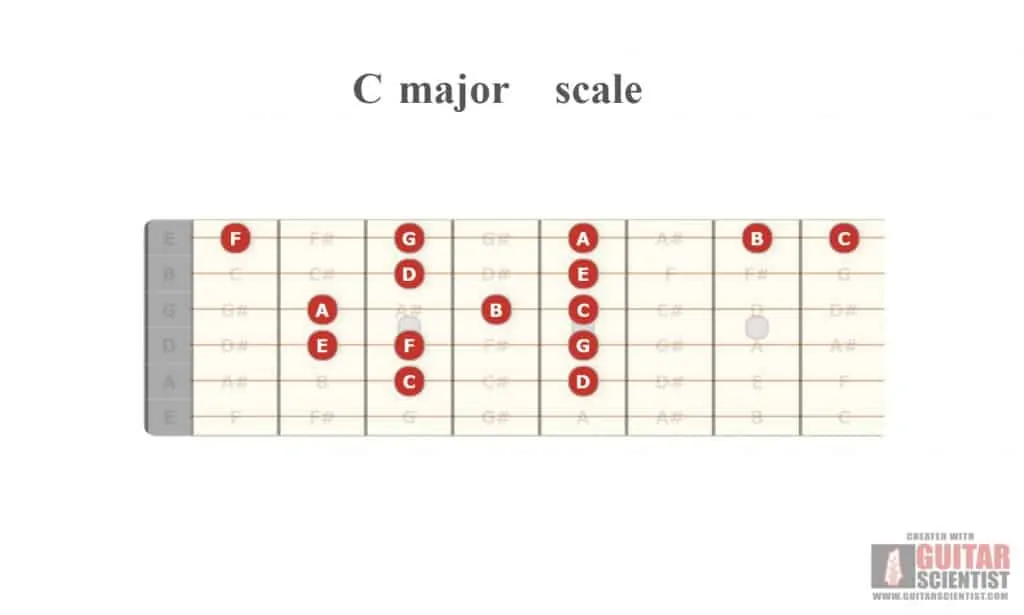
For example, the C Major scale goes:
C – D – E- F- G – A – B – C
C major scale on the first 8 frets.
The top and bottom note is the “tonic note.”
Here’s the definitive formula to build any scale: if you imagine the fretboard as a ladder, you can understand one fret of distance between one note and the other one is known as a half step (H). Two frets of distance are known as a whole step (W). Three frets of distance is a whole step and a half (WH)
You can read more about this formula steps in Music Theory Fundamentals.
So, when you play a major or minor scale, you play it in ascending fashion. It goes from the tonic note, which is the first, all the way up to a higher version of the tonic note, which is the 8th.
| Major scales | W – W – H – W- W -W – H |
| Minor scales | W – H – W- W – H -W – W |
So the C major scale would look like this:
| C | W | 1st |
| D | W | 2nd |
| E | H | 3rd |
| F | W | 4th |
| G | W | 5th |
| A | W | 6th |
| B | H | 7th |
| C | 8th |
Playing a guitar solo is understanding which scales the song uses or which scales are harmonious with the song. And then, play around the notes.
You would also need to learn how to play a pentatonic scale. A pentatonic scale is a simplified version of the major and minor scales.
A major pentatonic scale has 5 notes instead of 7 as it erases the 4th and the 7th. A minor pentatonic scale has 5 notes instead of 7 as it erases the 2nd and the 6th.
| Major pentatonic scales | W – W- WH – W- WH |
| Minor pentatonic scales | WH – W – W -WH – W |
Lastly, rock and metal guitar solos commonly use blues scales. The blues scale has 6 notes as they miss the 6th. They are somehow derived from the pentatonic scales as they simply have one extra note, which is known as “the blues note”.
| Major blues scales | W – H – H – WH -H- W |
| Minor blues scales | WH – W – H – H -WH – W |
It turns out, then, we have all of these alternatives:
| C major scale | C – D – E – F – G – A – B |
| C minor scale | C – D – D# – F – G – G# – A# |
| C major pentatonic scale | C – D – E – G – A |
| C minor pentatonic scale | C – D# – F – G – A# |
| C major blues scale | C – D – D# – E – G – A |
| C minor blues scale | C – D# – F – F# – G – A# |
These are the most used scales in today’s music (major, minor, major pentatonic, minor pentatonic, major blues, and minor blues).
Just know you can form any scale with the W/H formula. If you want to see more musical scales for your guitar, check this link out.
Master the C major scale and master your guitar skills.
Next, you can learn how to build chords with the scale.
Chords are made of various notes from any given scale played at the same tie. You can build a major or minor chord with a major or minor triad.
A triad is simply the first (root), the third, and the fifth. A triad chord would simply be the chord, either major or minor. Knowing your way around trials guarantees you can build any major or minor chord.
| C major triad (C) | C – E – G |
| C minor triad (Cm) | WC – D# – G |
What I recommend for you is to practice C minor pentatonic scale. It’s easy to use, it’s easy to learn, it’s very useful, and it sounds incredible. As you master it, you’ll find very easy to master any pentatonic scale:
- Find out the key of the song
So, the first thing you should learn how to play a guitar solo is practice over other songs. And the key step is finding the key of the song.
The keynote is the most resolved note of the song. It is the dominant note and oftentimes you can find it by pure ear, by intuition.
The key will tell you which scales and arpeggios you can play. Getting outside of the scale guarantees playing out of tune and sounding awful, unless you really, really know what you’re doing. So let’s stick with the easy process: play the right scales.
It’s easy to find out the keynote on most songs as it’s just the first note of the chord progression. A chord progression is the follow-up of chords repeating itself after a compass or a set number of compasses. A chord progression is built on harmonious scales.
Your guitar solo must relate with the rhythm section.
For example, here’s a basic chord progression:
- C – E – B – A
The keynote would be C, the scale would be C major. You would know the keynote is C because most sections of the song start at C. And you would know the scale is C major because other notes of the progression belonging to the C major scale, while other sections of the song – like the chorus – start at a different note of the scale (like the 5th, which is G).
Of course, that’s not always the case, and before we continue, here’s a great video tutorial helping us how to find out the key of a song:
Another way of finding out the keynote is by looking at the first and the last note of a melody or a riff. Often times, you’ll find a song’s melody or riff starts and ends at the keynote.
Let’s not dive into deep theoretical issues and agree the easiest way is to find the key of a song by ear.
Here’s a simple technique for you:
- Listen to the whole song first, feel the music and let it get inside your head;
- “Hum” with your voice. When you can hum a single note during a song, your brain will find a way to find that one note that works and fits the whole song;
- Once you find that “hum”, translate it into your instrument. More so, play it either as a major or a minor chord;
- Build the scale by finding all of the notes of the song. Play around the scales I gave you above.
Try it out with Dua Lipa’s “Don’t Start Now.” Pop songs are easier to study as they are built on simple chord progressions and scales:
Did you find the keynote? It’s Bm.
Because the root note is the first note on the scale and is the note that can sound good during the whole song, this is a safe bet. Play around with it, this is going to be the dominant note on your guitar solo.
- Find the scale of the song
To learn how to solo on your guitar, you must find the scale that works with the song. I already gave you a quick tip on the section above, so let’s build on that.
Listen, 99% of all guitar solos are made of scales. A guitarist picks a scale that works with the song and plays away.
A scale either works with a song because all of the notes sound harmonious; or because the songwriter purposely built the song with that particular scale.
Many scales are related to each other or are harmonious between each other. More so, a scale derives from the keynote, as you can consider the keynote as the first or root note of the scale.
The C major scale, as well as the Am scale, are the same. Both are easy to learn as they have no sharp and no flat notes.
For example, if your keynote is C major, you could use:
- C major scale
- C major pentatonic scale
- C major blues scale
Furthermore, we find relative scales, which share much of the same notes. Every major note has a relative minor scale, and every minor scale has a relative major scale.
A relative minor scale always start at the 6th note of the major scale; a relative major scale always starts at the 3rd note of the minor scale:
| C major scale | C – D – E – F – G – A – B |
| Relative Minor: Am | A – B – C – D – E – F – G |
It means that you could also mix the following scales:
- C major scale
- C major pentatonic scale
- C major blues scale
- A minor scale
- A minor pentatonic scale
- A minor blues scale
Pick only ONE scale for your solo, though.
- Use pentatonic patterns
Pentatonic patterns are shapes you can use along the fretboard to play pentatonic scales. These shapes can help you create a solo on by themselves.
In essence, pentatonic patterns mean playing mostly with the 1st, 2nd, and 4th note of the pentatonic scale in a motif that repeats itself either in ascending or descending order.
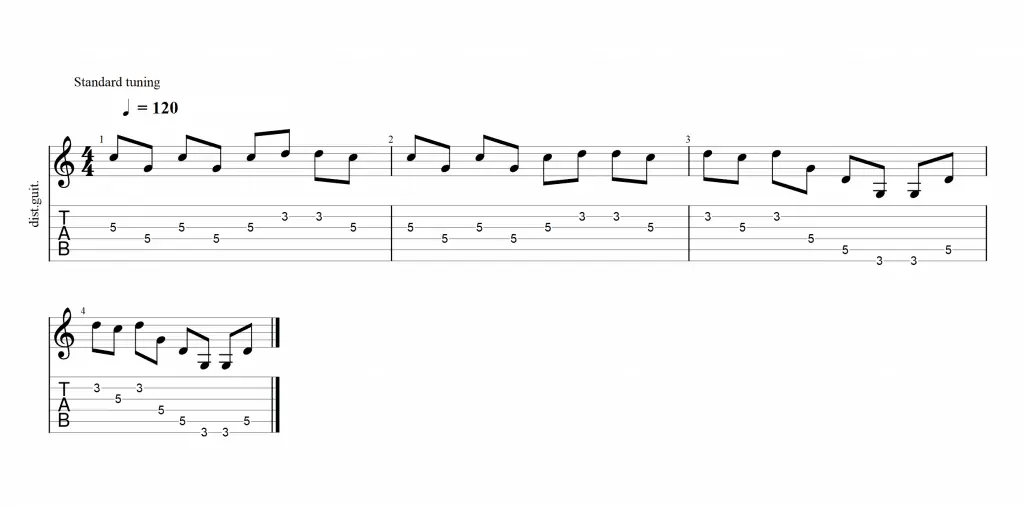
Let’s avoid explaining this and plunge right into the practice:
C major pentatonic pattern.
Audio:
Then, pentatonic patterns are easy shapes you can use on your songs. You can build these patterns yourself playing around with the pentatonic notes and using mostly half notes.
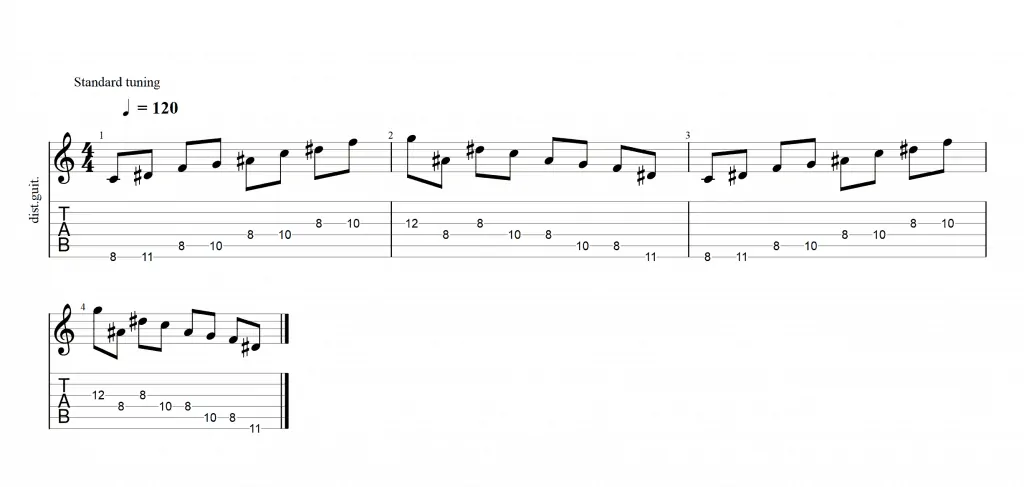
Here’s another example:
C minor pentatonic pattern.
Audio:
As you saw in the examples above, a pentatonic pattern follows a particular fingering you can repeat over and over to play all of the notes of the pattern. You would just need to move your fret hand, as it is, up and down & left and right the fretboard.
- Understand the song
Before you play any note, listen to the song first. Your solo should convey the feeling the song has in the particular section you play the solo in. Is it a build-up? Is it a discharge? Is it a cry?
You can have the most amazing skills, but if you don’t convey the right feeling it might not fit the song.
While many aspiring guitar players -and professional ones too- think a solo is just a time to play all of the buttons, you should think of it as a conversation with the other members of the band, the other instruments, and the audience.
Take time every day to practice guitar, or at least every week.
- Plan ahead
It would be best if you think before you play instead of rushing into the solo.
Planning ahead will turn you into a much better guitar player and make you stand from the crowd.
Listen, your guitar solo is the highlight of the song, so it’s not okay to just wiggle in with any scale or no scale whatsoever. Your solo should be memorable, and to make it so, it should be harmonious and in tune.
Just because you’re fast doesn’t mean you should play ALL OF THE NOTES. Not even all of the notes of the scale.
Instead, you must be tasteful and take advantage of triads to pick and choose notes. You can use, for example, pentatonic patterns or shapes to select the notes.
Furthermore, you can take advantage of silences to improve your sound and, more so, you can repeat a motif on a higher or lower scale.
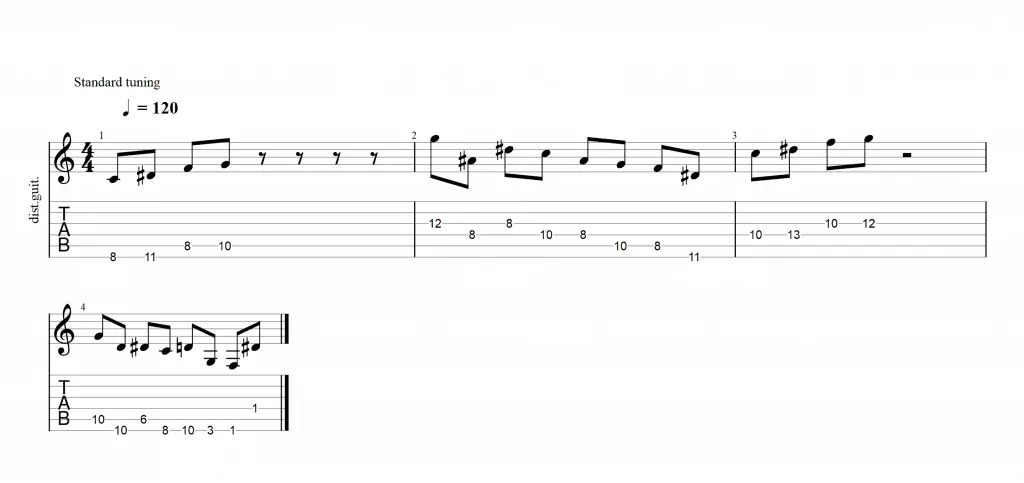
Here’s an example building upon the ones above:
Made with Guitar Pro 7. C minor pentatonic pattern.
Audio:
- Give your solo some space
If you find you can’t stop playing notes, try this guitar solo tip I’m sharing:
Every time you breathe out, play; every time you breathe in, rest. More so, you can leave the note hanging when you rest. This is the key for you to make silences, and you should dominate this practice and think your guitar is an extension of your body. Some Karate Kid stuff, right?
It would be good for you to impose some limitations upon yourself. See, a singer or a saxophonist can’t play notes continuously because they need to breath; use the same idea on your guitar. The song and the audience will be grateful.
- Your guitar solo is a story
Avoid the temptation of putting all of your best stuff at the beginning. Remember a guitar solo is a conversation, and within every conversation, there’s a story.
- How a story goes? It has an intro, where your guitar slowly builds up;
- It has a development, where it tells the meat of the story;
- It has a climax, where the guitar climbs all the way up to 11;
- And it has an end, where you release all of the tension.
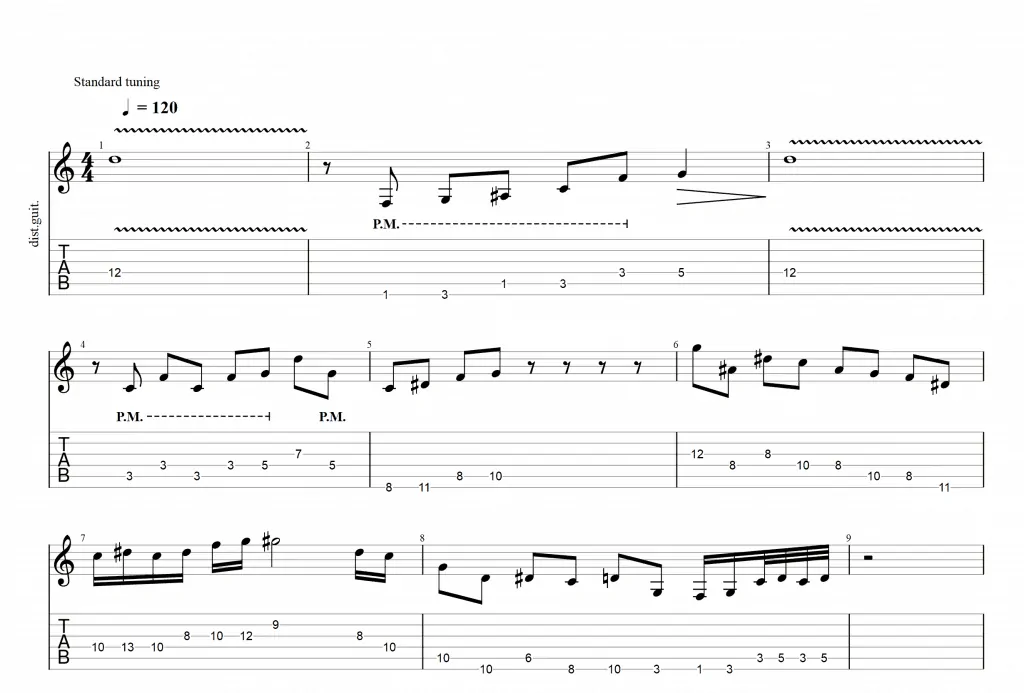
Here’s an example for you: notice how the motif changes every 4 compasses (like intro, development, and outro). I added bass, drum, and rhythm guitar to the audio so it feels more lively:
Made with Guitar Pro 7. C minor pentatonic solo.
Audio:
You can distinguish the different parts of your story by understanding musical figures, as they will help you slow down and accelerate the solo; and by understanding cadences and phrases. Let’s dive into these last two parts of the guitar solo 101 guide.
- Cadence and phrases
Phrases are the hidden punctuation of music. They give you a sensation of beginning and end and help you shape your rhythms and riffs into melodic portions.
Understand that music often changes at the 4th, 8th, or 16th beat. A change means it goes unto another section; or that the section gains or losses intensity.
A phrase is a cohesive section of the song, while a cadence represents the last portion of such a phrase. For example, if a verse has 8 compasses before the chorus, you would know the phrases lasts 8 compasses and the cadence exists on the last compass, where all of the instruments and the singers give way to the next section.
A guitar solo must follow this rule as well: you will gain or lose intensity as phrases come and go, and give way to the next section of the song in the cadence (commonly the last compass or the last 4 compasses of the section).
Imagine phrases build the tension and cadence resolve it. Just like a story. How would you translate this into your guitar solo? Give it a thought.
Use phrases and cadences as a way to tell a better story.
- Music figures
Let’s close up this first section of the tutorial by acknowledging musical figures. So far, we’ve created all of the examples with mostly half notes, and the result is a guitar solo that’s not very dynamic.
If you want to create some dynamic and distinguish the different sections of your solo-story, you should vary between musical figures.
C minor pentatonic solo with various musical figures.
Audio:
If you’re in doubt, Simplifying Theory does a great job explaining musical figures.
Guitar solo tone
This is a short section that still needed its own title because of how important it is.
Your guitar solo is very dependent on your guitar’s tone. The first thing you have to do is get to know the natural sound of your guitar. If you want to choose a new instrument, here is our top rock guitar guide.
Then, the tone you pick depends on the song’s genre, the band’s genre, and your personal style. I’m not here to teach you how to build your desired tone, I’m just here to tell you you need to decide how your guitar should sound like and then try and build that with guitar pedals, compressors, and other effects.
If you’re short on budget and can’t rely on having too many pedals to alter your tone, I can recommend you a multi-effect Zoom guitar pedal.
These devices carry plenty of onboard effects like delay, chorus, overdrive, tremolo, vibrato, compressor and more, all of them in great quality. More so, you can build your own presets and store them on the footswitch so you can activate them and deactivate them as you play.
Zoom G3Xn MultiEffects processor review
It carries 70 onboard effects, which include 68 effects, 1 looper pedal, and 1 rhythm pedal. It also packs 5 amp emulators, 75 custom presets, and 5 cabinet emulators.
YOu can use up to 7 effects and cabinets at the same time and chain them together in any other.
More so, the looper allows you to record up to 8p seconds of any phrase.
Multi-effect pedalboards are not easy to use, but once you grow accustomed to it, it can easily become your only pedal.
It’s a great practicing pedal because it has a lot of backing tracks, a looper option, and plenty of effects for you to try out new things. And, when you couple it with a good guitar, it’s a semi-professional live sound musical gear.
Individual pedals will always carry more quality and be easier to use, so I do recommend you slowly buy the guitar pedals you want.
Advanced guitar solos
As I said before, we started with the basics. Now, it’s time to move on to more complex things. If you’re an intermediate wanting to improve your guitar solos, follow these next steps:
Essential guitar solo techniques
There are essential guitar solo techniques that are simple enough to learn. However, mastering them is the key to improving your lead guitar skills.
Your job is to integrate them into your solos in a way that sounds natural and effortless.
These advance guitar solo techniques are:
- Hammer-on: you can do a hammer-on by playing a second note only with your fretting hand. It means you won’t play it with your strumming hand.
To play a hammer-on, you need to fret a string with your pointer finger, and then pluck the string. By plucking the string, you’re forcing the note a full step above.
- Pull-off: it’s the opposite of a hammer-on. To pull it off, fret a string with the ring finger. After you pluck this string, you will pull your ring finger on the fretboard, while your index finger remains on a fret, a full-step below.
- Bending: you can bend a guitar string with two or three fingers to raise or lower its pitch.
To play a bend, you need to fret a string with your ring finger, then place the pointer and middle finger on the fret behind it. You would then pressure the string with your three fingers and push the string up or down to raise the pitch.
IMPORTANT NOTE: many guitarists make the mistake of bending without purpose. Remember you’re raising either a half step or a full step with the bend, so be sure the resulting note IS NO SCALE. If it’s not, it’s just going to sound out of tune.
- Vibrato: this happens when you sustain a note and make it vibrate.
To do it, fret a string with the pointer finger and pluck the note. Then, allow the note to ring and jiggle it with your finger back and forth the fretboard. It causes the note to vibrate between sharp and out of tune notes.
- Slide: a slide is when you go from one note to another by sliding your notes on the fret.
So, instead of stepping over the 5th to the 8th fret to continue the solo, you would slide the finger down the fretboard.
Your slides must also be on the scale, and you can slide at any point of the solo, either to escalate from one fret to another; or to introduce a note.
Here’s a short video tutorial:
Now, try to play the previous examples I gave you but this time adding these advances techniques. See how it changes for yourself.
Consonant vs. dissonant
To fully master your solos, you should pay attention to the rhythm section. Remember the notes you play will feel different depending on how they relate to the underlying chord progression.
Here’s where it gets interesting. Remember how I said you should always stay on a scale? Well, I also gave you a rule: you can go out of tune by really knowing what you’re doing.
So, if the chord progression is playing with a C major chord as the keynote, then playing C, D, E, F, G, A, and B will sound consonant. But playing on an F# will sound very dissonant.
Create tension with dissonant notes and release the tension with consonant notes.
Your job is to find a balance between consonance and dissonance. Use them as tools to tell your story:
- Consonant notes feel stable. They are what the people want to hear as they feel easy on the ears, thus they are easier to understand and process.
- Dissonant notes feel unstable. They are unpredictable, harsh, uncomfortable, acid and create tension. You can release this tension with consonant notes.
It’s all about a fight between light and dark notes. It can make a difference.
If you need some extra info, here’s a guide about how to play dissonant chords.
Sing the solo
I advise you to sing the solo before you begin playing. If you want to be original and avoid patterns, then singing the solo you want to play first will give you both clarity and context.
It will also help you notice how the notes you’re planning relate to the song, so you can change them and even improve them.
After you sing it, your muscle memory will force you to find the notes and play what your brain has already created.
Decide the rhythm
As you grow accustomed to the different musical figures, you will find it best to decide the rhythm before you play.
Here’s where phrases and cadences play the most important role. It’s your job to tell the story of your solo -which is often times the climax or the resolution of the song. So, you may start slow and then build to 8th notes, or change the feeling with triplets, and finally end on 16th notes before a soul searching closing bend.
As you polish your skills, the rhythm will become a second language.
Find your personality and find your hero
Not every solo has to be fast and not every guitar player has to shred. The secret is for you to find your own style, a style that fits both your personality and the genre you’re playing.
For example, which one you prefer?
- David Gilmour (Pink Floyd) or Ritchie Blackmore (Deep Purple)?
- John Frusciante (ex-Red Hot Chilli Peppers) or Kirk Hammet (Metallica)?
Those are just examples. My advice for you is to find guitar players that inspire you and see what they do. Here’s our guide about how to play like famous guitarists.
It means you should find your guitar hero and emulate unless your hero is Yngwie Malmsteen. Then you should skip this step forever.
Me? I love Dani California’s solo:
Imitate another instrument or section of the song
If you want to build catchy solos, here’s a great recommendation: emulate how other instruments would sound.
How would a sax solo be? What would the voice sing in this section? Or how would the chorus lyrics in a guitar solo?
Combine this with you following the bass lines or the drum’s rhythm with your notes and end up with incredible results.
Use chords too
How says you can’t play chords on your solos? By using chord patterns, you can dig in the craziness and build up a lot of power.
You can also use them as arpeggios, which means that, instead of strumming the note, you will hit each string separately in beautiful, melodic patterns.
Improvisation and practice: hooks
From now on, you will spend 70% of your guitar practice soloing and coming up with new tasty melodies for the songs you like, the songs your band plays, and your own songs.
Your job is to create memorable snippets you can play at any part of the song. In other words, a hook. Remember how I said the keynote can play during the whole song? Well, the hook revolves around the keynote and it’s usually simpler than a solo.
If you want to learn how to construct a solo, learn first how to create a hook.
Your hooks will become your “mini solos or licks. They will give you an idea to go forward and, more so, to create catchy solos. YOu want people to remember and even sing what you play, even when it has no lyrics.
Practice makes the master. The only way to truly master a guitar solo is by taking your time to improvise solos over other songs and create new hooks and solos for them.
Final Considerations
I’ll make a summary of the most important factor to close this guitar solo tutorial article.
Your song is a movie, and the solo is the climax of this movie.
How would you play this?
Well, you’re solo is a new scene on a new scenario, so you should start on a wide shot that presents the situation. Those are long flowing notes, with bends and vibratos.
Then, you build-up to the most exciting moments of the movie with your guitar. There’s a battle between consonant and dissonant notes until it finally releases on the ending.
So, what’s the story of your song, of the movie? That’s how the solo releases the tension, with either consonant (good, comfortable, victory) or dissonant notes (uncomfortable, defeat, sad).
Your notes are the feeling, and your speed is the genre of the movie.
Do you have any questions? Leave them below!


