There are many excellent tunings to mess around with on your guitar, however, none sound quite as beautiful as the open D tuning. When changing your tuning, it’s very easy to feel lost as a lot can change on the fretboard, making the task of playing beautiful melodies and chord progressions all the more difficult. As you read on, we will cover several chords you can form in this tuning to make writing and playing in open D tuning that much easier. Let’s dive in!
Contents
Introduction to Open D
Open D, or “open D tuning”, is a tuning of the following notes: DADF#AD. Open D tuning gets its name from when you strum all of the open strings, you get the D major chord. This naturally gives the notes played in this tuning a very uplifting, and happy vibe.
Using open D tuning, you can form a barre (barre chord) to make other major chords in this tuning, as it quite literally only requires one finger to do. (A barre is formed by draping your index finger along all of the strings of an individual fret). Most often, you’ll see fingerstyle guitarists playing in this tuning, as it sounds more colorful and warm when played on the acoustic guitar. However, this tuning is also popular with slide guitarists, as it allows them to easily complete their chords using a slide.
Tuning Your Guitar – Open D
Tuning your guitar isn’t too hard. In fact, there are a few different ways of going about it. You may use an electronic guitar tuner, a plug-in, or pedal tuner, a tuning fork, or a smart app, or you can go with using your ear. For this method, it’s implied that your guitar is already tuned up in standard tuning, as we’ll be using each string as a reference for the next.
Let’s start with our low E string and tune it to D. It’s important to know the difference between E and D is a tone, the equivalent of 2 frets. When playing the low E string, you will want to slowly drop your tuning, but use the 7th fret of the guitar as a reference point with your A string below it. You’ll want to play these two strings back and forth and adjust your tuning accordingly. When these pitches sound the same, then we can move on!
The next string is the A string. However, that already falls within the tuning of open D, so we can skip it. Moving on, we have the D string. This is the same case as our A string, as it already falls in the tuning of open D, so we can skip this one too.
Now, we have our G string, and we’ll need to tune this to F#. To achieve this, we will need to drop the G string by a semitone, which is equivalent to 1 fret. You can use the 4th fret of the D string we skipped as a reference to how much you should drop your G string.
Once you have your F#, we’re onto our B string, which we need to tune to A. From B to A is the equivalent of a tone. So you may use your G string (now F#) and play the 3rd fret, then play the B string. Drop the tuning until the two sound the same, and we can move on!
Lastly, we have our high E string, which will also become D. There are two ways you may go about this. The first way, you can use your B string (now A) and play the 5th fret as a reference. The other way, you may use your low E string (now D) and use it as a good reference to how your high E string should now sound.
That’s all there is to it, give it a nice strum!
Open D sounds so nice, in fact, here is a demonstration of our open D tuning in action:
The Fretboard in Open D
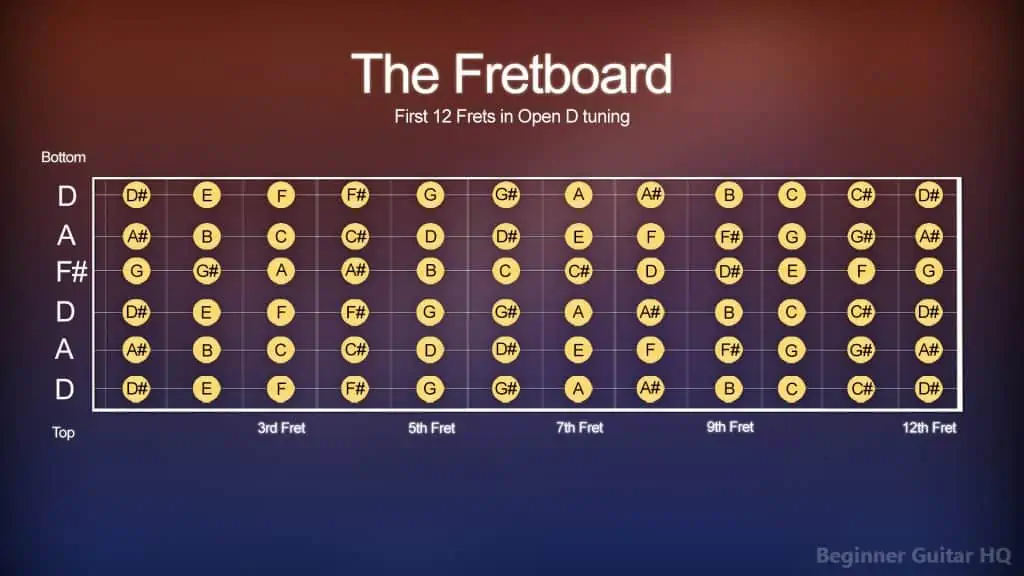
As we know, the fretboard can seem like a jumbled mess if you’re not too familiar with how it functions. It’s highly recommended to look into methods like the CAGED system to see how the entirety of the fretboard is a series of chord shapes and patterns. When we shift our tuning to open D tuning, we get a very different looking and sounding fretboard. Here is how is looks with our strings tuned to DADF#AD:
The fretboard of the guitar in Open D tuning, displaying all of the alterations to the notes.
How to Play Open D Chords
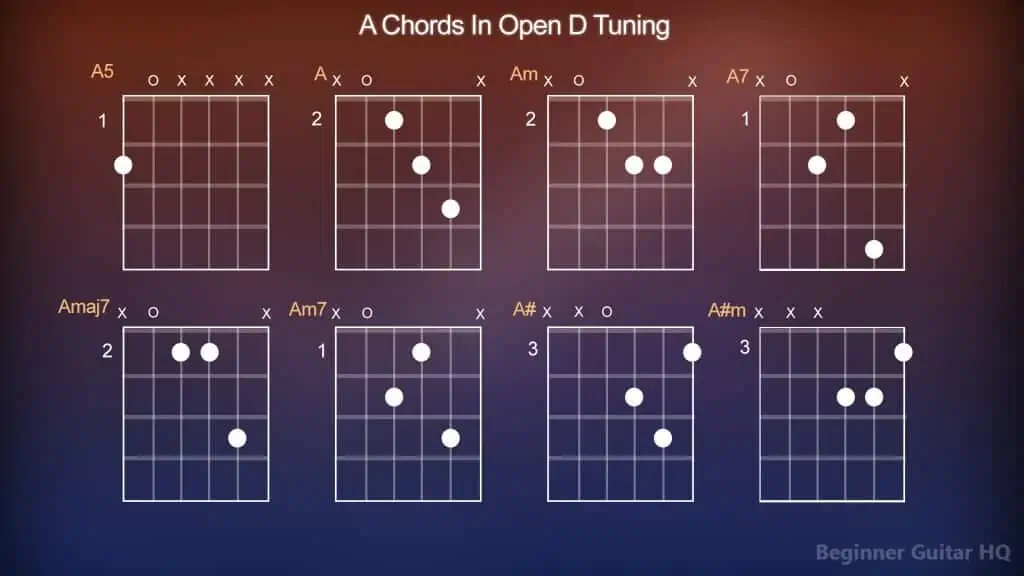
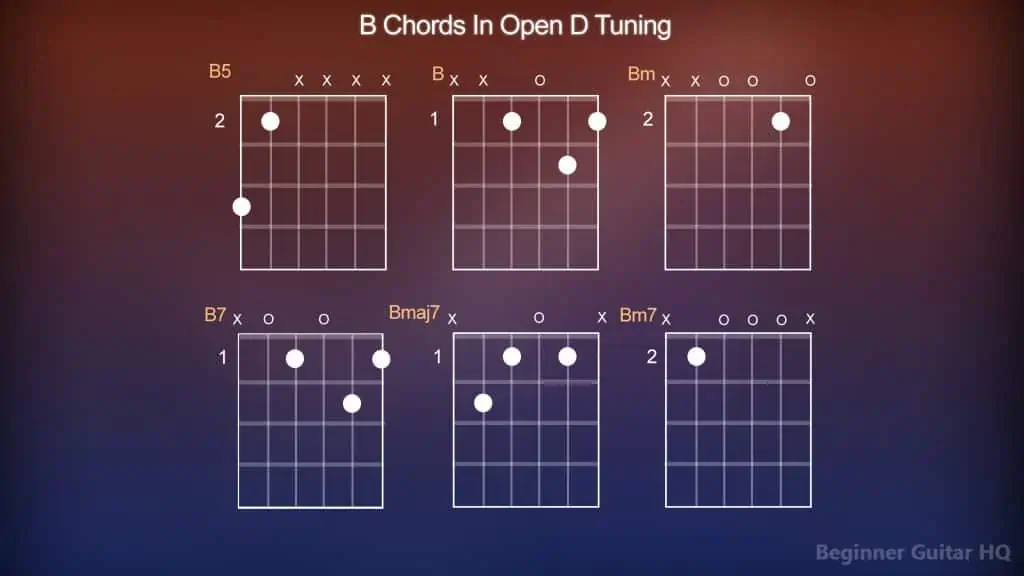
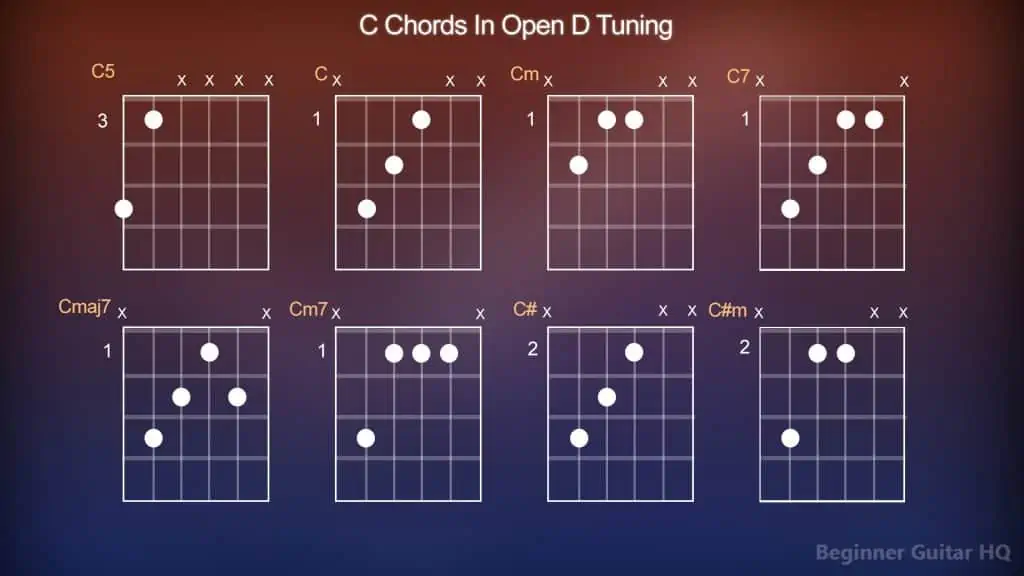
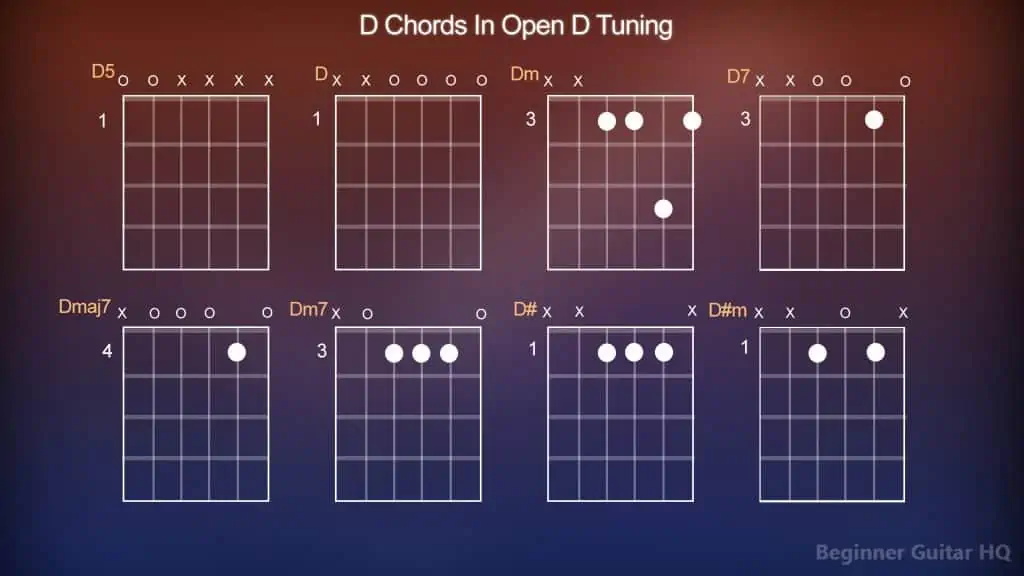
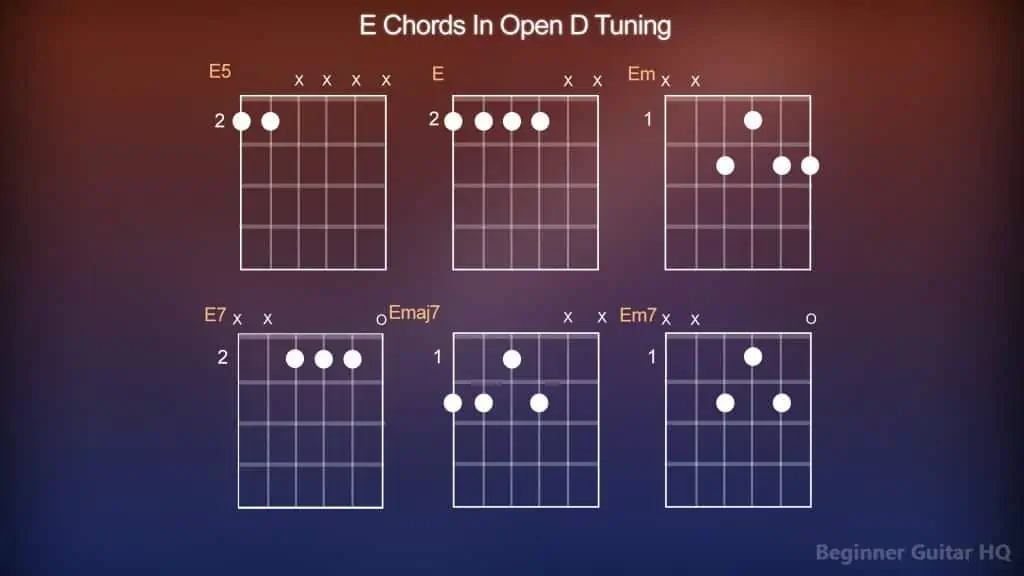
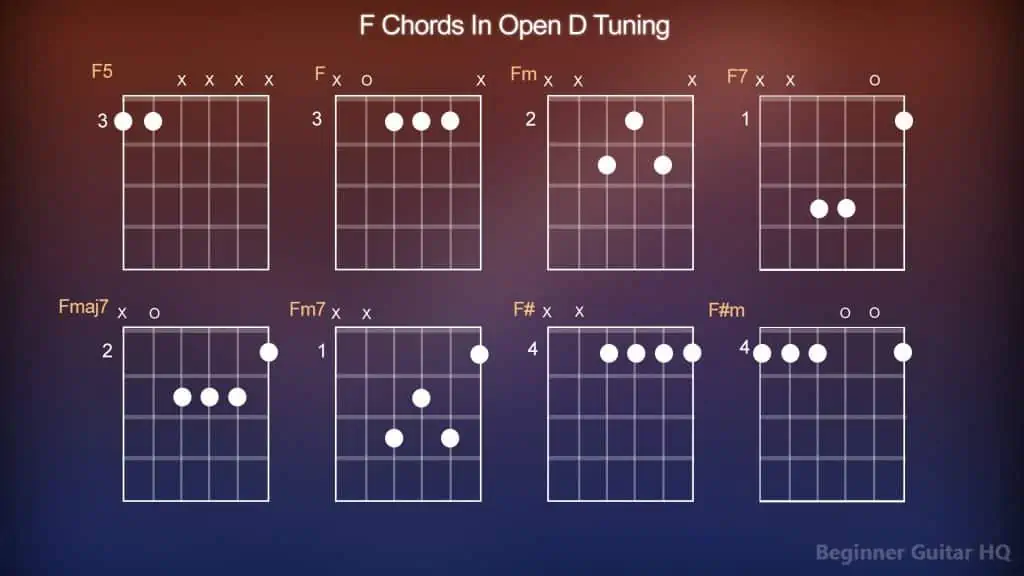
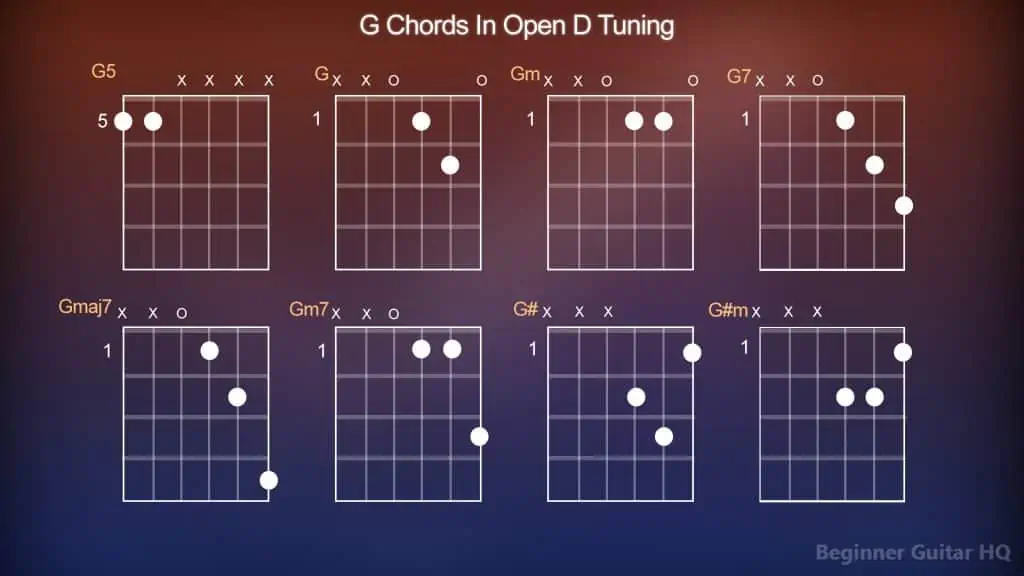
Cutting right to the chase, here are several chords you can play within the open D tuning:
Chord charts of all the A chords in open D tuning.
Chord charts of all the B chords in open D tuning.
Chord charts of all the C chords in open D tuning.
Chord charts of all the D chords in open D tuning.
Chord charts of all the E chords in open D tuning.
Chord charts of all the F chords in open D tuning.
Chord charts of all the G chords in open D tuning.
Reading Chord Charts
If you’re new to chord charts, don’t fret, as they’re very easy to get down. Firstly, you’ll notice a big rectangular square, which is supposed to represent a portion of the freboard. Within the rectangle, you’ll see six vertical lines. Each of these lines represent a different string on the guitar, from left to right these strings are the low E string, A, D, G, B, and high E string. However, inside of our open D tuning, from left to right, these would become low D, A, D, F#, A, and high E strings. You’ll also notice a few horizontal lines, which are meant to separate one fret from the next.
Next, you’ll see some circles containing numbers from 1 – 4 inside. Each of these numbers represent a different finger to use on the fretboard. The number 1 is for your index finger. The number 2 is for your middle finger. The number 3 is for your ring finger. Lastly, the number 4 is for your pinky finger.
Finally, above the strings you may also see some markers that look like an “O” or an “X”. The O represents an open string, which is a string to be played, but not fretted to complete the chord. The X, however, indicates that this string is to not be played to complete the chord. You may also notice a number to the left of a fret of the fretboard. This is to indicate that the chord starts on a certain fret. However, if there is no number, then that implies that you are starting from open note position.
D Major
It can be helpful to understand D major a little better as when you’re in the open D tuning, you’re naturally forming this chord. Therefore, seeing how the entire fretboard gets altered and how to adapt to this tuning in its entirety can be an asset!
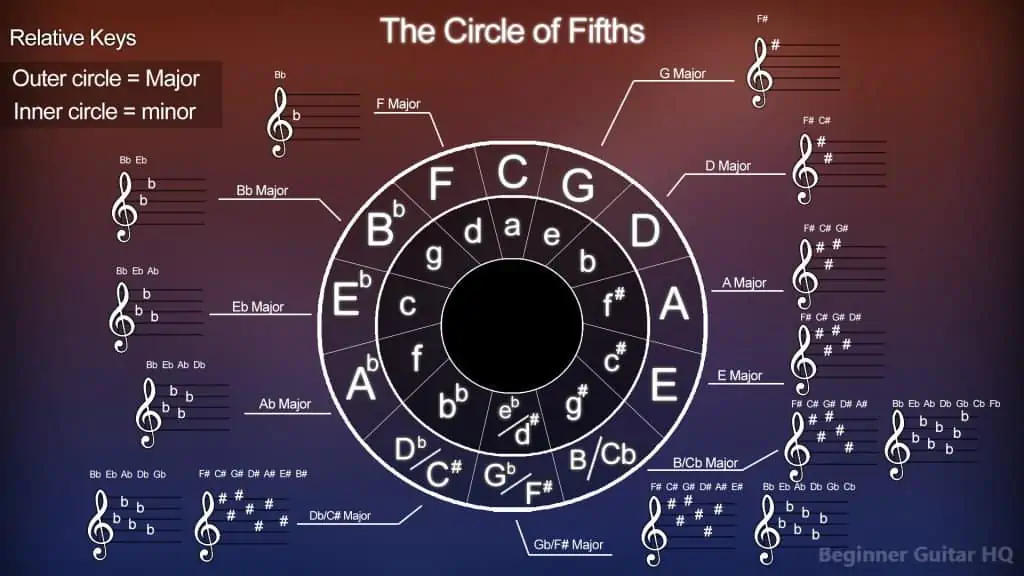
Let’s go over the key of D major, primarily its key signature. To find a key signature of a given key, it can be helpful to consult the circle of fifths. The circle of fifths is a wheel-shaped diagram displaying the most common keys and their corresponding key signatures:
A diagram of the circle of fifths, displaying the most common key signatures.
The outer ring of the circle displays all of our major keys, while the inner ring displays our relative minor keys (keys that share the same key signature as their major counterpart). As you go clockwise starting from C major, each key gains an additional sharp. How do we determine what notes are sharp within each key? We use a simple acronym: FCGDAEB. This stands for:
“Father, Charles, Goes, Down, And, Ends, Battle”
This saying is used to determine the sequence of sharps added as you go clockwise around the circle of fifths. In the case of D major, we have 2 sharps. These sharps are F and C. You can easily determine what sharps are in a key if you simply remember how many sharps each of them has. Then using the acronym (maybe even your fingers), you can say “D major has two sharps. So, Father, Charles… the sharps are F and C”.
Moving on, we have everything we need to now construct our D major scale. Here is how it looks:
D > E > F# > G > A > B > C# > D
Major scales will always follow a set pattern of tones (T) and semitones (S). The sequence appears as:
T > T > S > T > T > T > S
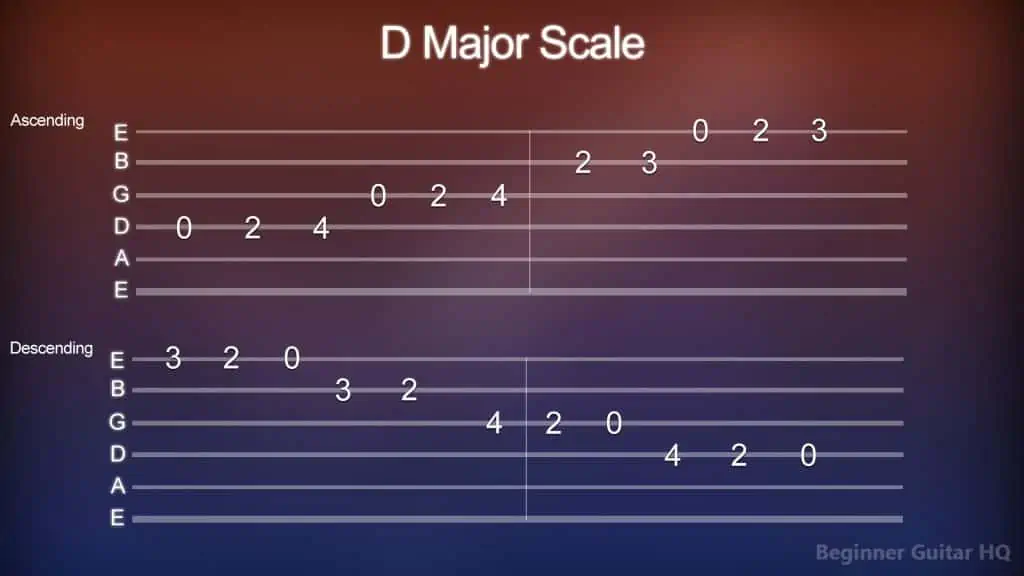
It does not matter what major scale you’re playing, whether it’s C major or F# major, the pattern remains the same. From standard tuning, here is how you play the D major scale using tablature:
A tablature diagram of the D major scale, ascending and descending.
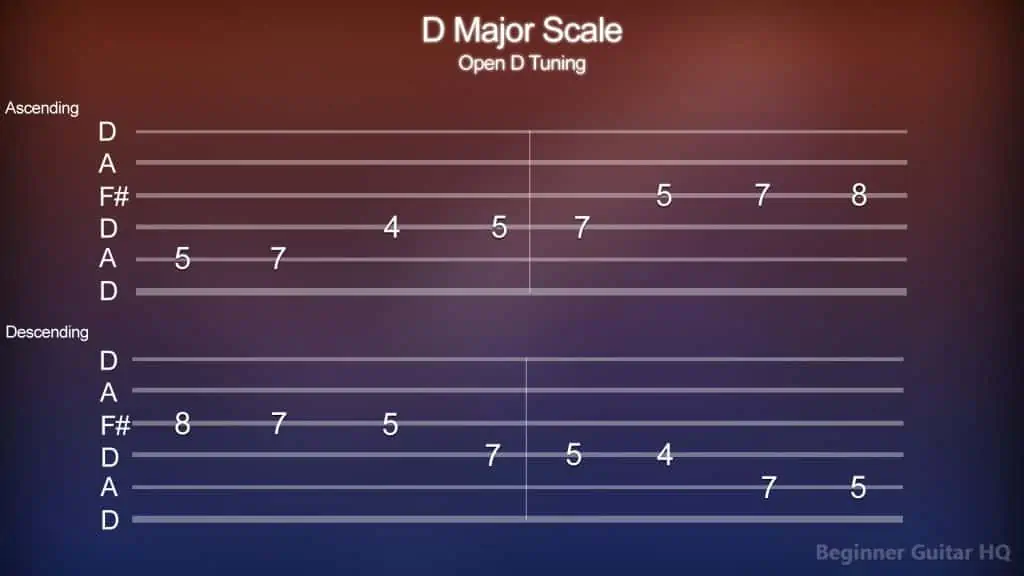
Here is the D major scale tab played in open D tuning:
A tablature diagram of the D major scale, ascending and descending in open D tuning.
Reading Tablature
For beginners, reading sheet music can be very challenging. There’s just so much going on! However, reading tablature is a godsend for aspiring guitarists, as it’s very simple to pick up. First, we have six horizontal lines, from the bottom to the top are the low E string, then A, D, G, B, and high E strings. However, since we’re in drop tuning, these are labeled as low D, A, D, F#, A, and high D strings.
The numbers on the lines represent the note to be fretted on the corresponding string. So on the A string, you have the number “5”, which means you are to fret the 5th fret of that string. Following that, you fret the 7th fret of the same string, and then change to the D string fretting the 4th, and so on.
It’s important, however, to look ahead at what notes you are supposed to play. Chord charts display where your fingers are supposed to go, while tablature, on the other hand, doesn’t tell you. A good way of planning ahead is to look at what will fit in your hand on the fretboard starting from the earliest fret to our latest fret. For instance, our first note of the scale is on the 5th fret, but you might notice, above that string, we have a note on the 4th fret. It’s more practical to play the first note with your middle finger so that when you move to the next string having to play the 4th fret, you have a place to put your index finger.
Maintaining proper fretting technique is vital, so maintaining good habits around that is important for new guitarists.
Scale Degrees
Every note within our major scale plays an important role. These are called degrees, which are names to distinguish a note’s place in the greater whole of the scale.
D = Tonic (1st Degree)
E = Supertonic (2nd Degree)
F# = Mediant (3rd Degree)
G = Subdominant (4th Degree)
A = Dominant (5th Degree)
B = Submediant (6th Degree)
C# = Leading Tone (7th Degree)
D = Tonic (1st Degree/Octave)
Now we’re onto the meat of it, the triad. Triads are chords built from three notes played in sequence. Major triads are formed from the 1st degree, the tonic. The 3rd degree, the mediant. Lastly, on the 5th degree, the dominant. Major triads, in particular, also have specific intervals between the notes forming the triad:
- Major 3rd (From the tonic to the mediant)
- Minor 3rd (From the mediant to the dominant)
- Perfect 5th (From the tonic to the dominant)
In the key of D major, our notes forming our triad are D, F#, and A. These are the notes that form the D major chord.
How to Find Compatible Chords
Now that we have our D major chord all sorted out, how do we find the chords that go well with it? It’s actually fairly easy! Since we have the essentials: our key signature, scale, and triad, the rest gets easier! Let’s take our D major scale and form triads on each degree of our scale:
(1st Degree) D Major = D, F#, A
(2nd Degree) E minor = E, G, B
(3rd Degree) F minor = F#, A, C#
(4th Degree) G Major = G, B, D
(5th Degree) A Major = A, C#, E
(6th Degree) B minor = B, D, F#
(7th Degree) C diminished = C#, E, G
These triads are the makeup of the chords that work in the key of D major. Sometimes, however, it’s good to go with the tried and true method of chord progressions. As you probably know, there are many pop songs that have a similar chord progression, you don’t have to reinvent the wheel to make something good and original! Here are some commonly used chord progressions in the key of D:
- I – IV – V (D Major > G Major > A Major)
- I – vi – IV – V (D Major > B minor > G Major > A Major)
- ii – V – I (E minor 7th > A 7th > D Major 7th)
Remember when we mentioned how scale degrees play an important role? This is the time. Let’s run through each of these different chord progressions and explore why they work:
For the first chord progression, we start on the first degree, the tonic. This is the root note of the scale, our home, where things sound fairly calm, and marks the point for resolution. To add some tension to our chord progression, we will alternate from our tonic to our fourth degree, the subdominant. To add even greater tension, we will shift from our subdominant to our fifth degree, the dominant. Finally, from the dominant, we can shift home to our tonic, where things resolve.
For our second chord progression, we will once again start on our tonic. From here, you move to the sixth degree, the submediant. This degree can act as a “predominant” chord, as it shares two notes with our tonic triad and two with our subdominant. We’ll now shift from the submediant to our subdominant, completing the bridge and adding some needed tension to our progression. From our subdominant, as before, we will move to our dominant at the peak of our tension. Lastly, we’ll move to our tonic allowing our progression to resolve.
Our third chord progression, otherwise known as the “two-five-one turnaround”, is a commonly used progression in the world of Jazz music, however, genres like Country, R&B, and Rock tend to use it as well. This chord progression uses seventh notes and will start on our second degree, the supertonic. The supertonic acts as a common substitute for our subdominant chord, as they have many of the same notes in their triads. From here, we will reach the peak of our tension, a seventh chord on our dominant. Finally, as per usual, we will move from the dominant, and resolve back home on our tonic.
There are a ton of popular songs that utilize open D tuning, songs such as, “Mumford & Sons – The Cave”, “Pearl Jam – Even Flow”, or even “Beck – Loser” and more. Learning a song from an already well-known artist can be an excellent place to start in learning to use open D tuning.
Other variations of open D tuning include:
-
- DADFAD – Also known as open D minor.
- DADF#AC# – Also known as open Dmaj7 tuning.
- DADFAE – Also known as open Dmadd9 tuning.
- DADDAD – Also known as Open D5 tuning.
- And more…
A personal favorite of mine is the DADGAD tuning, otherwise known as Celtic tuning. It’s used in a lot of folk rock music, and notably, Andy McKee’s song “Drifting”.
When Practicing
It’s recommended to always use a metronome when practicing scales, chords, inversions, or any other exercise. Practicing with a metronome will help you keep a proper tempo and help you avoid speeding up or slowing down unnecessarily. It’s good to start at a tempo you are comfortable with, anywhere from 40 to 60 BPM. It’s fun to try playing things quickly, or at their normal tempo, however, if you can’t play it on tempo slowly, how can you play it quickly?
Over time, as you feel that you’ve gotten the tempo down, you can bump it up anywhere from 3 – 6 BPM, and gradually increase it over time. You may even decide to be more thorough and gradually bump it up from 1 – 2 BPM each time. The important thing is that you practice at your own pace, and do what works best for you!
If you have no access to a metronome, there are other ways to go about it. For instance, if you have a smart phone, there are metronome apps you can download as a perfect substitute for the real thing. This can also be more cost-effective, as you’ve already paid for the phone, and the apps are generally free. There are also websites you can access on your web browser that have a metronome with an adjustable tempo you can follow along with.
Conclusion
Now you know all that you need to in order to get yourself started with open D tuning. Exploring different tunings can really help you get out of a “musicians block” and allow for more creativity. However, the process of really learning a different tuning can take some time, so it’s important to be patient and have fun with it. Learning a few different songs in open D can be an excellent place to start, or even practicing inversions. How will you spend your practice? Do you have a better method? Regardless of your process, you can enjoy playing in this new beautiful tuning today. Keep on rockin’.

