Seventh chords are an amazing way to provide a fuller sound with more character, but for those who don’t understand them, they might be somewhat intimidating. Learning how to play the E7 chord can be easy, fairly rewarding, and fun! As you read on you’ll not only understand how this chord works, but how you can start using it today!
Contents
Playing the E7 Chord on Guitar
Cutting right to the chase, the E7 chord requires very little effort to play, especially from the open note position, which we will begin with before going into a couple of its other variations:
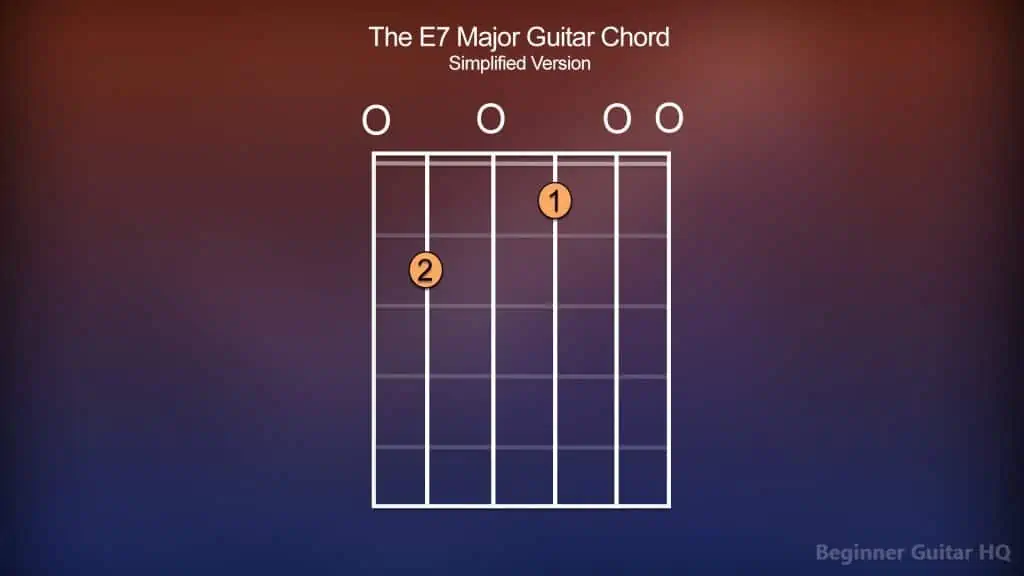
A diagram displaying the E7 guitar chord in its simplistic form from the open note position.
Firstly, you will want to put your middle finger on the 2nd fret of the A string. Following this, you will want to place your index finger on the 1st fret of the G string. From the low E string to the high E string, give the guitar a nice strum. You have successfully played an E7 chord!
In this second chord shaping, it will be much like the first, except for a couple of extra fretted strings:
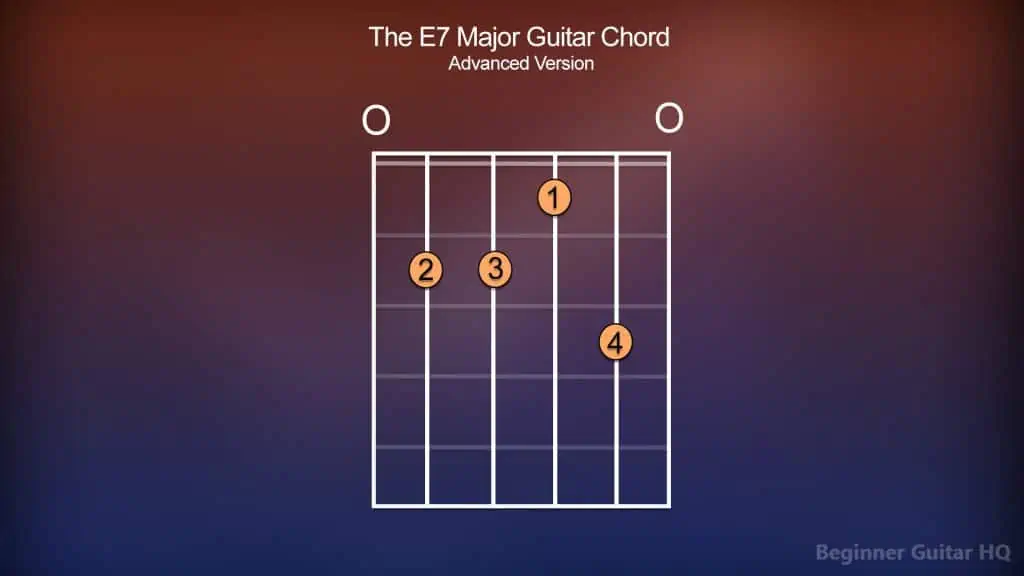
A diagram displaying the E7 guitar chord in its advanced form in the open note position.
You will first want to place your middle finger on the 2nd fret of the A string. Following this, you will now want to place your ring finger on the 2nd fret of the D string. Now, take your index finger and place it on the 1st fret of the G string, like before. Finally, take your pinky finger and place it on the 3rd fret of the B string. From the low E string to the high E string, give it a good strum. That is your 2nd E7 chord shaping!
Of course, for beginners, the second shaping might be a little difficult, especially for working your pinky into the chord shape. But given time and practice, you will develop muscle memory and stronger fingers to form this chord shape with ease!
Now, let’s take a look at our third variation of the E7 chord. For beginners, this one might be a bit more challenging than the last, but let’s run through it:
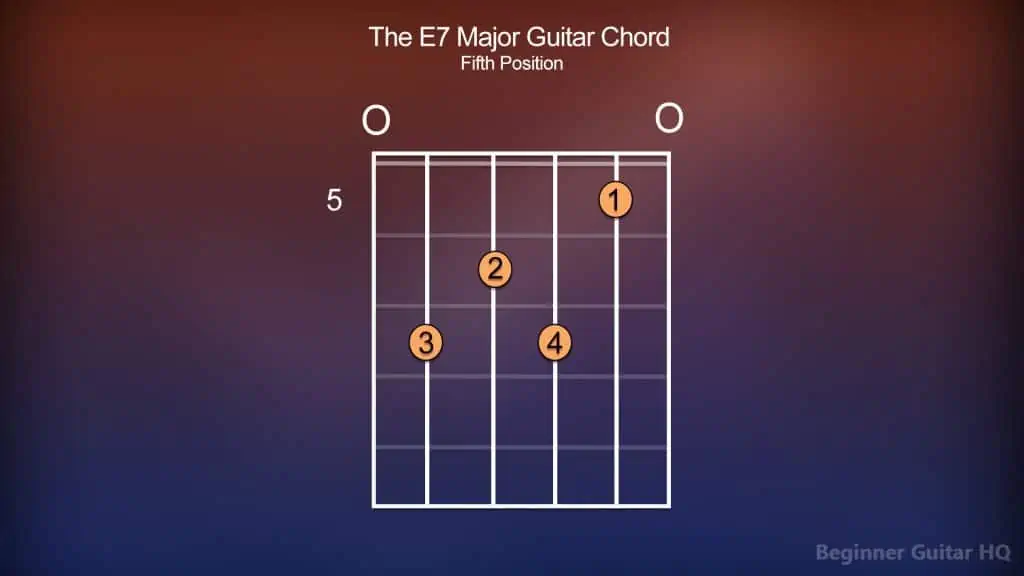
A diagram displaying the E7 guitar chord in the fifth position.
On the 7th fret of the guitar, take your ring finger and place it on the A string. On the 6th fret of the guitar, take your middle finger and place it on the D string. On the 7th fret of the guitar, place your pinky finger on the G string. Finally, on the 5th fret of the guitar, place your index finger on the B string. Now from the low E string to the high E string, give it a nice strum. There is your E7 string in the 5th position!
Reading Chord Charts
If you’re a beginner, then this is likely new to you. Thankfully, reading a chord chart is very simple to understand. Each vertical line represents a string on the guitar. The leftmost string is your low E string and when plucked is the lowest note you can play on your guitar. To the right and onward you have your A, D, G, B, and high E strings. The horizontal lines separate one fret from the next.
You’ll notice that there are circles inside of these frets with a number on them. The number is meant to represent a finger housed on that fret to complete the chord. 1 is for your index finger, 2 is for your middle finger, 3 is for your ring finger, and 4 is for your pinky finger. Above the fretboard, you may see an “X” or an “O”. The X is for a string not to be played to complete the chord, while the O indicates that the string is to be played open (not to be fretted). Finally, to the left, you might see a number which is to indicate the fret number, should the chord be higher up on the neck. Look to our fifth position E7 chord, and you’ll see a “5” there, indicating that that’s where we begin.
Now, that you can play the E7 chord, let’s dive a little deeper into chords and how you can make the most of them.
How to Build Chords
You hear chords in pretty much every song that’s played on the radio, so how do they work? To figure that out, it’s essential we learn the three fundamental things needed to make our chords:
- The Key
- The Scale
- The Triad
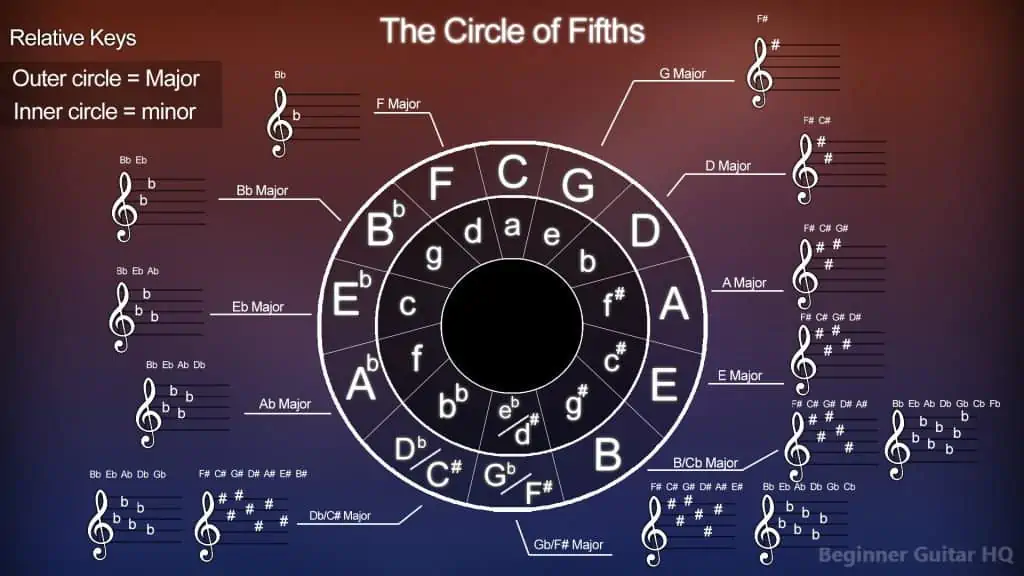
We will begin with our key. If we knew the chord we wanted to make, for instance, let’s say it was the E major chord – then the next step would be to understand the key of E major. A handy tool for figuring out the key signatures of our corresponding key is the circle of fifths. The circle of fifths is a wheel-shaped diagram displaying the most commonly used key signatures in a very comprehensive way.
The outer wheel houses our major keys, and the inner wheel houses our “relative minor keys” (keys that share the same key signature). These key signatures will have sharps or flats depending on what key we are playing in. You’ll find that the right half of the diagram contains our keys with sharps, while the left half contains keys with flats. Sharps indicate that the note is to be raised by a semitone, while flats indicate that the note is to be lowered by a semitone.
A diagram showcasing all of the most commonly used key signatures, known as the Circle of Fifths.
The diagram is a very helpful tool to reference the different key signatures, however, there is a simple way of memorizing it. First, it’s important to know that there is a method to the madness behind which notes are sharp in each key. The acronym FCGDAEB can help us remember the sequence of sharp notes added to each key. You may remember this acronym as:
“Father Charles Goes Down And Ends Battle”
The first letter of each word represents the note that is to be sharp. As you go clockwise through the wheel, the key will contain an additional sharp. The sequence will look like this:
C = No sharps
G = F
D = F, C
A = F, C, G
E = F, C, G, D
B = F, C, G, D, A
F# = F, C, G, D, A, E
C# = F, C, G, D, A, E, B
The idea is that you only need to remember how many sharps are in each key and not exactly which notes. So for instance, if you know that E major has four sharps, then while using the acronym (and maybe using your fingers), you would say “Father, Charles, Goes, Down”. Therefore, the sharps included in the key signature of E major are F, C, G, and D.
Using this same method, we can also determine which notes are flat. The only difference, however, is we reverse our acronym from before, making it: BEADGCF. This can be remembered as:
“Battle Ends And Down Goes Charles’ Father”
The sequence of notes would therefore look like this:
C = No flats
F = B
Bb = B, E
Eb = B, E, A
Ab = B, E, A, D
Db = B, E, A, D, G
Gb = B, E, A, D, G, C
Cb = B, E, A, D, G, C, F
If the key we were searching for was Gb major, we can do as we did before to find the flats, however, there is an easier method. You only need to remember the number “7”. If we know that G major has only 1 sharp, F, then how many flats would Gb major have? The answer is 6, which are the notes B, E, A, D, G, and C. If we add up the two that gives us 7. If you try this method with any of our sharp keys on the right half of our circle of fifths, you will get the answer to the number of flats needed for the left half. Memorizing the circle of fifths has never been easier!
Now that we have defined our key signature, going back to E major, let’s look at our scale. The E major scale looks like this:
E > F# > G# > A > B > C# > D# > E
This follows a series of tones (T) and semitones (S), a cookie-cutter pattern for all major scales:
(T) > (T) > (S) > (T) > (T) > (T) > (S)
E and F naturally are a semitone apart, but because the key of E major has an F#, this becomes a tone apart, the same occurs for B and C#. The key signatures and scales will always follow their respective pattern based on whether it’s a major or minor scale.
Diatonic scales, like our E major containing seven notes, have names for each degree of the scale.
E > 1st Degree = Tonic
F# > 2nd Degree = Supertonic
G# > 3rd Degree = Mediant
A > 4th Degree = Subdominant
B > 5th Degree = Dominant
C# > 6th Degree = Submediant
D# > 7th Degree = Leadingtone
E > 1st Degree (Octave) = Tonic
Now that our degrees have been established, we can now get to our triads. A triad is a grouping of three notes, forming a chord. All triads are chords, but not all chords are triads. Major triads are formed on the tonic, mediant, and dominant degrees of the scale, (in other words our 1st, 3rd, and 5th degrees). In the case of E major, the notes forming the E major triad would be E, G#, and B.
Major triads all have the same essential build of:
Major 3rd – From tonic to mediant degree.
Minor 3rd – From mediant to dominant degree.
Perfect 5th – From tonic to dominant degree.
Using these intervals and scale degrees we can form our E major chord.
How Seventh Chords Work
You might have seen chords with names like C7, Gm7, or Fdim7. These are various types of seventh chords. What makes a chord a seventh chord is when you have your initial triad of notes, with an additional note on the 7th degree of the scale, (the leading tone). In the case of our E7 chord, we have the notes we had gone over before, E, G#, and B, with an additional D on top. The D being included is what makes this a seventh chord as this is the seventh degree of our scale, a tone away from our tonic creating additional tension.
You can often find these seventh chords being used in jazz and blues music, as well as hip-hop occasionally when they want to carry a similar feeling to those genres. These chords are excellent for transitioning to and from a tonic degree, as they can help bring tension or resolve.
From Major to Minor
We’ve gone over a lot regarding our major keys, scales, and triads, however, what makes minor different than major? Well, firstly, the key signatures are slightly different. For instance, the C minor key signature contains 3 flats, while the C major scale contains no sharps or flats. You may call this a parallel key.
Another difference is the pattern of tones (T) and semitones (S) within the scale. While the major scale follows the pattern of: (T) > (T) > (S) > (T) > (T) > (T) > (S)
Minor scales, however, follow the pattern of: (T) > (S) > (T) > (T) > (S) > (T) > (T)
This greatly changes the overall sound of the scale, from something happy to something more melancholy. Finally, the way triads are formed from major to minor carries a slight difference. When you form a major triad, you have an interval of a major 3rd from the tonic to the mediant and a minor triad from the mediant to the dominant. However, a minor triad instead uses a minor 3rd from the tonic to the mediant and a major 3rd from the mediant to the dominant.
So, what difference would this make to the E7 chord?
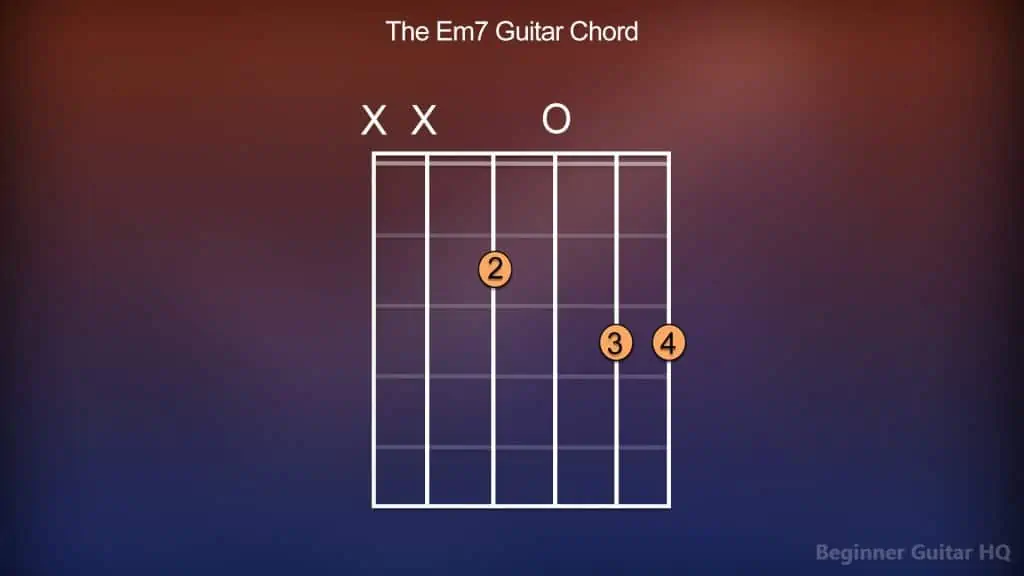
Our E7 chord would then become an Em7 chord with a triad of E, G, and B with the 7th note on top, which is “D”. The only difference between the E7 and Em7 is that G#, and D# are lowered to just G and D. Therefore the chord would look something like this:
A diagram of the E minor seventh guitar chord from the open chord position.
Chords in the Key of E
Finding just the right chord progression can be a challenge to new and seasoned musicians alike. However, there is a way to things less difficult – and it all comes from knowing what key you are playing in! For instance, let’s take the E major scale:
E > F# > G# > A > B > C# > D# > E
Each one of these notes can be made into a triad (chord), that will always follow this sequence:
Major > minor > minor > Major > Major > minor > diminished
Now, if we were to break down our scale, and build triads on each degree of the scale, it would look something like this:
1st Degree > E Major = E, G#, B
2nd Degree > F# minor = F#, A, C#
3rd Degree > G# minor = G#, B, D#
4th Degree > A Major = A, C#, E
5th Degree > B Major = B, D#, F#
6th Degree > C# minor = C#, E, G#
7th Degree > D# diminished = D#, F#, A
Then when you make each of these a seventh, your chords will become:
1st Degree > E Maj7 = E, G#, B, D#
2nd Degree > F# min7 = F#, A, C#, E
3rd Degree > G# min7 = G#, B, D#, F#
4th Degree > A Maj7 = A, C#, E, G#
5th Degree >B Maj7 = B, D#, F#, A#
6th Degere > C# min7 = C#, E, G#, B
7th Degree > D# dim7 = D#, F#, A, C
Now you have everything you need to make a great chord progression in the key of E.
Practicing With Chords
Improving Your Timing
It’s highly recommended that before you begin your practice session you use a metronome. A metronome can help you improve your timing allowing you to play more precisely. There are several types of metronomes to choose from, depending on your budget and preference.
First off, you have your traditional metronomes, the analog kind, utilizing a wind-up mechanism, thus not requiring electricity to be used. These often come in various shapes and sizes. Some are bigger, while others are smaller, making them more fit for travel.
Then you have your digital kind, and for this, I’d like to split this into two categories, physical and non-physical. Physical digital metronomes are as it sounds – they are electronic, and are within human touch. The most common are the little box-shaped ones with a digital display, coming with additional functions, such as a built-in tuner. These metronomes may also come in the form of a foot pedal, dial, and clip-on.
The non-physical digital metronomes are on the other hand in the form of a digital application or program. For instance, a smartphone app, website, or program for your computer. This is an excellent choice for those looking for a cheaper alternative as many of these are free and can function with something you’ve already invested money into.
When practicing with a metronome it’s recommended that you start with a comfortable tempo, and slowly ramp your way up after being able to play things flawlessly. For beginners, anything within the range of 40 – 60 BPM is a great place to start. It’s however up to you to decide when you are ready to increase the tempo, and when you do so, anywhere from 3 – 5 BPM is a good rule of thumb to follow, but it couldn’t hurt to go even lower than 3 if you need to take things slower. The idea here is: if you can’t play it slow, how can you play it fast? Which makes practicing with a metronome all the more important.
Practicing Inversions
Inverted chords, also known as inversions, are an excellent way to spark creativity, as well as enable you to play chords in several positions, thus improving your fretboard knowledge. In regards to our E7 chord, there are three types of inversions you can play:
- Root Position = E, G#, B, and D#
- 1st inversion = G#, B, D#, and E
- 2nd inversion = B, D#, E, and G#
- 3rd inversion = D#, E, G#, and E
Normally, our chords have two inversions, but in the case of our E7 chord being a seventh chord; an E major triad with a seventh on top, we, therefore, have three inversions. Changes like this would occur in the case of a ninth chord with a fourth inversion, an eleventh chord with a fifth inversion, and a thirteenth chord with a sixth inversion.
Practicing inversions on the guitar is much different than the piano. A piano has a very lateral movement, whereas, on a guitar, you can think of the movement on an x, and y-axis as there are multiple strings, and multiple ways to play the same notes. Therefore, there are multiple ways to go about practicing them.
The ideal method of practicing inversions on the guitar is by going up the neck and using the same group of strings. This might be challenging at first, but will absolutely help you remember notes on the fretboard. When this becomes easier, you can then play the notes individually and strike the chord, while progressing up the neck to the next inversion doing the same, and so on.
Practicing CAGED
If you are unfamiliar with the CAGED system on guitar, it’s a very handy way of learning the fretboard. It works by utilizing open chord shapes within the acronym “CAGED”, showing how these chord shapes flow into one another. This means you use:
- The C chord shape
- The A chord shape
- The G chord shape
- The E chord shape
- The D chord shape
The C shape will flow into the A shape, which flows into G, then E, and D all the way up the fretboard, until you land on the C shape again on the 12th fret. However, this is not to say you must always start on C, you can start on any of these chord shapes! It’s easy to learn which notes are on the fretboard, but the CAGED system really helps you see the bigger picture, that the fretboard contains a series of patterns and shapes.
Conclusion
Now you have everything you need to get started with the E7 chord and then some! Seventh chords are a great way to add some flavor to your chord progressions, so taking the time to learn them and add them to your repertoire will only benefit you as a guitarist, musician, and songwriter. Where will seventh chords take you, and how will you make the most of them? Are ninth, or eleventh chords on the horizon? Wherever your practices take you, keep on rockin’.


