Are you looking to add more major chords to your repertoire? Unlike its minor counterpart, the G# major guitar chord is one of the warmer and happier-sounding chords you can play on the guitar. As you read onward, we’ll go over how it works, and how you can start using this chord today. Let’s dive in!
Contents
How to Play the G# Chord
For beginners, looking to add chords to your repertoire can be somewhat difficult. This may be that you haven’t developed the necessary finger strength to play it comfortably, or perhaps you’re new to guitar chords as a whole. This is where chord variations can help.
Naturally, chord variations allow you the guitarist to play a different version of the same chord, bringing out different tonal characteristics, which may fit better for different songs. It also allows you to play the same chord from a different position on the neck, which may work for songs involving the use of a capo (a device that holds down all the strings on a single fret, transposing the tuning of the guitar). Finally, chord variations allow you to play what feels more comfortable, fitting your playing ability. The important thing to keep in mind is it all comes down to preference, and what you enjoy playing and feel is best.
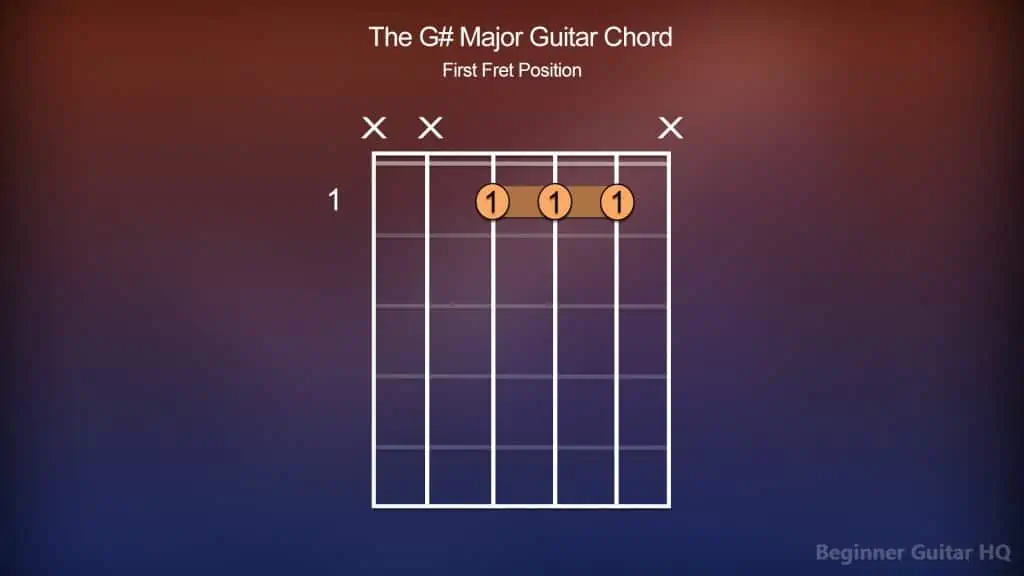
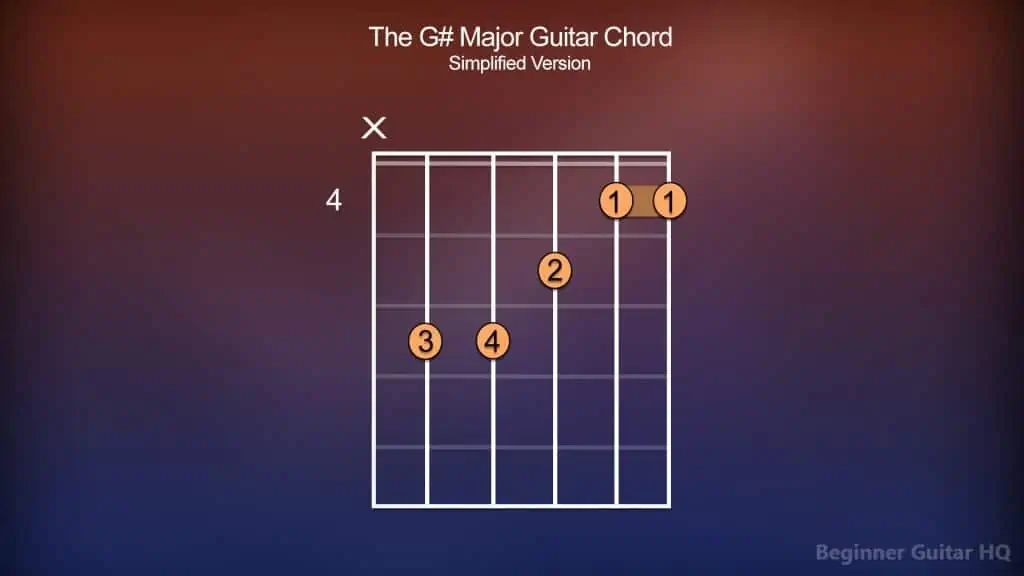
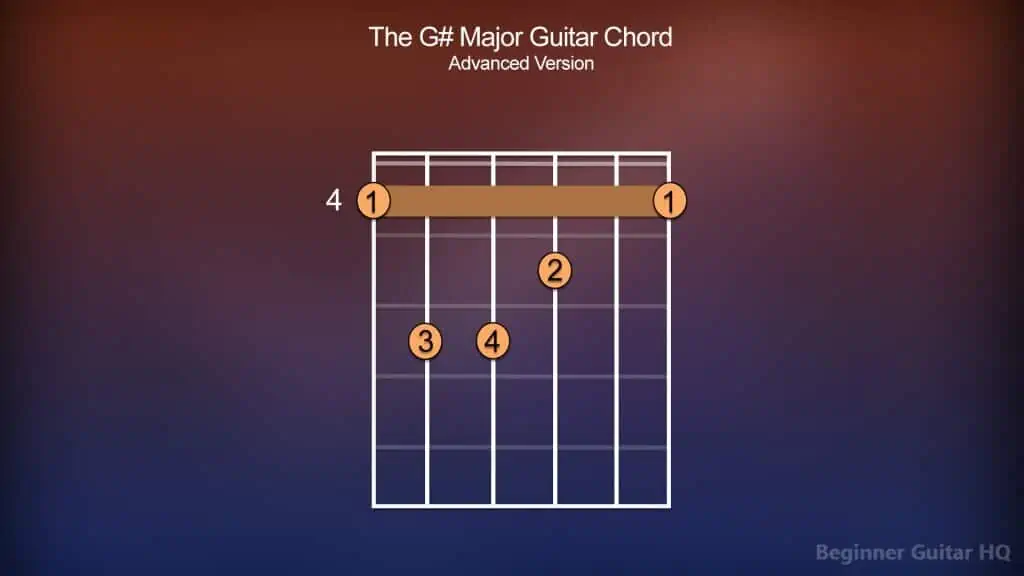
Typically, our G# major chord and many of its variations involve the use of a barre, forming what’s known as a barre chord. When forming a barre, you must hold down a grouping of strings along an individual fret with your index finger, forming the foundation for your barre chord. However, this won’t be the most comfortable for you if you’re new to chords, therefore, we’ll tie in our variations of the G# major chord, giving you a more simplified version to get you started! Here is how it’s played:
Chord chart of the G# Major Guitar Chord, played from the 1st fret.
Chord chart of the G# Major Guitar Chord, simplified from the 4th fret.
Chord chart of the G# Major Guitar Chord, advanced version, from the 4th fret.
Trouble With Chord Charts?
If you’re new to chord charts, don’t fret, they’re a lot easier to understand than they might look! First off, we have our big rectangular box containing a collection of vertical and horizontal lines. This represents our fretboard. The vertical lines within, each represent a different string on the guitar. From left to right, we have our low E, A, D, G, B, and high E strings. The horizontal lines, however, each separate one fret from the next.
Within these frets and on the strings, you may notice a circle with a number anywhere from 1 – 4. These numbers represent which finger is meant to play each note in order to form our chord. The number 1 represents our index finger. The number 2 represents our middle finger. The number 3 represents our ring finger. Finally, the number 4 represents our pinky finger. In some cases, there may be a bar connecting from one string to another along an individual fret. This represents a barre.
On top of the fretboard, you might notice an “O” or an “X”. The “O” represents an open note; a string to be played, but not fretted. The “X”, however, represents a string not to be played in order to complete the chord. Lastly, on the side of our fretboard, next to a fret, there might be a number present. This number represents the fret we’re starting at in forming our chord.
That’s all there is to it!
Breakdown of the G# chord
We know how to play our G# major chord now, but how does it work? There are three very important factors around our G# major chord; the key signature, scale, and the triad.
First, let’s talk about the key. Our key can be thought of as a collective group of pitches, basically, those found in our scale, which are then used as the foundation of a song or piece of music. In this case, everything is centered around the key of G# major and the notes associated with its scale. How do we know what notes these are? This is where our key signature comes into play.
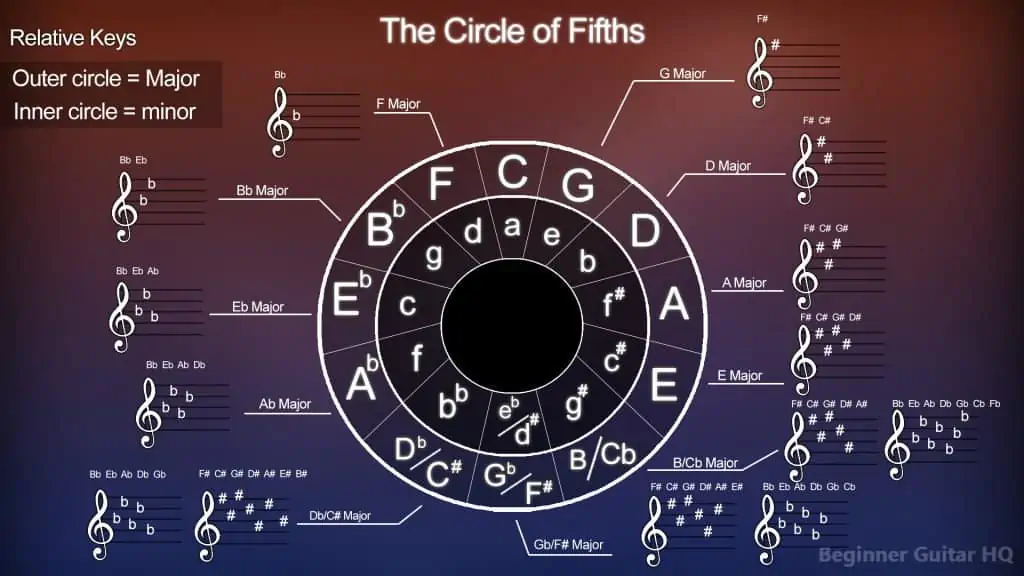
Every key contains its own key signature. The key signature is often visually represented by the #’s and b’s found after the clef on a piece of sheet music. These symbols represent which notes are to be changed or in other words, sharp or flat. A note that is marked as sharp (#) is to be raised by a semitone, while a note that is marked as flat (b) is to be lowered by a semitone. However, for guitarists who don’t have a musical background, it can help to consult the circle of fifths to gain a better understanding of which notes are affected in each key.
Diagram of the circle of fifths, displaying the most commonly used keys.
The circle of fifths is a wheel-shaped diagram displaying all of our most commonly used keys and their corresponding key signatures. The outer ring contains all of our major keys, while the inner ring contains all of our relative minor keys (keys that carry a different root note, but share the same key signature). As we go clockwise around the ring, starting from C, you’ll notice that every key gains an additional sharp to its key signature. On the other end of the spectrum, going counterclockwise from C, you’ll notice that every key gains an additional flat to its key signature. However, since we’re in a key using sharps, we’ll stick to the right half of the wheel.
So, how do we know which notes are sharp within each key? We use a simple acronym: FCGDAEB. This stands for:
“Father, Charles, Goes, Down, And, Ends, Battle”
Each word within this little saying represents a note that is to be made sharp. The only thing required now is knowing how many sharps are in each key. Here is how the sequence appears as you go around the wheel:
C = No sharps or flats.
G = F#
D = F#, C#
A = F#, C#, G#
E = F#, C#, G#, D#
B = F#, C#, G#, D#, A#
F# = F#, C#, G#, D#, A#, E#
C# = F#, C#, G#, D#, A#, E#, B#
If you can remember how many sharps each key has, then that will make figuring out which notes they are much easier! For instance, if we know that the key of E major has 4 sharps, then using our fingers, counting to three, “Father, Charles, Goes, Down.” Therefore, the key of E major has the sharps, F#, C#, G#, and D# in its key signature. Let’s try another one. If we were in the key of F#, knowing it has 6 sharps, we would go, “Father, Charles, Goes, Down, And, Ends.” Therefore, the key of F# major contains the sharps, F#, C#, G#, D#, A#, and E#.
Here’s where things get interesting, however. If you look at our circle of fifths, you might notice G# major is not present. What does this mean? Well, we did mention that the circle of fifths displays the most commonly used key signatures. In the key of G# major, you may look at it as taking another lap after C# major, which contains 7 sharps. This is where double sharps come into play. A double sharp may be represented with an “X” or an “##”. This indicates that a note is to be raised by two semitones, or a tone. Therefore, taking another lap after C# major lands us on G# major, and counting to 8, we’d go “Father, Charles, Goes, Down, And, Ends, Battle … Father.” So F gets the double sharp.
Now, let’s have a look at our G# major scale:
G# > A# > B# > C# > D# > E# > F## > G#
Every major scale follows a strict pattern of tones (T) and semitones (S) that give them their characteristic sound. This sequence appears as:
T > T > S > T > T > T > S
As you can see, our G# major scale is no different than any other major scale when it comes to this pattern. B# > C# is a semitone apart, and E# > F## is a tone apart, pushing F## > G# closer together, making them a semitone apart.
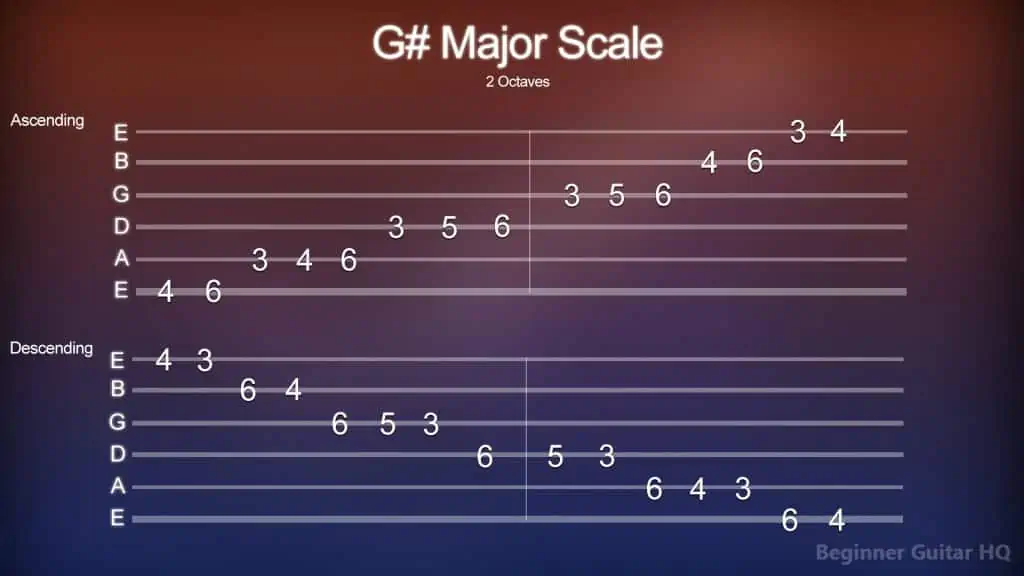
Let’s try playing our G# major scale:
Guitar tablature of the G# major scale, ascending and descending two octaves.
Trouble With Tablature?
Tablature, also known as “tab”, is an excellent means for guitarists with no real musical background to learn, share, and practice some of their favorite songs and exercises! You can think of tablature as an alternative more simplified and generic version of your standard musical notation/sheet music.
First, let’s draw our attention to the six horizontal lines, as each of these is to represent a different string on the guitar. From the bottom to the top we have our low E string, followed by our A, D, G, B, and high E strings. You may also see the string names off to the left of the lines. On some of the lines, you’ll notice a number representing the note to be played (fretted) on the corresponding string. If it’s a “1” on the low E string, you play the first fret of that string. If it’s a “4” on the A string, you play the fourth fret of that string, and so on. It’s easy as that!
Utilizing tablature is excellent for guitarists, especially those who are just starting out, however, it’s important to make a mental note of some of the drawbacks. The main drawback is the lack of detail, especially when compared to its more complex and detailed cousin, musical notation. Often times tablature gives you the bare minimum in terms of how something is meant to be played. In fact, more often than not, it’s up to you the guitarist to use your ear and fill in the gaps. However, this is not always the case, as the quality in the tab varies. For instance, here are some widely used symbols to help guitarists comprehend how a song is to be played in tablature:
H = Hammer-on
P = Pull-off
B = Bend
X = Mute
PM = Palm Mute
\ = Slide Down
/ = Slide Up
~~~ = Vibrato
The second important drawback, which can apply to any self-taught musician reading tablature, or sheet music is maintaining good playing habits, primarily fingerwork. Fingerwork can go a long way in improving and cleaning up your playing technique. Therefore, it’s important that you play in a way that feels comfortable, while also making sure you’re coming down enough on the strings to prevent “buzzing”, or “muted notes” unless that’s what you’re going for! A good way of exercising good habits involving fingerwork is to read ahead of whatever it is you intend to play. It’s good to plan where your hand and fingers need to be so that all of the notes can fit within that space, or fluidly transition up the neck if required. You want to have a fret marked out for your index, middle, ring, and pinky fingers to prevent yourself from having to move around too much and having the overall sound broken up. Practicing with a metronome can improve this experience.
Scale Degrees
Now that we have each of our notes marked out on the G# major scale, let’s talk about each of them and the role that they play. Each of these notes is also known as a “degree”, or scale degree. Each degree has an identifying name that helps musicians refer back to them when required to do so. Here is how the G# major scale appears:
G# = Tonic (1st Degree)
A# = Supertonic (2nd Degree)
B# = Mediant (3rd Degree)
C# = Subdominant (4th Degree)
D# = Dominant (5th Degree)
E# = Submediant (6th Degree)
F## = Leading Tone (7th Degree)
G# = Tonic (1st Degree/Octave)
In terms of chord progressions, these degrees each play an important role in determining the overall flow. Our 1st degree, the tonic is our tonal center, the root of our scale – things are calm and tend to resolve here. The 2nd degree, the supertonic, is an excellent option to fill in for our subdominant, as they share two notes in their triads. Next, we have our third degree, the mediant, sharing two notes with the tonic, it’s an excellent degree to draw the tonic out. Next is our fourth degree, the subdominant. This degree holds some tension, sharing a note with the tonic in its triad, the root note. Moving to even greater tension, we’re on the fifth degree, the dominant. The dominant triad shares one note with the tonic, but not the root note. The sixth degree is the submediant. This degree acts as a “weak predominant chord” making it an excellent degree to fill in for the subdominant sharing two notes with it. Finally, we’re at the seventh degree, the leading tone. Our leading tone is a degree withholding a lot of tension and naturally wants to resolve to the tonic. Trying playing a simple C major scale and ending on B. Your ears will want to hear it play the following C note. After our leading tone, we’re back to our first degree, the tonic, just one octave higher from where we began.
Major Triads
When forming a major triad, we take the tonic, mediant, and dominant degrees of the scale and stack them on top of each other (1st, 3rd, and 5th degrees). When we do this with our G# major scale, we get the notes G#, B#, and D#, giving us a G# major triad; the notes required for our G# major chord.
Major triads are made up of intervals that give them their characteristic sound. These intervals appear as the following:
- Major 3rd – Between the 1st and 3rd Degrees. G# > B#.
- Minor 3rd – Between the 3rd and 5th Degrees. B# > D#.
- Perfect 5th – Between the 1st and 5th Degrees. G# > D#.
Finding Chords Compatible With G#
It can be hard sometimes to make chord progressions that sound good, let alone one that we really enjoy the sound of. Thankfully, there’s a method to make this process a little easier! Taking what we know about triads, we’re going to form one on every degree of our G# major scale:
- G# Major (1st Degree) = G# > B# > D#
- A# Minor (2nd Degree) = A# > C# > E#
- B# Minor (3rd Degree) = B# > D# > F##
- C# Major (4th Degree) = C# > E# > G#
- D# Major (5th Degree) = D# > F## > A#
- E# Minor (6th Degree) = E# > G# > B#
- F## Diminished (7th Degree) = F## > A# > C#
That’s all there is to it! These are all the chords you can use in the key of G# major. It’s important to note, however, their degree within the scale when forming a chord progression, as this plays a very important role in how it flows.
There are some very tried and true chord progressions you might look to try. For instance, the I – I – IV – V chord progression contains the chords G# major > G# major > C# major > D# major. You may even try the vi – ii – V – I chord progression, containing the chords E# minor > A# minor > D# major > G# major.
Try looking at some of your favorite songs and analyzing the key the song is played in, and break down their chord progressions. This may give you some insight into how they work so well!
G# Major to G# Minor
We’ve gone over quite a bit about G# major, but what about its minor counterpart, G# minor? It’s important to note, however, the relationship between G# major, and G# minor is a parallel relationship, and not a relative relationship. As we’ve gone over before, G# major’s relative counterpart is E# minor; they share the same key signature but have a different tonic. G# major to G# minor, however, is seen as a parallel relationship, because while they have the same tonic, they have different key signatures. G# major has 8 sharps within its key signature, while G# minor has only 5 sharps, F#, C#, G#, D#, and A#.
Aside from G# major and G# minor containing different key signatures, they both contain different scales:
G# > A# > B > C# > D# > E > F# > G#
Much like major scales do, minor scales have their own set pattern of tones (T) and semitones (S). The sequence appears as this:
T > S > T > T > S > T > T
As you can see, the G# minor scale follows this pattern to a tee. A# > B is a semitone apart, while B > C# becomes a tone apart. D# > E is a semitone apart, while E > F# becomes a tone apart. It never fails!
Now, let’s move on to our triad of G# minor. Just as before, we’re going to take the tonic, mediant, and dominant degrees of our G# minor scale (1st, 3rd, and 5th degrees) and stack them on top of each other. This gives us the notes: G#, B, and D#.
Minor triads also contain their own set of intervals, giving them their signature melancholy sound:
- Minor 3rd = Between the 1st and 3rd degrees. G# > B.
- Major 3rd = Between the 3rd and 5th degrees. B > D#.
- Perfect 5th = Between the 1st and 5th degrees. G# > D#.
Can you see the difference between major and minor triads? That’s right! The intervals are reversed. The first interval in a minor triad is a minor 3rd, while the first interval in a major triad is a major 3rd. The second interval of a minor triad, however, is a major 3rd, while in a major triad it’s a minor 3rd. The perfect 5th remains the same in both.
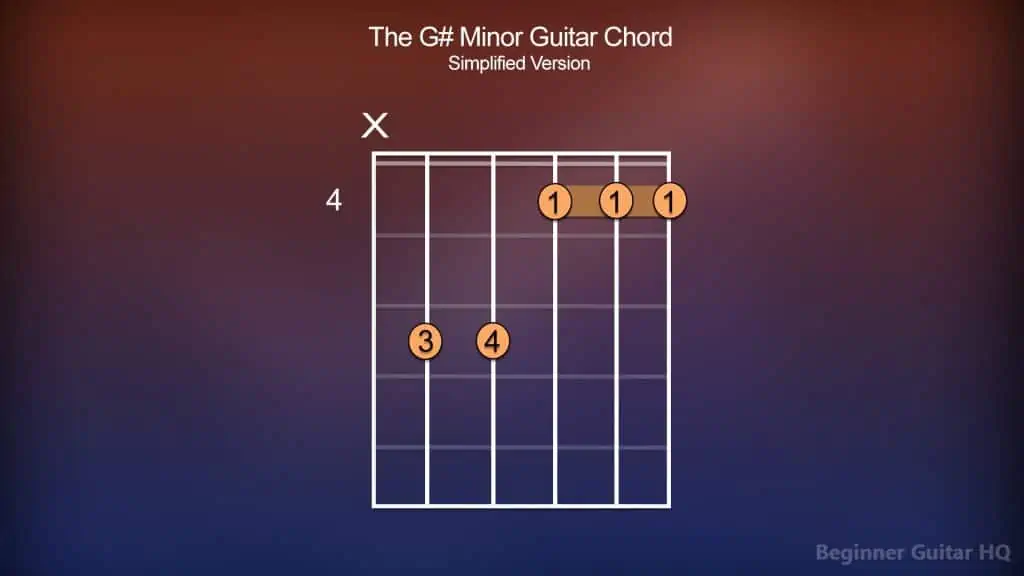
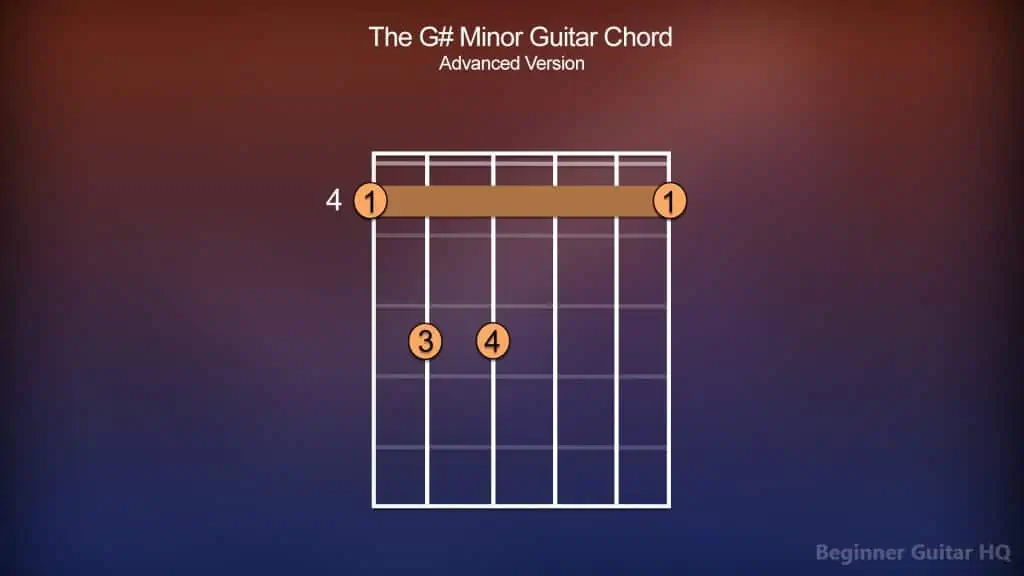
Now, let’s try playing some G# minor chords:
Chord chart of the G# minor chord simplified from the fourth fret.
Chord chart of the G# minor chord simplified from the fourth fret.
Conclusion
Now you know everything you need in order to get started with your G# major chord! Learning new chords can be a great and rewarding way to bolster your finger strength, and improve your overall fretboard knowledge. It’s important to be patient with yourself, especially if guitar chords are still relatively new to you. If the chord isn’t sounding as great as you imagined, just keep trying, as this is something that will improve over time, especially with learning barre chords. The most important thing, however, is that you have fun and find interesting ways to spice up your practice routine, while still challenging yourself. Where will the G# major chord take you? How will you incorporate it into your chord progressions?

