Mic placement, vocal technique, and acoustic treatment are only part of the recipe for creating a modern, professional vocal sound.
Though the general goal is to capture the best take during recording (and not to ‘fix it in the mix’), it is true that most sound engineers actually apply a significant amount of post-processing to their vocal tracks.
After all, the vocals are typically the main focus of the song, so why wouldn’t you want them to shine?
One of the techniques pro audio engineers apply when mixing vocal tracks is compression, and that’s exactly what we’re going to cover in this guide.
You’ll learn:
- What a compressor is
- Why compression is important
- How compressors work
- Why vocal recordings require compression
- When to apply compression to vocals
- The different kinds of compressors available
- How to use compression on vocals
Let’s get started.
Contents
What is a compressor?
A compressor is an audio tool used to control and reduce dynamic range.
Let me explain:
Every kind of sound source, whether a voice, a guitar, or a pair of clapped hands, has a dynamic range.
That is, the difference between the loudest sound and the quietest sound.
In some cases, this dynamic range is desirable. For example, when playing a piece on acoustic guitar that builds from a softly plucked arpeggio to a full-on strumming masterpiece, like John Butler’s Ocean.
Sometimes, though, you want to reduce the dynamic range.
For example, if you’re mixing a drum kit, maybe you want every snare hit to be more or less the same volume. A compressor can help you with this, by reducing the dynamic range.
When you reduce a track’s dynamic range, you lift the level of the quietest sounds and reduce the level of the loudest ones.
Why do vocals need compression?
Imagine you’re working on a track with a great sound mix.
Your drums are pumping, the electric guitars are sitting nicely, and your bass is thunderous and rumbling.
But there’s a problem:
No matter where you set your vocal track, something sounds weird. It’s either too loud in the verses, or too quiet in the choruses.
Even some of the specific lines within sections are popping out more than others.
That’s where vocal compression can come in handy.
By applying a compressor to a vocal track, you can carefully craft the dynamic range of your recording so that those too loud parts and those too quiet parts come closer together, and you have a consistent vocal take that sits nicely in the context of the rest of the band.
So, how do you do this?
Let’s begin to answer this by looking at the main controls that compressors often include.
Compressor controls
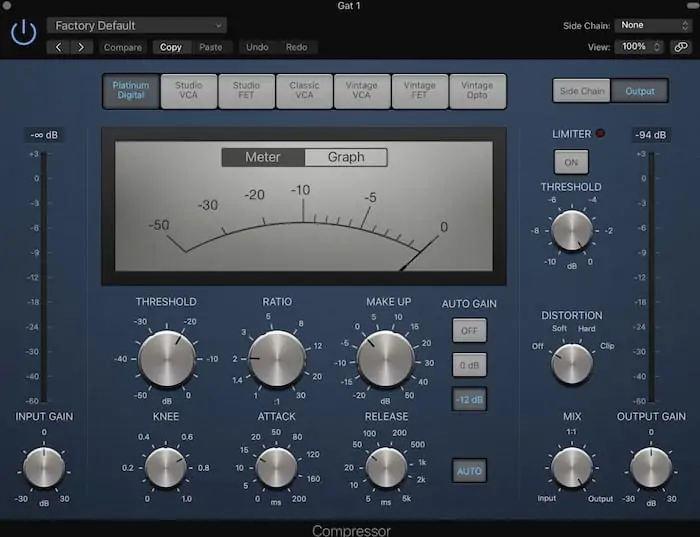
This is an example of a common compressor:
I know, it looks pretty overwhelming.
Let’s break it down.
Threshold
The first compressor control you need to know about is the threshold control.
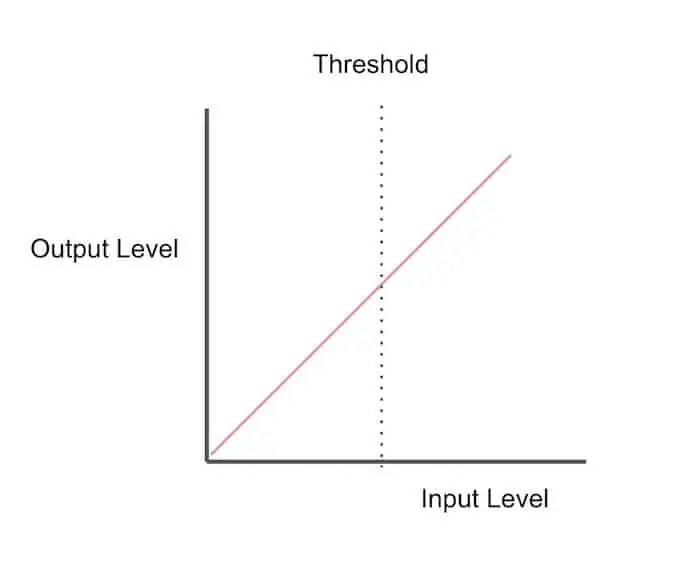
Compressors are not in action all of the time. In fact, very often you’ll set a compressor to be inactive most of the time, only acting when the input level of your vocal track moves past a certain point.
This point is called the threshold, and you set where this threshold sets.
When the input level exceeds the threshold, your compressor will knock the audio level back down. The lower you set the threshold dial, the more often your compressor will come into effect.
Ratio
Okay, so you’ve got your threshold set, then what happens?
We mentioned that when your input level exceeds the threshold, the compressor will clamp down on your audio signal i.e. it compresses your audio.
The question is, by how much?
The answer to this depends on how you set the ratio control.
The ratio control on compressors is measured in dB and expressed like this:
- 2:1
- 4:1
- 8:1
- 10:1
Let’s look at how this works:
Imagine you’ve set the ratio to 2:1. This means that if a signal exceeds the threshold by 2dB, it will be compressed to exceed the threshold by only 1dB.
Equally, if you have a ratio of 2:1 and the input level exceeds the threshold by 10dB, the output will be 5dB about the threshold (2:1).
Make sense?
Now, let’s take a look at a heavier ratio, something like 10:1.
If the input level exceeds your threshold by 2dB, the output will be knocked down to just 0.2dB above the threshold. When the input level is 10dB above the threshold, the output will be just 1dB above.
So, both the threshold and ratio controls contribute to the amount of compression being applied, but in very different ways.
The threshold determines when and how often the compressor is engaged, and the ratio determines how hard the compressor will work once engaged.
But that’s not all…
Attack and Release
To further craft the sound of your compression, you generally have access to controls called attack and release.
The attack knob controls how quickly the compressor acts once a signal jumps over that threshold.
If you set the attack very fast, it will clamp down as soon as that input level exceeds the threshold. If you set it a bit slower, the compressor will let the initial transient through, but then clamp down on the rest of the waveform.
This is useful when compressing drums, as you want the initial crack of the snare hit to come through, and then have your compressor slam down on the rest of the waveform to give the snare more body and resonance.
The release control does a similar thing, but on the opposite end.
It says: after the signal falls back below the threshold, how quickly should I stop compressing the signal?
Make-up gain
Because compression tends to significantly reduce the volume of a track (you’re clamping down on and compressing loud sections), compressors generally have a make-up gain control which allows you to lift the output level back to normal.
The idea here is to set the make-up gain so that your uncompressed and compressed signals (when you switch the compressor on and off) sound roughly the same level overall, allowing you to assess the effects of your compression accurately.
So, when do you know whether or not to apply compression to a vocal track?
When to apply compression to vocals
It’s a rare case that a modern vocal track doesn’t have at least some amount of compression on it, which sort of begs the answer “always”.
Technically, though, the idea is to apply compression on vocals, or any instrument for that matter, when you’ve got parts that are too loud or too quiet, or you’re wanting to highlight a certain element of the waveform (i.e to bring up or deaden the transients).
The next question to answer is where in the chain of effects to put compression.
Generally, compression will sit before things like reverb and delays, but rules are always made to be broken!
The age-old debate with signal chains is whether to have your EQ before your compressor, or after your compressor.
There’s no right or wrong here, try out both and see which you like the taste of!
Speaking of tastes, there are a couple of different ways that pro audio engineers like to use compression on a vocal track.
Vocal compression for dynamic control
This type of compression is what we’ve discussed so far, controlling the dynamic range of a performance.
Vocal compression for dynamic control can be used to bring softer phrases up in the mix, or tame those overly enthusiastic high notes (higher-pitched notes need more vocal effort to achieve so they tend to be louder).
This type of compression tends to use a high threshold (so the compressor is only acting on the loudest notes) and a high ratio (so that when the threshold is surpassed, the compressor clamps down aggressively).
Vocal compression for tonal control
The other way you can use compressors on vocal performances is to add a bit of character and aggression to the track.
This is typically achieved with a more modest ratio setting (around 2:1) and a lower threshold which captures more of the vocal track and ensures the compressor is acting on the audio almost the whole time.
You’ll generally want to aim for about 2-3dB of gain reduction when using compression for tonal control.
Different kinds of compressors
With us so far?
Cool. Now let’s take a look at the four main kinds of compressors you’ll find:
- VCA compressors
- FET compressors
- Optical compressors
- Variable-Mu compressors
Though they all do essentially the same job (controlling the dynamic range of your vocal performance), they achieve this via different technological means.
As a result, each imparts a slightly different sound on the resulting audio track.
VCA compressors
VCA (voltage-controlled amplifier) compressors are arguably the most common type of compressor you’ll see.
Brands like SSL, Neve, and API use VCA designs in their channel strips, to drop a couple of names.
The resulting sound of VCA compression is fast (great for taming transients), punchy, and snappy.
VCA compressors are often used to give an edge to drum tracks, but they can be pretty epic on vocals as well.
I love using VCA compression when I’m mixing heavy metal vocals so I can achieve a really edged, forward, aggressive vocal sound.
Let’s look at one of the most widely-used examples of VCA compressors.
VCA compressor example: dbx 160A
The name dbx rests firmly atop a history of fast-attacking, aggressive compression devices, which tend to use the VCA concept.
The 160A is one such example.
Based on the OG VCA compressor, the 160, the 160A is a single-channel, 19” rack-mounted compressor unit with a fairly simple control set:
- Threshold
- Ratio
- Output gain
- Overeasy control
The Overeasy button is what makes the 160A so special, which allows you to switch in a Hard Knee (more aggressive) compression curve, or dbx’s famous Overeasy knee control which is ideal for smoothing out vocal performances without being too obnoxious.
FET compressors
FET (field effect transistor) compressors are another type of compressor known for their aggressive and upfront style.
They are fast and responsive, and tend to be super colorful (imparting their own tone on the source), and can even deliver some nice subtle (or not so subtle) when driven hard.
So, you probably wouldn’t use FET compression on say, a soft jazz vocal.
But if you’re mixing rock and rap vocals, then FET compressors are gonna be your best friend.
So, if you need a FET compressor, where should you turn?
FET compressor example: Universal Audio 1176LN
The Universal Audio 1176LN is, for all intents and purposes, a remake of the famous UREI 1176. And a bloody good one at that.
You’re probably noticing a bit of a trend here. Most of the compressors I’m recommending are based on older models that are no longer available.
Now, that might just be because “they just don’t make ‘em like they used to”, but I’m gonna go out on a limb here and say that most of us sound engineers are nostalgic purists who can’t get enough of that old-school goodness.
Either way, the 1176LN is damn awesome.
This FET compressor gives you both input and output controls so you can crank up the input, get the compression cranking, and then roll back the output, as well as attack and release controls.
The ratio control on the 1176LN is fairly unique in that it’s not continuously variable, you are given four options and that’s it:
- 4:1
- 8:1
- 12:1
- 20:1
The VU meter is remarkably responsive and the tonality of the 1176LN works well for edgy vocal performances, bass guitars, and snare drums alike.
Optical compressors
Let’s take things down a notch and talk about optical compressors.
When I say down a notch, I’m talking about speed and aggression.
Optical compressors use light (hence, optical) as their method for compression. This process is fast, but it’s not instant, which means optical compressors aren’t capable of the same attack speeds as their VCA and FET counterparts.
That’s okay, though, if we’re looking for something a little more laid-back.
Optical compressors have an interesting sound to them because the fall off from compression (when the amount of compression falls back to zero) is typically non-linear, and the shape of the curve depends on how hard the compressor is hit.
This kind of compression is a great choice for when a vocal track just needs a little rounding out, or when you’re looking for a bit of tonal control, as opposed to a performance with too much dynamic range.
Teletronix LA-2A
The Teletronix LA-2A is the quintessential optical compressor, and you might even recognize it for its distinct silver livery.
It’s a 2U rack-mounted unit, with two main knobs: input gain, and peak reduction.
Driving up the input gain is like lowering the threshold, and cranking up the peak reduction is essentially bringing the ratio up.
You can even use the LA-2A as a limiter, a special type of compressor with an ∞:1 ratio, meaning regardless of the input level, the output will be squashed right down to the threshold.
The Teletronix LA-2A is a fantastic choice for vocals that need a little color, character, and gentle rounding out.
Variable-Mu compressors
Variable-Mu compressors (also known as Vari-Mu or Delta-Mu) are an interesting type of compressor that use vacuum tubes (like the kind you find in tube guitar amps) to achieve compression.
Basically, as the input is driven up, the current sent to the tube is driven down (this is the variable part), compressing the signal.
This is quite the oversimplification, but I’m not going to bore you with the technical-scientific details here.
Here’s what you need to know:
Variable-Mu compressors, as a result of their tube compression, are creamy, smooth, thick, and vintage-sounding.
They are often used as a sort of ‘glue’ to hold tracks together, like on the master buss or on a drum group.
I like using a stereo Vari-Mu compressor across a backing vocal buss on songs that have a bunch of BV takes.
Manley Stereo Variable MU
I couldn’t talk about Vari-Mu compressors without talking about this bad boy from Manley.
This guy is a big old stereo unit (so you can compressor two tracks at once, or a stereo mix), with pretty standard controls:
- Threshold
- Attack
- Recovery (release)
- Output
Note there is no ratio control. Simply drive the input gain to get more compression happening.
The two channels can be used independently or linked (so they share the same settings), and they are both able to be used as limiters just like the LA-2A.
How to use compression on vocals
Now, we’re going to take a quick look at how to apply compression to a vocal track.
Quick disclaimer though: use your ears, not your eyes.
The compression settings I’m about to show you are relevant to the track I’m working with, but they’re going to be different for whatever it is you’re working with.
What I’m saying is don’t just take this and run with it, spend some time figuring out how to use a compressor to craft your vocal tracks just how you want them.
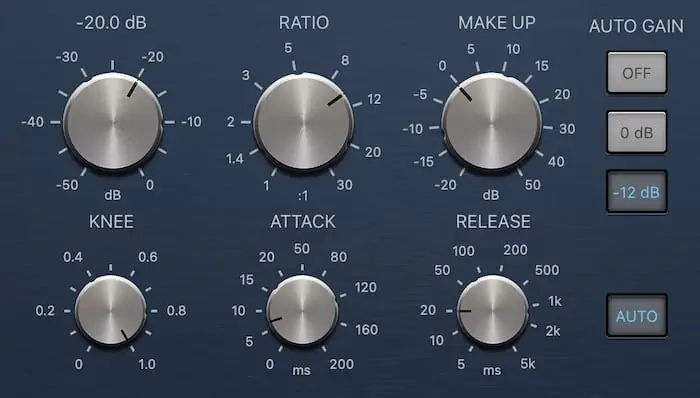
First, we’re going to load up a compressor plugin on our vocal track, and set a ratio of 10:1.
We’re going to go with a medium-fast attack time of around 5-10ms, and a release time of 20ms, which we’ll adjust so that the compressor is breathing nicely with our track.
Now we’re going to bring the threshold up (or down) until the compressor is only acting on the peaks of our track, not all of it.
From here, we’ll drop the ratio down a bit so that we’re achieving an appropriate amount of gain reduction. Generally, we’re aiming for around 2-3dB of gain reduction, maybe twice that for heavier, more aggressive vocal sounds.
Lastly, you’ll want to bring the make-up gain up a touch to counteract the lost volume. This will probably only need to be a dB or two.
If you’re going for a more tonal shaping kind of compression (rather than for dynamic control), I’d dial the attack back to around 15-30ms for more punch, and drop the ratio right down to like 1.5dB.
Typical vocal compression settings
Again, bear in mind here that ‘typical’ vocal compression settings will depend entirely on your source material.
That being said, this is generally a pretty good starting point, and you can tweak to taste:
- Ratio: 2:1 to 3:1
- Threshold: -20dB to -25dB
- Gain Reduction: 2-4dB
- Attack Time: 5ms (medium-fast)
- Release Time: 20ms (medium)
- Knee: Hard
- Makeup Gain: 1-2dB
Special types of compression
We’ve already discussed the four methods of compression: VCA, FET, Opto, and Vari-Mu, but I wanted to cover a few ‘special’ kinds of compression which can go down well on a vocal track.
These are compressors which have a specific function, or are a specific way of using compression to achieve a desired result.
Let’s take a look.
Parallel compression
I absolutely love parallel compression; it’s a favorite technique of mine.
Parallel compression involves duplicating the vocal track (or creating a send at full volume) and heavily compressing one of the tracks, leaving the other as it is.
This gives you an insanely compressed, aggressive, edgy vocal track, but allows you to blend this in with the regular, uncompressed vocal track.
Usually I’ll still apply my standard compression to the ‘normal’ vocal track, and use an aggressive FET compressor like the 1176 on my parallel track, coupled with some form of analog overdrive for a really gritty tone.
Serial compression
Serial compression is pretty straightforward: it’s just using more than one compressor on a single track.
This might be one or the other, or they might be spaced out across your plugin chain.
For example, I’ll generally have a compressor at the start of my chain for a bit of tonal control, and then a heavier-handed dynamic compressor happening after I’ve used an EQ and a de-esser.
A what?
De-essers
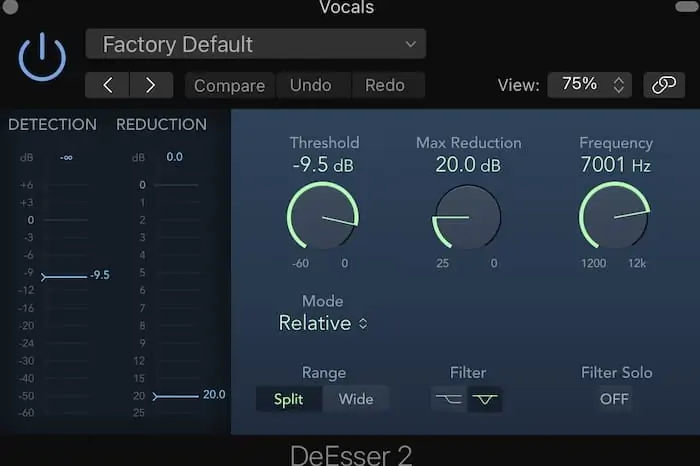
De-essers are a special type of compressor that are designed to remove the harshness of tracks that have a lot of sibilance (S) sounds.
When recording vocals, S sounds can often cut through quite aggressively, especially during loud sections, and this can really wreck a vocal performance.
A de-esser is a compressor that only acts on a certain frequency range (in the high-mids where S sounds are located).
You dial up your threshold and gain reduction settings, and then use the frequency control to get real specific on where the de-essers is going to act.
Multi-band compression
Multi-band compression is another kind of frequency-dependent compressor, but instead of acting on just one range of frequencies, it cuts up your track into several different frequency ranges.
Usually you have 4-6 different ranges, like this:
Essentially, what you’re seeing here is four different compressors in one, each focusing on a specific frequency range with their own ratio, threshold, and attack/release controls.
Multi-brand compression can be great if you’re targeting a very specific part of the frequency range that your EQ just isn’t handling well, and it’s especially valuable when you get to the mastering stage and you’re working with a finished 2-track.
Side-chain compression
Our last ‘special edition’ of compression is side-chain compression.
Here’s how it works:
With a normal compressor, the track your compressing is what tells the compressor to start or stop working.
With side-chain compression, a different track is telling the compressor when to turn on or off.
A common use for side-chain compression is when mixing EDM music.
You throw a compressor on the bass track, and set the side-chain to the kick channel. Every time the kick plays, it triggers the compressor on the bass track and ducks it’s volume.
That’s what gives you that big, breathing sound in the bass.
You can use this style of compression more subtly when mixing vocals.
For example, if you’re having trouble getting your vocal and guitar tracks to sit nicely together (which is pretty common as they occupy the largely the same frequency range), you can put a compressor on the guitar track triggered by the vocals.
With very light settings (so the guitars don’t sound weird), the guitars will dip slightly whenever a line is sung, giving the vocal track a bit more room to breathe.
Conclusion
That wasn’t so hard, was it?
Though compression is a pretty complex subject (and we’ve really only just touched the surface here), it’s a highly valuable mixing technique to learn, and you’ll be applying it to more than just vocals.
Pretty much every track in your mix will require some compression, from bass to drums to brass.
Perhaps the only thing that won’t need much compression is heavily distorted guitar tracks, since they are highly compressed already.
Don’t forget to apply a bit of compression to your clean guitars, though. You’ll thank me for it later!


